Introduction
When dealing with existing systems, sometimes a challenge presents itself in the form of a flat file. Trying to impose structure upon a flat file can be achieved, however, using the Table Looping and Table Extractor functoids. This article will demonstrate the use of these functoids in BizTalk maps.
Audience
This article assumes some familiarity with schemas, BizTalk, and the BizTalk maps.
Overview
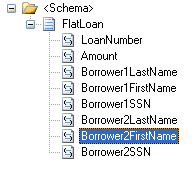
Consider the following schemas:
Source schema:

Destination schema:

One’s first attempt at a map to transform the source to destination might look something like this:

We'll use the following input file to test the map.

The output isn't quite what we were hoping for. Rather than creating two borrower nodes, the two first names, last names, and SSNs are within a single borrower node.

The Table Looping functoid is the key to what we're trying to achieve. Below is the map that uses the Table Looping and Table Extractor functoids to create the desired output.

The Borrower fields are used as inputs into the Table Looping functoid as well as some definitions about how many rows and columns there will be. One tip I gleaned from Dan Shultz is to label the input links, as they'll be infinitely more readable within the Table Looping inputs window.

The first two arguments are akin to defining the number of rows and the number of columns for the table, and the rest of the arguments define the values that will be used within the table. By opening up the Table Looping Grid, we're able to view which fields will go into certain columns/rows:

The Table Extractor functoids are used to define which columns from the table map to use as inputs. Each Table Extractor functoid corresponds to a column within the Table Looping Grid.

And finally the output from Table Looping functoid to the Borrower node dictates that a Borrower node be created for each row within the Table Looping Grid. With that said, here’s the output from testing the second map:

History
- 17th December, 2009: Initial post
