Introduction
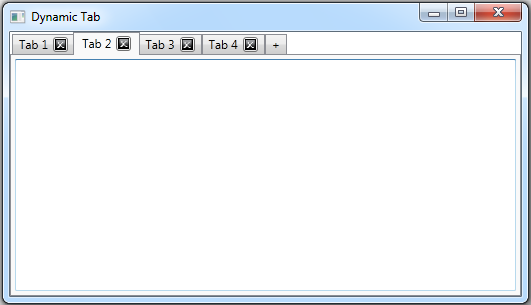
This article shows how to create dynamic tabs in WPF (Windows Presentation Foundation) similar to the one you see in most web browsers where you have an empty tab at the end to add new tab and a close button on each tab to close the tab. There are several techniques to achieve this. Here, a List of TabItem is used to hold the tabs that are bound to the TabControl. The last item of the List is an empty tab that is used to add new TabItem in the list whenever that is selected. A DataTemplate is used for tab header to add a Delete button in each tab.
XAML
The first step is to define XAML for the TabControl. Set the ItemsSource property to {Binding} whereas the DataContext will be supplied by a List of TabItem in the code-behind. Next add the SelectionChanged event.
<TabControl Name="tabDynamic" ItemsSource="{Binding}"
SelectionChanged="tabDynamic_SelectionChanged">
</TabControl>
Define the DataTemplate for tab header under TabControl.Resources tag and set the DataType as TabItem. Use any container to add and align a TextBlock and a delete Button. I used a DockPanel since it's easy to align delete Button to right using DockPanel.Dock property. Add Click event to the button and bind the CommandParameter property to the tab Name. This will be used to identify the tab to be deleted in the Click event handler of the button. Bind Text property of TextBlock to the Header of the TabItem. The Header that is a string value will be set in the code-behind.
<DataTemplate x:Key="TabHeader" DataType="TabItem">
    <DockPanel>
        <Button Name="btnDelete" DockPanel.Dock="Right" Margin="5,0,0,0"
         Padding="0" Click="btnDelete_Click"
         CommandParameter="{Binding RelativeSource=
         {RelativeSource AncestorType={x:Type TabItem}}, Path=Name}">
            <Image Source="/delete.gif" Height="11" Width="11"></Image>
        </Button>
        <TextBlock Text="{Binding RelativeSource={RelativeSource AncestorType=
                         {x:Type TabItem}}, Path=Header}" />
    </DockPanel>
</DataTemplate>
This is the complete XAML that also includes the style for a TextBox control that is added to each tab:
<TabControl Name="tabDynamic" ItemsSource="{Binding}"
 SelectionChanged="tabDynamic_SelectionChanged">
    <TabControl.Resources>
        <DataTemplate x:Key="TabHeader" DataType="TabItem">
            <DockPanel>
                <Button Name="btnDelete" DockPanel.Dock="Right"
                 Margin="5,0,0,0" Padding="0" Click="btnDelete_Click"
                 CommandParameter="{Binding RelativeSource=
                 {RelativeSource AncestorType={x:Type TabItem}}, Path=Name}">
                    <Image Source="/delete.gif" Height="11" Width="11"></Image>
                </Button>
            <TextBlock Text="{Binding RelativeSource=
            {RelativeSource AncestorType={x:Type TabItem}}, Path=Header}" />
            </DockPanel>
        </DataTemplate>
        <Style TargetType="TextBox">
            <Setter Property="VerticalAlignment" Value="Stretch"></Setter>
            <Setter Property="HorizontalAlignment" Value="Stretch"></Setter>
            <Setter Property="AcceptsReturn" Value="True"></Setter>
            <Setter Property="TextWrapping" Value="WrapWithOverflow"></Setter>
            <Setter Property="MaxLines" Value="5000"></Setter>
            <Setter Property="ScrollViewer.VerticalScrollBarVisibility"
             Value="Auto"></Setter>
            <Setter Property="ScrollViewer.HorizontalScrollBarVisibility"
             Value="Auto"></Setter>
        </Style>
    </TabControl.Resources>
</TabControl>
Now I explain the code that contains the logic to add and delete TabItems.
Code-behind
In the code-behind file, define two data members. One is _tabItems that is a list of TabItem to hold the tabs and other _tabAdd that is a reference to the last TabItem that is used to add new tab dynamically.
private List<TabItem> _tabItems;
private TabItem _tabAdd;
Initialize the above data members in the contructor and set the header of the last tab as text "+" or any image you prefer. Add the first TabItem using the function AddItemItem() then bind the TabControl to the List and select first TabItem.
public MainWindow()
{
try
{
InitializeComponent();
_tabItems = new List<TabItem>();
TabItem tabAdd = new TabItem();
tabAdd.Header = "+";
_tabItems.Add(tabAdd);
this.AddTabItem();
tabDynamic.DataContext = _tabItems;
tabDynamic.SelectedIndex = 0;
}
catch (Exception ex)
{
MessageBox.Show(ex.Message);
}
}
In the function AddTabItem() used above, add a new TabItem to the list _tabItems and returns the instance of that TabItem. Set the HeaderTemplate as the one we defined above. Give a unique name to the TabItem like "TabXX", where XX is a counter to make the name unique. You can use same unique string as the Header text too. It is important to set Header and Name properties since in the DataTemplate defined above in XAML we bound TextBlock.Text and Button.CommandParameter to these properties. Next, add controls that you want to have in your TabItem and add the TabItem in the list _tabItems. Here, I added a simple TextBox control. Also notice that the new tab is inserted right before the last tab that is used to add new tabs.
private TabItem AddTabItem()
{
int count = _tabItems.Count;
TabItem tab = new TabItem();
tab.Header = string.Format("Tab {0}", count);
tab.Name = string.Format("tab{0}", count);
tab.HeaderTemplate = tabDynamic.FindResource("TabHeader") as DataTemplate;
TextBox txt = new TextBox();
txt.Name = "txt";
tab.Content = txt;
_tabItems.Insert(count - 1, tab);
return tab;
}
In the implementation of the SelectionChanged event handler, check if the selected TabItem is the last one then add a new TabItem using AddTabItem() function, rebind the TabControl and select newly added TabItem. For other tabs, you can add your code, if any, for this event.
private void tabDynamic_SelectionChanged(object sender, SelectionChangedEventArgs e)
{
TabItem tab = tabDynamic.SelectedItem as TabItem;
if (tab != null && tab.Header != null)
{
if (tab.Header.Equals(_addTabHeader))
{
tabDynamic.DataContext = null;
TabItem newTab = this.AddTabItem();
tabDynamic.DataContext = _tabItems;
tabDynamic.SelectedItem = newTab;
}
else
{
}
}
}
Finally, implement the Click event handler of the delete button that was added the DataTemplate. Here, identify the tab to be deleted using CommandParameter that in turn gives the TabItem.Name. You can easily find this tab in TabControl.Items collection using linq. Validate that this tab is not the only tab left in the list, then after confirmation, delete the tab from the list _tabItems and rebind the TabControl. If an active tab is deleted, then select the first tab after rebinding, otherwise select the tab that was selected before deletion.
private void btnDelete_Click(object sender, RoutedEventArgs e)
{
string tabName = (sender as Button).CommandParameter.ToString();
var item = tabDynamic.Items.Cast<tabitem>().Where
(i => i.Name.Equals(tabName)).SingleOrDefault();
TabItem tab = item as TabItem;
if (tab != null)
{
if (_tabItems.Count < 3)
{
MessageBox.Show("Cannot remove last tab.");
}
else if (MessageBox.Show(string.Format
("Are you sure you want to remove the tab '{0}'?", tab.Header.ToString()),
"Remove Tab", MessageBoxButton.YesNo) == MessageBoxResult.Yes)
{
TabItem selectedTab = tabDynamic.SelectedItem as TabItem;
tabDynamic.DataContext = null;
_tabItems.Remove(tab);
tabDynamic.DataContext = _tabItems;
if (selectedTab == null || selectedTab.Equals(tab))
{
selectedTab = _tabItems[0];
}
tabDynamic.SelectedItem = selectedTab;
}
}
}
History
- 18th November, 2012: Initial version
