Introduction
When you
have developed a WCF web service using the internal Visual Studio Development
Server, you should test it in a more real environment. They say IIS Express is
a good choice in this case.
There are
several articles/tutorials how to do that using Visual Studio graphical tools
and/or full IIS Manager, listed in the additional sources below. This short
article is about how to do this if you just have Microsoft Visual Web Developer
Express Edition and IIS Express without those graphical tools. The free Microsoft
Web Matrix 2.0 will be used for controlling IIS Express instead.
The VWD
Express version in question is 2008, but 2010 should be similar. IIS Express
version is 7.5.
Additional
sources:
- http://msdn.microsoft.com/cs-cz/library/ms733766.aspx
- http://www.hanselman.com/blog/WorkingWithSSLAtDevelopmentTimeIsEasierWithIISExpress.aspx
- http://www.youtube.com/watch?v=mX8quq7MoeI
Using the code
There is a sample Visual Web Developer Express 2008 project attached. It runs the sample generated WCF web service at Microsoft Visual Studio Development Server.
Next, there is its conversion to Web Matrix 2.0 website that runs the same web service using IIS 7.5 Express.
Step 1 – Prerequisites
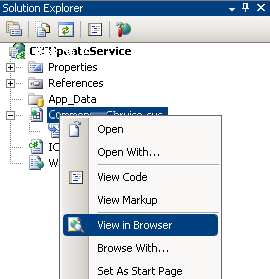
It’s supposed you have a working WCF service. A way to test it is to run it (see picture 01).

Copy the address from your browser’s address bar (it opens
automatically), start a Visual Studio 2008 Command Prompt (it comes with Visual
Studio and sets the path for using additional tools) and type:
wcftestclient http://localhost:nnnn/YourService.svc (an address from the browser).
In a
graphical tool (see picture 02) you should see a tree of contract(s) containing
the web service operation(s). You can doubleclick an operation, set its input
parameters (if any) and Invoke it to see if it returns what you expect.

Step 2 –
Install IIS 7.5 Express and Microsoft Web Matrix 2.0
It can be
accomplished in one single step by downloading the installer from http://www.microsoft.com/web/webmatrix/.
Step 3 –
Set the endpoint (optional)
In your VWD
Express open your web.config file and modify the binding for your endpoint(s)
to basicHttpBinding. This is a suggested step for older target IIS
compatibility according to the additional source 3) and might be omitted. If
you are not sure, modify the behaviorConfiguration in your web config as
follows:
<service behaviorConfiguration="YourService.YourServiceBehavior"
name="YourServiceNamespace.YourService">
    <endpoint address="basic" binding="basicHttpBinding"
    contract="YourServiceNamespace.IYourServiceContract">
        <identity>
            <dns value="localhost" />
        </identity>
    </endpoint>
    <endpoint address="mex" binding="mexHttpBinding" contract="IMetadataExchange" />
</service>
After the change, you can rebuild the VWD Express project and retest the web service functionality (see Step 1).
Step 4 – Convert the project to Web Matrix 2.0
Don’t use the newly added context menu item „Open as a Web Site with Microsoft
WebMatrix“, which is shown at folders in the Windows Explorer. It would make your following work more complicated.

Instead, start Web Matrix 2.0 directly, click „Templates“, „Empty web“ and set its name as desired.
After the Web Matrix 2.0 GUI has been shown, you can test whether the IIS 7.5 Express works correctly. In a Homepage tab, run the web in your browser and see your
system tray if it indicates the IIS start, see picture 04.

Copy the YourService.svc file into the project root.
Replace the
Web.config in the root by your modified Web.config from Step 3.
Create the
folder App_Code at the same level as App_Data (i.e. in the root). Copy your
codebehind file YourService.svc.cs and contract file IYourService.cs to that
folder.

Step 5 –
Modify the project in the Web Matrix 2.0
Remove the
codebehind reference from YourService.svc markup.
<%@ ServiceHost Language="C#" Debug="true"
  Service="YourServiceNamespace.YourService" CodeBehind="YourService.svc.cs" %>
Don’t be confused if Web Matrix underlines the markup in red as incorrect. It works.
If your WVD
project was .NET 3.5, you will need to comment out some lines in your
web.config because WebMatrix runs the code on .NET 4.0. You will find out, when
you restart your modified site and view it in your web browser. If there are
corresponding errors listed, modify your web.config as follows.
<configSections>
<sectionGroup name="system.web.extensions"
type="System.Web.Configuration.SystemWebExtensionsSectionGroup,
System.Web.Extensions, Version=3.5.0.0, Culture=neutral, PublicKeyToken=AAAABBBBCCCCDDDD">
<sectionGroup name="scripting" type="System.Web.Configuration.ScriptingSectionGroup,
System.Web.Extensions, Version=3.5.0.0, Culture=neutral, PublicKeyToken=AAAABBBBCCCCDDDD">
<sectionGroup name="webServices" type="System.Web.Configuration.
ScriptingWebServicesSectionGroup, System.Web.Extensions,
Version=3.5.0.0, Culture=neutral, PublicKeyToken=AAAABBBBCCCCDDDD">
</sectionGroup>
</sectionGroup>
</sectionGroup>
</configSections>
After that,
your website should show blank page without any error.
Step 6 –
Access your webservice, now running at IIS 7.5 Express
Ensure that
Visual Development server is stopped.

You can do
that also by closing Visual Web Developer Express.
Restart
your site in WebMatrix 2.0 and run it in your favourite browser. In the address
line, there should be <a>http://localhost:nnnn</a>.
Append it with /YourService.svc and press Enter.
The web service
welcome screen should be shown – the same you can see when it is running under
Microsoft Visual Studio Development Server from VWD Express. But now it runs
on IIS 7.5 Express. Congratulations.

Step 7 –
Retest your webservice hosted at IIS 7.5
Express
Start WCF
test client (see Step 1) and try to invoke web service operations if they work
as expected.
Notes
When running IIS 7.5 Express I sometimes encounter Internet Connection unavailable error. This can usually be fixed by restarting your website.
