Introduction
The Kendo UI Grid for Angular displays data in a tabular format and comes with many features. Here are some features:
Data Operations
- Data binding
- Editing
- Filtering
- Grouping
- Paging
- Sorting
Export Options
Advanced Implementation
- Row Rendering
- Toolbar template
- Responsive design
- Hierarchy, etc.
Our area of interest for this article is Export options and that is not Excel and PDF but CSV (which Kendo does not provide as in build feature. CSV is a very common format to export tabular data.
In this article, we will learn how to export data in CSV format with Kendo UI in Angular.
Prerequisites
NOTE: If anyone who is familiar with Export with PDF and Excel in Kendo Grid with Angular, then they can skip to this section, as they must already know how to set up and install Kendo UI controls.
- Basic knowledge of Angular
- Basic knowledge of Kendo UI controls
- Setting up the Angular Project
The easiest way is to use Angular CLI Tool is:
npm install -g @angular/cli
- Adding the Kendo UI Components (with Angular CLI)
To install any package from Kendo UI for Angular, you can "ng-add" and add the name of the NPM package. For example, the name of the grid package is:
ng add @progress/kendo-angular-gird
- The command will install all the necessary packages and imports the component module.
The Kendo UI Grid (which we just added into our Angular project) for Angular displays data in a tabular format. Once the module is installed, import the GridModule in your application root or feature module. You can easily do that by following the Official Documentation.
- To get familiar with Export options, follow the link:
NOTE: After downloading the source code, please install npm package to make it a working application. due to size limitation, I needed to exclude the node_module package from the application. Following is the command:
{your_drive_path}:\kendo-angular-CSVExport> npm install
Let's Get Started
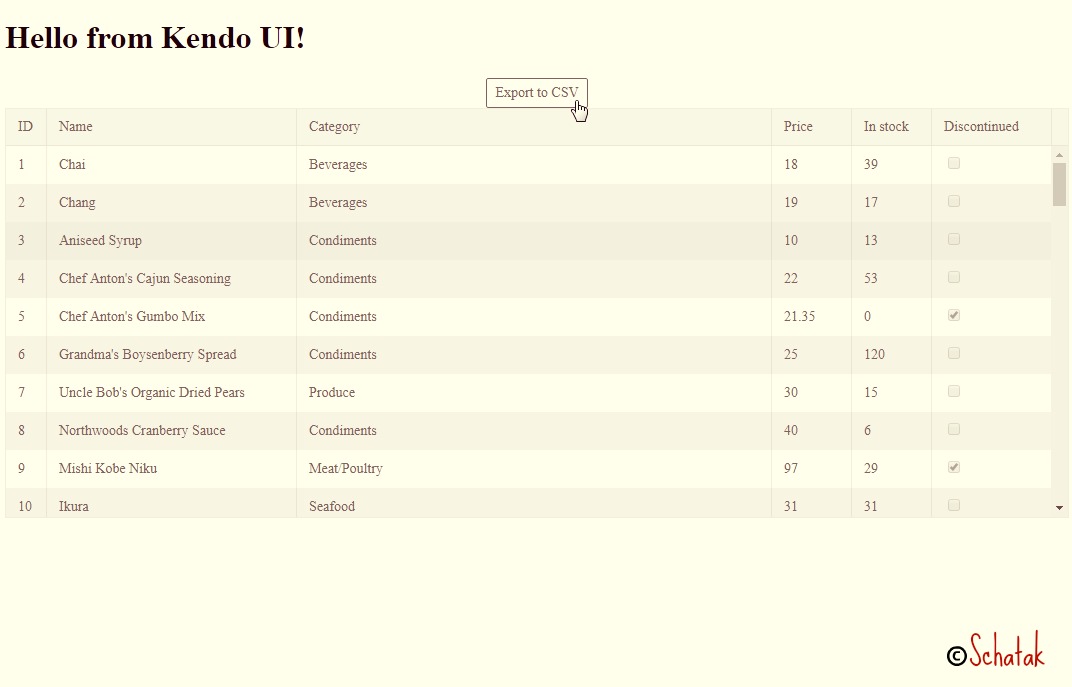
This is how the application looks like (Application.jpg).

The grid having the data which is the default for Kendo grid control. (See the link above for Kendo grid binding on official site.)
Following is the structure of the application (a very basic Angular app):

In the data folder, there is a file "products.data.ts". This file is used to bind the grid data. A simple JSON format file, easy to understand. In the real-world scenario, the user probably needs to bind the data with the database via API call (which is beyond the scope of this article).
The second file in the folder is "MapExportData.ts". This file is used to map the grid data to export format (in our case is CSV). Here, you do the mapping and make a row-wise data for CSV. The column which needs to map to CSV (it can be possible that the user need not export all the columns in from the grid to CSV).
In the Interfaces folder, there is one file "IExport.ts" having two interfaces, one is for column headers and other is to map the columns header and other properties. In this case, we have data to bind, column headers, and the column header which need not be included in the export file.
In the Models folder, there is one file "export-headers.model.ts". Basically, this file is to use for mapping the fields and corresponding titles to the columns selected.
In the services folder, there is one file "export.service.ts" the file is having the actual logic to convert the data into the export format.
And we have app.component.html/ts component to do the Angular part.
Using the Code
In the application, I have tried to follow the right approach to flow the data.
Kendo grid UI: app.component.html
<kendo-grid [data]="gridData" [height]="410">
<kendo-grid-column field="ProductID" title="ID" width="40">
</kendo-grid-column>
<kendo-grid-column field="ProductName" title="Name" width="250">
</kendo-grid-column>
<kendo-grid-column field="Category.CategoryName" title="Category">
</kendo-grid-column>
<kendo-grid-column field="UnitPrice" title="Price" width="80">
</kendo-grid-column>
<kendo-grid-column field="UnitsInStock" title="In stock" width="80">
</kendo-grid-column>
<kendo-grid-column field="Discontinued" title="Discontinued" width="120">
<ng-template kendoGridCellTemplate let-dataItem>
<input type="checkbox" [checked]="dataItem.Discontinued" disabled />
</ng-template>
</kendo-grid-column>
</kendo-grid>
Bind Kendo grid: app.component.ts
import { products } from 'src/app/data/products.data';
public gridData: any[] = products;
In app.component.html, there is a button, having a typescript method on click "exportToCSV()".
<button kendoButton (click)="exportToCSV()" [look]="'outline'">Export to CSV</button>
Here is the method:
exportToCSV() {
this.title = 'Exporting to CSV';
var exportData: IExport = {
data: this.gridData.map(x => MapExportData.mapProducts(x)),
columnHeaders: ExportColumnHeaders.ProductColumns,
columnHeaderNotToBeIncluded: []
}
this.exportService.ExportToCSV(exportData);
}
As we are implementing an interface with properties, data, columnHeaders and columnHeaderNotToBeIncluded. In data, we are mapping grid data filtering the columns to display with mapProducts() method.
On hitting the button, this method will further call the method in export.service.ts.
ExportToCSV(exportConfig: IExport) {
let fileName = "ExportCSV.csv"
this.ConvertDataToCSVFile(exportConfig.columnHeaders,exportConfig.data,
exportConfig.columnHeaderNotToBeIncluded,fileName);
}
ConvertDataToCSVFile(HeaderColumns: any[], data: any,
HeaderColumnsIgnored: any[], filename: string) {
let csvArray: any;
const replacer = (key, value) => value === null ? '' :
(value.toString().indexOf('"') > 0 ?
value.replace(/"/g, " ") : value); // specify how you want to handle null values here
if (data.length > 0) {
const header_original = Object.keys(data[0]).filter(function (item) {
return HeaderColumnsIgnored.indexOf(item) === -1
});
const header_show = header_original.map(function (value: string, index: number) {
return HeaderColumns.filter(function (item) { return item.field === value })[0].title
});
let csv = data.map(row => header_original.map
(fieldName => JSON.stringify(row[fieldName], replacer)).join(','));
csv.unshift(header_show.join(','));
csvArray = csv.join('\r\n');
}
else {
// no record rows
const header_show = HeaderColumns.map(function (value: string, index: number) {
return value["title"];
});
let csv = data.map(row => header_show.map
(fieldName => JSON.stringify(row[fieldName], replacer)).join(','));
csv.unshift(header_show.join(','));
csvArray = csv.join('\r\n');
}
var a = document.createElement('a');
var blob = new Blob([csvArray], { type: 'text/csv' }),
url = window.URL.createObjectURL(blob);
a.href = url;
a.download = filename;
a.click();
window.URL.revokeObjectURL(url);
a.remove();
}
Questions?
Feel free to ask any question related to this post. Hope this will help you somewhere in your application.
Happy coding! :)
History
- 23rd July, 2019: Initial version
