Introduction
So, this time, I was writing a desktop application where the user should be able to select a part of an image and save the cropped image.
Normally, I spend a lot of time and energy on searching the net and trying out existing controls before I start rolling my own, but in this case I didn't, because I was 99% certain right from the start that I wouldn't find any that would live up to my expectations.
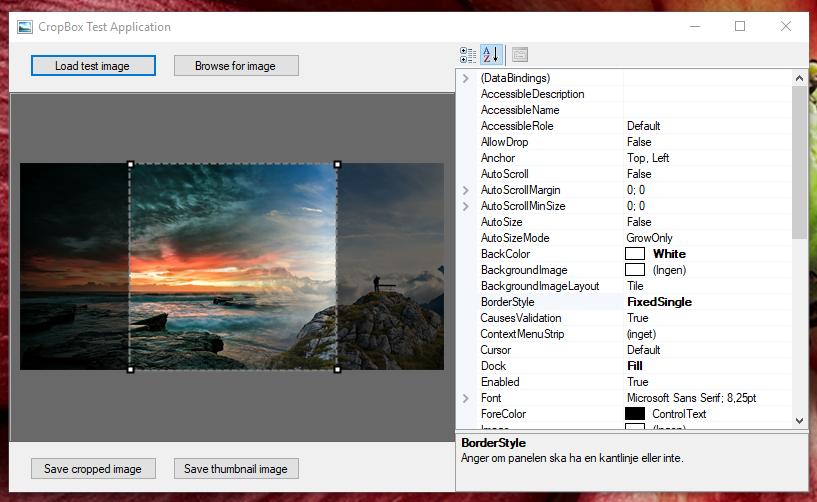
So I started developing the control myself straight off. I wanted sort of a PictureBox that could show the image, with a selection rectangle that could be adjusted and so on.
Not much more to say. The control ended up better than I could ever have expected and extremely easy to use. So here it is. If you need it, just go ahead - otherwise don't...
Control Feature Overview
1) Basic Control Info
I derived the control from the standard Panel control. That way, it would get all the Panel properties and behaviour that makes it easy to design and layout your form.
Why didn't you derive it from a PictureBox, I can hear you ask? Good question! Don't know, really. I wanted the control to be as lightweight and simple as possible, and I thought that a Panel would be a better base for that than a PictureBox.
2) Properties You Need to Know About
As you will see later, the control is EXTREMELY simple to use. There are a handful of properties that are good to know about. Most of them have to do with the look of the control.
Image - The image property is where you assign the image you need to crop.OverlayColor - The part of the image that is NOT selected is shown with a semitransparent overlay to make it easier to see the selection itself. You can set the color of the overlay here.OverlayAlpha - The overlay is semitransparent, and the OverlayAlpha property determines just HOW transparent it is. The value should be between 0 (invisible) and 255 (completely opaque).SelectionInitialMode determines what selection is shown automatically when you load the image. If you don't like the standard modes and select Custom, you should make sure to handle the SetInitialSelection event in your code. If you don't, the FullImage mode will be used.SelectionResizeMode determines how you can resize the selection. It also determines if the corner handles are shown or not.SelectionBorderColor, SelectionBorderDashStyle, SelectionBorderDashPattern and SelectionBorderWidth all determine how the border around the selected part of the image is drawn. SelectionBorderDashPattern is not visible in the designer, but should be set in code if you set SelectionBorderDashStyle to Custom. Otherwise, you can forget about it.SelectionResizeHandleBorderColor, SelectionResizeHandleBorderWidth and SelectionResizeHandleColor determines how the resize handles in the corner are drawn (if they should be drawn at all, that is).ThumbnailScalingPercentage - The control can generate a thumbnail for your cropped image if you want. This property determines how big it should be, in percent of the full image size.
New in version 1.2:
StartEditingMode - Determines when it should be possible to edit the Image.
3) Methods You Need to Know About
GetCroppedImage - Returns the image in the control cropped to the selected area.GetCroppedImageThumbnail - Returns a thumbnail of the image in the control cropped to the selected area. Also see the ThumbnailScalingPercentage property.
New in version 1.2:
StartEdit and EndEdit - Call these methods to start the edit mode or end it.SaveCroppedImage - Saves the cropped image directly to fileSaveCroppedImageThumbnail - Saves the cropped image thumbnail directly to fileResetSelection - Resets the selection to the initial selection
Usage

As mentioned, it is VERY easy and straightforward to use the control. Merely drop it on your form and adjust the size and look to your liking. Then assign an image to the Image property, for instance like this:
cropBox1.Image = Image.FromFile(fileName);
After that, you can edit the selection, and when you're ready to crop the image, you can get the cropped image like this:
Image croppedImage = cropBox1.GetCroppedImage();
After that, it's simple .NET programming to save the image to a Jpeg file:
croppedImage.Save(fileName, ImageFormat.Jpeg);
Tip
The control uses the entire client surface to paint the Image, but if you think that looks stupid, you can simply set the Padding property to get a border around the image.
Interesting Thing I Learned
The standard .NET functionality to load an image from file (see code above) doesn't care anything about the EXIF orientation tag. That means that if you've taken the photo using your smartphone, etc., it may be shown completely wrong when you load it into an Image class.
Luckily, it's easily fixed, and I have of course incorporated it in the control:
if (Array.IndexOf(_image.PropertyIdList, 274) > -1)
{
var orientation = (int)_image.GetPropertyItem(274).Value[0];
switch (orientation)
{
case 1:
break;
case 2:
_image.RotateFlip(RotateFlipType.RotateNoneFlipX);
break;
case 3:
_image.RotateFlip(RotateFlipType.Rotate180FlipNone);
break;
case 4:
_image.RotateFlip(RotateFlipType.Rotate180FlipX);
break;
case 5:
_image.RotateFlip(RotateFlipType.Rotate90FlipX);
break;
case 6:
_image.RotateFlip(RotateFlipType.Rotate90FlipNone);
break;
case 7:
_image.RotateFlip(RotateFlipType.Rotate270FlipX);
break;
case 8:
_image.RotateFlip(RotateFlipType.Rotate270FlipNone);
break;
}
_image.RemovePropertyItem(274);
}
(The above code snippet is for the sake of simplicity "borrowed" directly from the user ReenignE on StackOverflow - The rest of the control is all my doing! Give credit where credit is due...)
History
Version 1.2 (2019-08-26)
- New functionality: Added StartEditing property that determines when the editing should start
- New functionality: Added StartEdit and EndEdit method calls
- New functionality: Added methods to save directly to file, SaveCroppedImage (2 overloads)
- New functionality: Added methods to save thumbnail directly to file, SaveCroppedImageThumbnail (2 overloads)
- New functionality: Added ResetSelection method
- Bugfix: MaintainAspectRatio mode didn't work properly
Version 1.1 (2019-08-22)
- Bugfix - Image didn't resize with the control
- Bugfix - Fixed "negative" selection rectangles
- Bugfix - Fixed rounding errors for square image selections
- Improvements - A few minor cosmetic code changes
Version 1.0 (2019-08-21)
