The Why
This article has come about during the
work I'm doing to investigate audio generation technologies on the
Windows platform, and it describes one core requirement I had, namely
using the Win32 API to create and manage a Windows application UI.
There
are many ways I could have gone about this, but for this work I wanted
to get deep into the workings of the API, to understand techniques and
develop my own resources, so I skipped the many UI libraries available,
in favour of direct UI manipulation using the API.
There are many
well documented examples out there, but none I seemed to meet my
immediate need, which was for an application to open a simple form with a
button and listbox, nothing else, something I could reuse and build on.
The How
Skipping
the detailed explanations then, of which there are many available, and
getting straight into the code, the first thing I wanted to do was
design the presentation of the UI.
Using Visual Studio 2010 again,
for the full version there is a built in editor for this, on the
express version you will have to make use of an external tool such as
Resedit, as described
here.
What these editors allow you to do is to create a form or window
design, and generate what is know as a resource script from it. It is
this resource script (a .rc file) whcih is then included in the main
project to describe the form and manage access to the elements within
it.
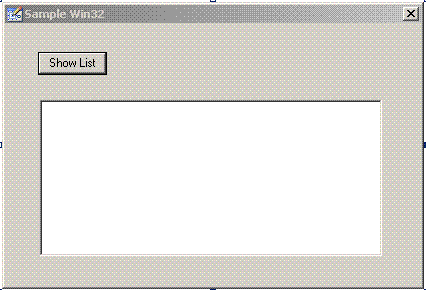
Without going into too much detail, for my sample, I created a
simple dialog form for my application, with a single Button and a List
Box, as below:

From
here, on saving the dialog, the tool creates two files, a .rc file, and
another called resources.h. These need to be included in the main
project.
The .rc file is the actual script describing the controls, for the form above this should look like:
#include <windows.h>
#include <commctrl.h>
#include <richedit.h>
#include "resource.h"
LANGUAGE 0, SUBLANG_NEUTRAL
IDD_DIALOG1 DIALOG 0, 0, 277, 161
STYLE DS_3DLOOK | DS_CENTER | DS_MODALFRAME | DS_SHELLFONT |
WS_CAPTION | WS_VISIBLE | WS_POPUP | WS_SYSMENU
CAPTION "Sample Win32"
FONT 8, "Ms Shell Dlg"
{
DEFPUSHBUTTON "Show List", IDSHOWLIST, 22, 17, 46, 14
LISTBOX IDC_LIST1, 23, 47, 228, 96, WS_TABSTOP | WS_VSCROLL |
LBS_NOINTEGRALHEIGHT | LBS_SORT | LBS_NOTIFY
}On to the main part of the code. The entry point for the
application is the WinMain function. Within this, the window defined
above is created as a dialog box, as below:
int WINAPI WinMain(HINSTANCE hInstance, HINSTANCE hPrevInstance,
    LPSTR lpCmdLine, int nCmdShow)
{
    return DialogBox(hInstance, MAKEINTRESOURCE(IDD_DIALOG1), NULL, DlgProc);
}
Note in the DialogBox call, MAKEINTRESOURCE refers to the name
of the resource created previously which is to be shown on the screen.
Note also the reference to DlgProc. This is the function that handles
the callback from the dialog window, that is the response from the user.
DlgProc handles the response, known as a message, received from the dialog, as below:
BOOL CALLBACK DlgProc(HWND hwnd, UINT Message, WPARAM wParam, LPARAM lParam)
{
switch(Message)
{
case WM_INITDIALOG:
break;
case WM_COMMAND:
switch(LOWORD(wParam))
{
case IDSHOWLIST:
{
HWND hListBox = ::GetDlgItem(hwnd, IDC_LIST1);
for (int i = 0 ; i < 8 ; i++)
SendMessage( hListBox, LB_ADDSTRING, 0, (LPARAM)("Modes List Box"));
}
break;
}
break;
case WM_CLOSE:
EndDialog(hwnd, 0);
break;
default:
return FALSE;
}
return TRUE;
}Here, the code looks at the value of Message returned. If this
is WM_COMMAND, it means that the user interacted with the window in
some way. The actual control involved in that interaction can be derived
by looking at the value of wParam, and will be one of the values
defined in Resource.h. In this case, if the button was clicked, then
WM_COMMAND will be set to the ID of the button, IDSHOWLIST, and code can
be written to handle this message.
The simple example code here
populates the list box with a number of lines of text data. To do this, a
reference to the handle of the ListBox is found (note that all controls
are actually seen as windows in their own right). Given this handle,
messages can be sent to the ListBox, in this case to add text, indicated
by the LB_ADDSTRING parameter.
