Note: This is Part 5 of a CodeProject Article Series entitled WestWorld. To get more background information for this article:

Introduction
A practical example of how to create agents that utilize finite state machines. In this article, I focus path finding in a tile based 2D Map. We are going to look at the game dynamics of the AStar PathFinding Algorithm. There are two inhabitants of WestWorld — a gold miner named Miner Bob and his Wife, Amanda.
In the history of this series we have covered the following topics:
WestWorld1 - Basics of Finite State Machine(FSM)WestWorld2 - FSM with two agents (Miner & Wife)WestWorld3 - Messaging between two FSM AgentsWestWorld4 - Intro of WindowsForms GDI+WestWorld5- (this article) 2D Map Rendering
Background
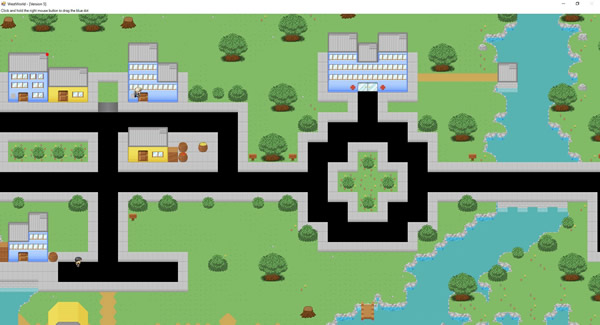
The aim of this tutorial is to show you how to create a simple game, from scratch, without the help of higher level APIs like XNA or DirectX, or Unity which automate the process for you. All we will be using is Windows Form GDI+ to perform basic map rendering.
Map Generation
In this series of the article I found it beneficial to utilize Tiled the open source and free map editor.
Tiled is a general purpose tile map editor. It is a free tool that allows the easy creation of tile map layouts. It is versatile enough to allow abstract things such as collision areas, enemy spawn positions, or power-up positions. It saves all of this data in a convenient, standardized *.tmx format.
Object Layer
For the purpose of this article we will only need to utilize an Object Layer and a couple of Tile Layers. The Object Layer is where we will specify special gameplay elements. Using objects you can add a great deal of information to your map for use in your game. The Objects in Object Layer can replace tedious alternatives like hardcoding coordinates (like spawn points, exits, entrances, etc.) in your source code. You can also maintain additional data about your Object tiles for storing gameplay elements.
Tile Layer
To keep the Tile Layer simple this project uses an open source graphics file. One of many can be located here: OpenPixels on Github.
Custom Properties
One of the major strengths of using Tiled is that it allows setting custom properties on all of its basic data structures. For the purpose of WestWorld I am using Custom Properties to store information that will be used to match an Enum value in game.

TiledBasic
To read the *.tmx file I am using a modified version of TileSharp called TiledBasic. This implementation allows me to read into my class and game info. TiledBasic is used for parsing and importing TMX files generated by Tiled. Each Tile in a *.tmx Map file is read into a Map class.

Tile Rendering
Once all of the tiles are read that can then be rendered on screen by one of the Draw() methods of the Scene class.

PathFinding
Pathfinding in the game helps to find the shortest route between two points. It is like a practical way to solve a maze. A* grid-based pathfinding works well for games because the characters can move along both the x- and y-axes. The adapted algorithm utilized in WestWorld allows the AI character to follow the path chosen based on the route to their goal.
In this version (WestWorld v.5) we have defined a 'hard-coded' route for the NPC. However, in a future and final version of the series we will discuss a more clever way to allow the Non-Playable Character(NPC) to 'think' and to choose (i.e. Decision Tree) which goal to pursue.

References
