Goal to Achieve
We have a fictional company that needs to expose a set of methods to perform these operations:
- Create a product
- Read a product
- Update a product
- Delete a product
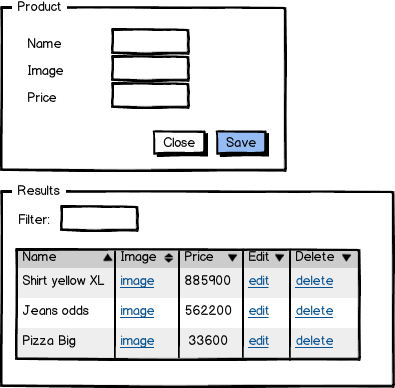
The external applications which are going to consume these API methods have a screen like this:

In this case, we have an entity called Product with 4 fields:
Product (int)Name (string)ImageUrl (string)Price (decimal)
Before we start coding, I encourage you to refresh the basic concepts about API and JSON format.
What are APIs?
I have read a lot of definitions about this concept and I have preferred to keep this in my mind:
APIs is the specification of how one piece of software can interact with another.
In our example, we are going to create a set of pieces (“methods”) that will be in charge of doing a specific task interacting with external applications.
| Operation | Http Verb |
| Create a product | POST |
| Read a product | GET |
| Update a product | UPDATE |
| Delete a product | DELETE |
What is JSON?
- JSON stands for JavaScript Object Notation
- JSON is a lightweight format for storing and transporting data
- JSON is often used when data is sent from a server to a web page
- JSON is “self-describing” and easy to understand
So, let´s start coding.
Step 1: Run Dotnet Command
Open the command line window and go to your repositories folder and create a new API project by typing the next dotnet command:
dotnet new webapi - n crudstore
Step 2: Explore Your Project
Go inside your project crudstore, by typing:
cd crudstore
Open your project in vscode, by typing:
code .
Step 3: Set Up Your Environment
Click on the extension panel and explore a great amount of tools that will help you to prepare your environment and be more productive.
Personally, I would recommend you to install:

Step 4: Creating the Model
namespace Models
{
public class Product

{
public int Idproduct { get; set; }
public string Name { get; set; }
public string Imageurl { get; set; }
public decimal Price { get; set; }
}
}
Step 5: Creating the Controller
I will use static collections of products to illustrate this example, but in a real scenario, certainly, you will have to add more code to connect with the database.
static List<product> _products = new List<product>(){
            new Product(){ Idproduct =0, Name= "hard disk", Price= 100  },
            new Product(){ Idproduct =1, Name= "monitor", Price= 250  },
        };
After that, add the next code to handle all the requests.
Be aware that you have to use some namespaces in the header:
using System.Collections.Generic;
using System.Linq;
using Microsoft.AspNetCore.Http;
using Microsoft.AspNetCore.Mvc;
using Models;</code>
[Produces("application/json")]
    [ApiController]
    [Route("api/products")]
    public class productController : Controller
    {
        static List<Product> _products = new List<Product>(){
            new Product(){ Idproduct =0, Name= "hard disk", Price= 100  },
            new Product(){ Idproduct =1, Name= "monitor", Price= 250  },
        };

        [HttpGet("GetAll")]
        public IActionResult GetAll()
        {
            return Ok(_products);
        }

        [HttpPost]
        public IActionResult Post([FromBody] Product product)
        {
            _products.Add(product);
            return StatusCode(StatusCodes.Status201Created);
        }

        [HttpPut]
        public IActionResult Put([FromBody] Product product)
        {
            var entity = _products.Where
                         (x => x.Idproduct == product.Idproduct).FirstOrDefault();
            entity.Name =  product.Name;
            entity.Price = product.Price;
            entity.Imageurl =  product.Imageurl;
            return StatusCode(StatusCodes.Status200OK);
        }

        [HttpDelete]
        public IActionResult Delete([FromBody] Product product)
        {
            var entity = _products.Where
                         (x => x.Idproduct == product.Idproduct).FirstOrDefault();
            _products.Remove(entity);
            return StatusCode(StatusCodes.Status200OK);
        }
    }
Step 6: Add Swagger to Your Project
Swagger is a nugget very useful to document and describe all the methods in your API.
In the command line and inside of your project, type the next command:
dotnet add package Swashbuckle.AspNetCore
As a result, you will see a message like this:

Go to the startup.cs class in your project and make some changes to allow that swagger can be configured appropriately.
In the method Configureservices, add this code:
services.AddCors(o => o.AddPolicy("MyPolicy", builder =>
{
builder.AllowAnyOrigin()
.AllowAnyMethod()
.AllowAnyHeader();
}));
services.AddSwaggerGen();
After that, go to the Configure method in the Startup class and add this code:
app.UseSwagger();
app.UseSwaggerUI(c =>
{
c.SwaggerEndpoint("/swagger/v1/swagger.json", "My API V1");
});
Finally, your Startup class should be like this:
public class Startup
{
public Startup(IConfiguration configuration)
{
Configuration = configuration;
}
public IConfiguration Configuration { get; }
public void ConfigureServices(IServiceCollection services)
{
services.AddControllers();
services.AddCors(o => o.AddPolicy("MyPolicy", builder =>
{
builder.AllowAnyOrigin()
.AllowAnyMethod()
.AllowAnyHeader();
}));
services.AddSwaggerGen();
}
public void Configure(IApplicationBuilder app, IWebHostEnvironment env)
{
if (env.IsDevelopment())
{
app.UseDeveloperExceptionPage();
}
app.UseSwagger();
app.UseSwaggerUI(c =>
{
c.SwaggerEndpoint("/swagger/v1/swagger.json", "My API V1");
});
app.UseHttpsRedirection();
app.UseRouting();
app.UseAuthorization();
app.UseEndpoints(endpoints =>
{
endpoints.MapControllers();
});
}
}
Step 7: Testing your API
Type the next command in the command line window:
dotnet run
Step 8: Verifying the Results
Open the browser and type the url https://localhost:5001/swagger/index.html, you will see the set of methods that we created previously.

Method GetAll
Url: https://localhost:5001/api/products/GetAll
[
{
"idproduct": 0,
"name": "hard disk",
"imageurl": null,
"price": 100
},
{
"idproduct": 1,
"name": "monitor",
"imageurl": null,
"price": 250
}
]
Method Post
Url: https://localhost:5001/api/products
{
  "idproduct": 0,
  "name": "watch",
  "imageurl": "http://url",
  "price": 150
}
You can explore all the features that Swagger offers to test the APIs, therefore you have other interesting alternatives like Postman and Fiddler to test the APIs.
I hope you enjoy this code!
