AutoExcel is very simple and only requires a small amount of code to complete complex import and export. When using it, programmers have no sense of import and export, that is, there is no need to directly manipulate POI.
Why AutoExcel?
Excel import and export is very common in software development, as long as you are a programmer, you have encountered it. I believe that many people will choose to use Apache POI to complete this work like me. While feeling the power of POI, my team also encountered the following problems:
- Directly use POI to operate Excel will generate a lot of hard code, you will hardly write row index and column index in the code.
- A large number of non-reusable format control codes, such as background color, alignment, cell style, etc.
- The implementation consultant clearly provided a ready-made template, but had to develop the code to implement it again, resulting in low development efficiency.
- Development resources have to be used when the template is adjusted.
- Simple export also requires specific code.
AutoExcel solves the above problems. It is very simple and only requires a small amount of code to complete complex import and export. When using it, programmers have no sense of import and export, that is, there is no need to directly manipulate POI. At the same time, the implementation consultant provides Excel is the import and export template, unless new data sources or fields are added, the template update does not need to use development resources.
AutoExcel does not over-encapsulate the POI, but makes full use of Excel's own feature-the name manager, through some tricks, the cell and the data source are mapped, thereby decoupling the programmer and the POI, and avoid hard code, so that import and export work becomes enjoyable and no longer boring.
Imprint
- Current version: v2.0.0
- Support Excel format: 2007
Features
Function Preview
Before Export
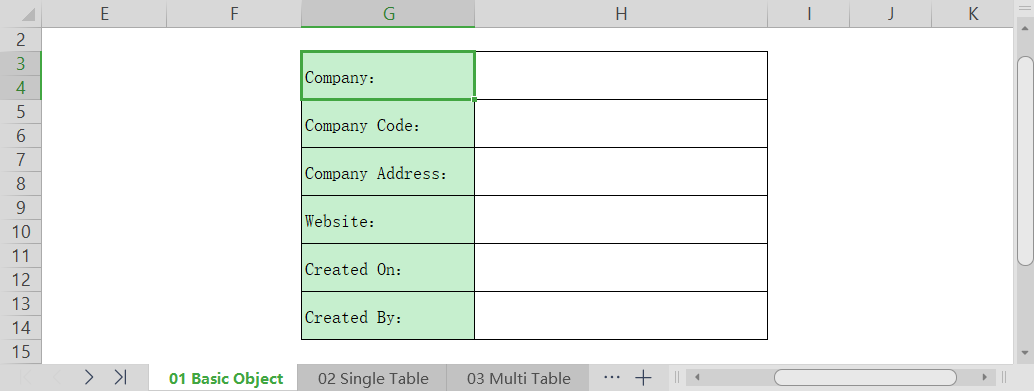
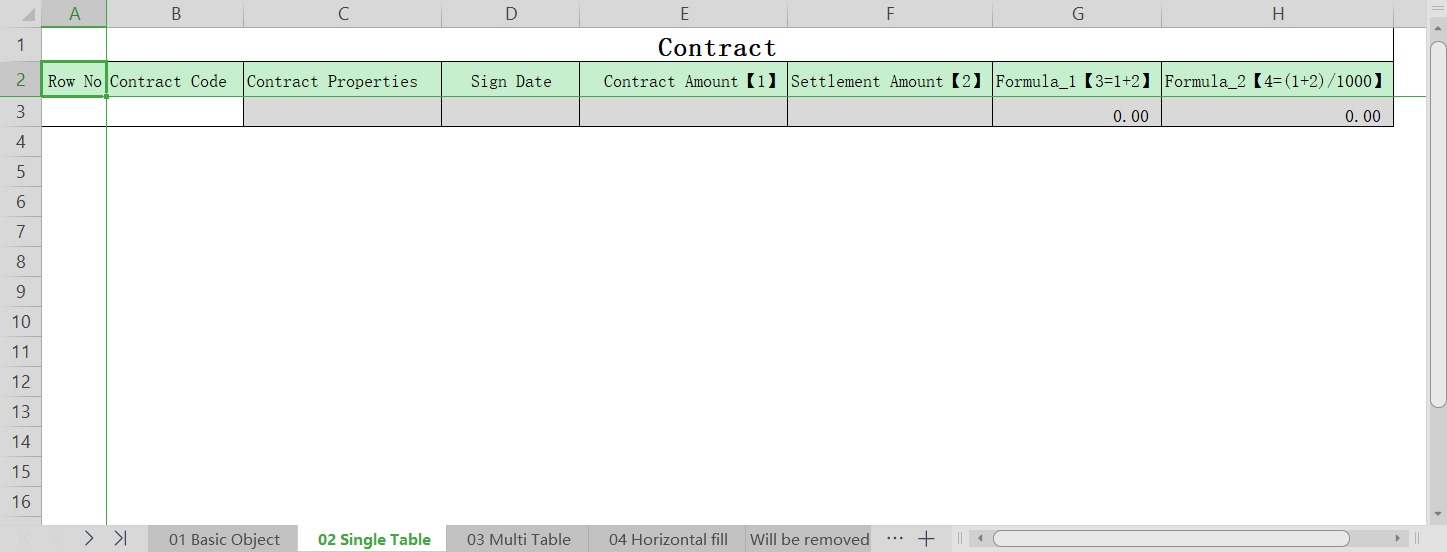
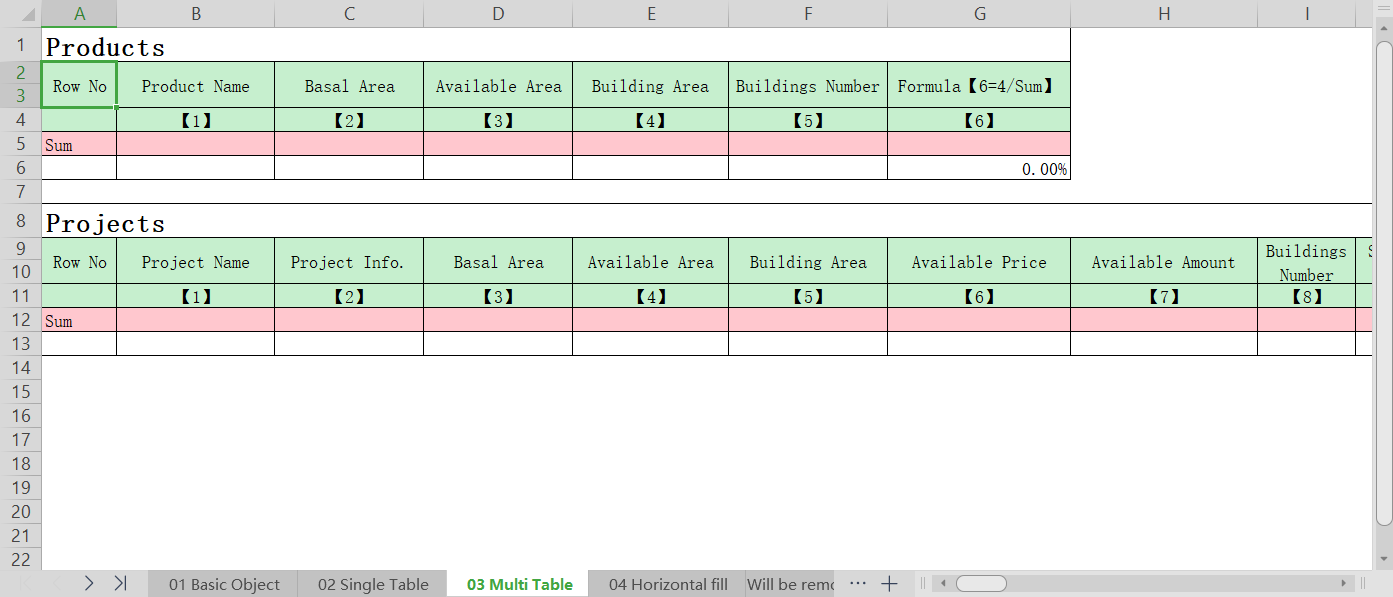

After Export
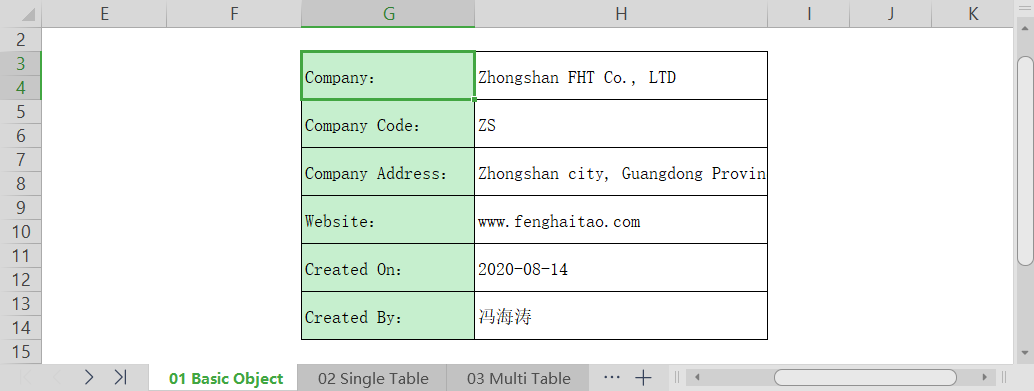
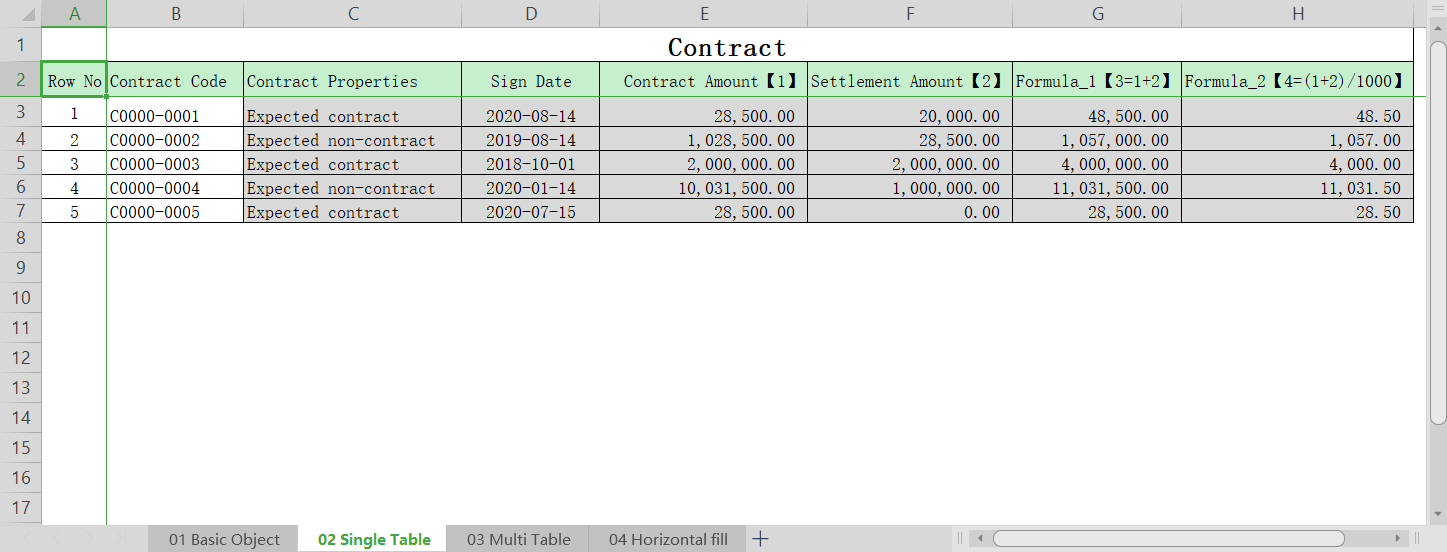
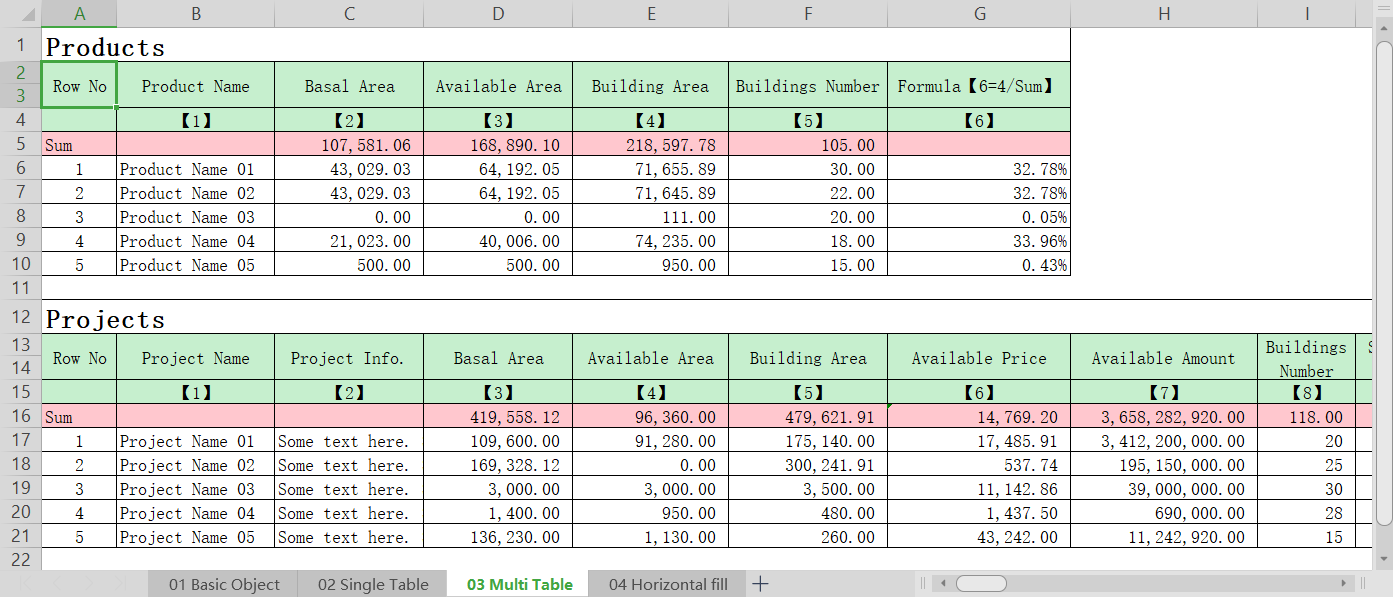

To achieve all of the above exports, you only need to write the following small amount of code (you need additional code to prepare the data source, for example, from the database. In the following example, use DataGenerator to generate demo data.)
List<TemplateExportPara> paras = new ArrayList<>();
paras.add(new TemplateExportPara("BusinessUnit", DataGenerator.genBusinessUnit()));
paras.add(new TemplateExportPara("Contract", DataGenerator.genContracts()));
paras.add(new TemplateExportPara("Project", DataGenerator.genProjects(1)));
List<Product> products = DataGenerator.genProducts(1);
TemplateExportPara para3 = new TemplateExportPara("Product", products);
para3.setInserted(true);
paras.add(para3);
TemplateExportPara para5 = new TemplateExportPara("Product2", products);
para5.setDataDirection(DataDirection.Right);
paras.add(para5);
ExcelSetting excelSetting = new ExcelSetting();
excelSetting.setRemovedSheets(Arrays.asList("will be removed"));
AutoExcel.save(this.getClass().getResource("/template/Export.xlsx").getPath(),
this.getClass().getResource("/").getPath() + "AutoExcel.xlsx",
paras,
excelSetting);
Maven
<dependency>
  <groupId>net.fenghaitao</groupId>
  <artifactId>auto-excel</artifactId>
  <version>2.0.0</version>
</dependency>
Know the Template
To achieve the above export, you first need to complete the production of the template. Some report creation tools such as Microsoft’s RDL, you will make the export model in RDL, and then export the data to Excel in combination with the code. In this process, RDL only acts as an intermediary. It means that every time there is a new export task, an export model must be made first. In AutoExcel, Excel is the template. If your Excel comes from an implementation consultant, it is very likely that this Excel has already set the data format, cell style, etc. And it is waiting for you to fill in the data. In that case, why not use this Excel as our export template, what we have to do is just add our stuff to it.
Name Manager
The name manager in Excel, a feature that is ignored by most people, has become a bridge between data sources and cells in AutoExcel. You can open the name manager by clicking the menu Formula->Name Manager. Each name corresponds to a specific location in Excel. It can be a region or a cell. Of course, here, the names we defined all point to cells. So it can be understood that the name manager is used to name cells. It is precisely because the cell has a name that we can automatically assign a value to the cell without the need for personalized code.
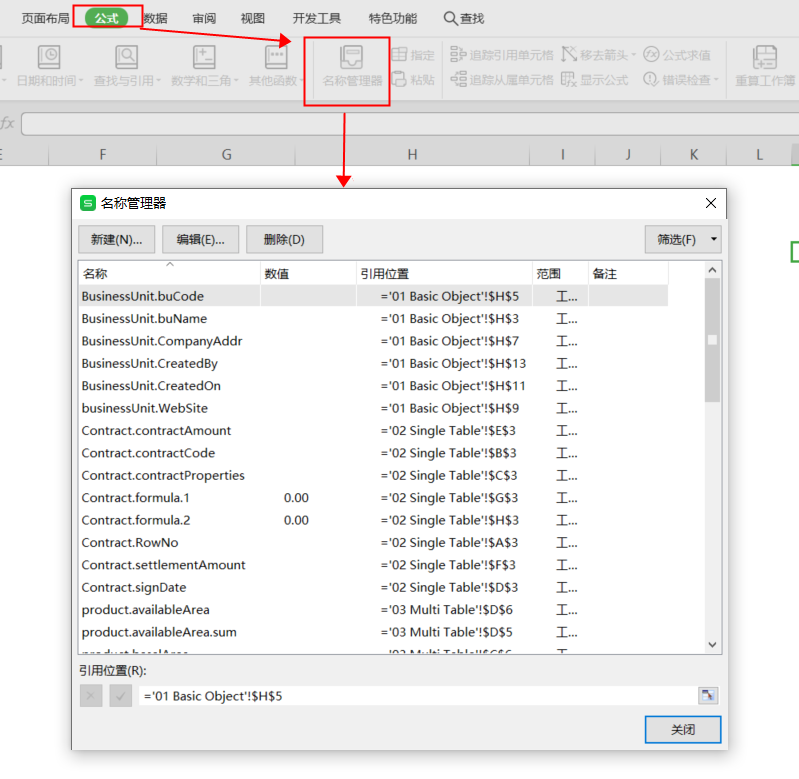
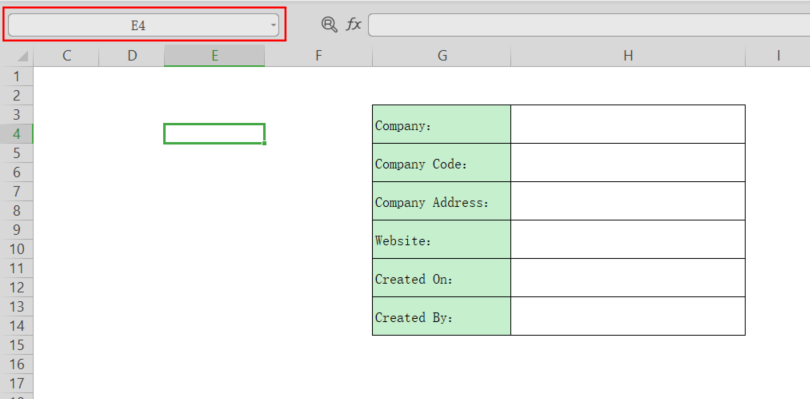
After defining the name for the cell, when you click on the cell again, you will find the name you just defined is displayed in the upper left corner.
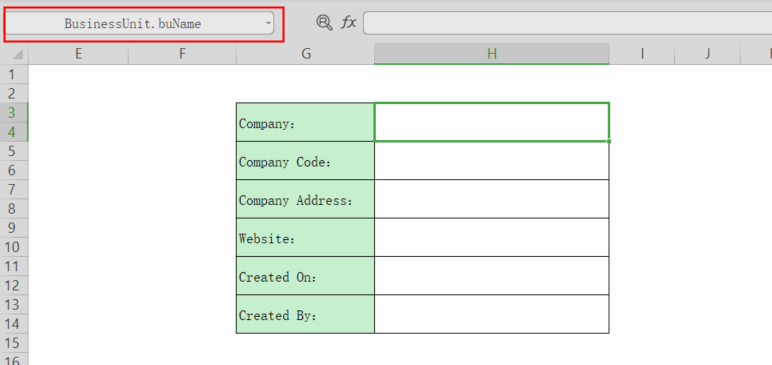
In addition to adding new names in the name manager, there is another way that is more intuitive and faster. Click on the cell you want to name, then directly enter the name in the upper left corner, and finally press the Entry button. It is recommended to create names in this way.
Name Rule
Because the cell name determines what kind of data and how to fill in, it must be named according to the following rules:
DataSourceName.FieldName[.AggregateType], used to fill common fields or aggregate of common fields, e.g., product.SaleArea.sumDataSourceName.Formula.xxxx, used to fill the formula, e.g., product.Formula.1DataSourceName.RowNo, used to fill the row number, e.g., product.RowNo
All names are not case sensitive, the following will be introduced according to specific scenarios.
Export
Basic Object
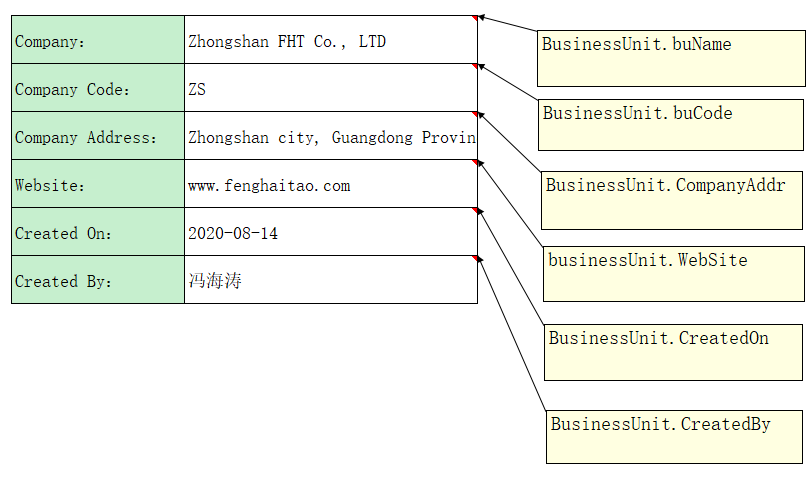
As shown in the figure, the name of each cell is indicated in the remarks, written in accordance with the rules of DataSourceName.FieldName.
Java code:
String templatePath = this.getClass().getResource("/template/Export.xlsx").getPath();
String outputPath = this.getClass().getResource("/").getPath() + "AutoExcel.xlsx";
TemplateExportPara para =
new TemplateExportPara("BusinessUnit", DataGenerator.genBusinessUnit());
AutoExcel.save(templatePath, outputPath, para);
Single Table

If you want to export a list of data, you only need to name it according to the writing rules of the base object. Of course, the export of list data is often more complicated than the basic object. For example, you may need a column of row numbers, but you don’t want to do special processing in the code. At this time, you can use DataSourceName.RowNo to hand over the work to AutoExcel to process. Note that RowNo is a built-in field. If this field is included in the data source, it will be overwritten.
There is also a very common situation, you have a cell with a formula in the table, such as: =E6+F6, you want the cell in the next row to be assigned the value =E7+F7. At this time, you should use DataSourceName.Formula.xxxx, you can use any formula you like, and AutoExcel will automatically fill it for you eventually. You can write whatever you want at the part of xxxx, as long as the name is unique. Formula is also a built-in field.
Java code:
String templatePath = this.getClass().getResource("/template/Export.xlsx").getPath();
String outputPath = this.getClass().getResource("/").getPath() + "AutoExcel.xlsx";
TemplateExportPara para = new TemplateExportPara("Contract", DataGenerator.genContracts());
AutoExcel.save(templatePath, outputPath, para);
If you have run the above code, you will find that AutoExcel automatically applies the cell style for you. Any style you want to apply to the exported data can be controlled by setting the style of the data start row (that is, the row of the cell you named) in the template.

Multi-table
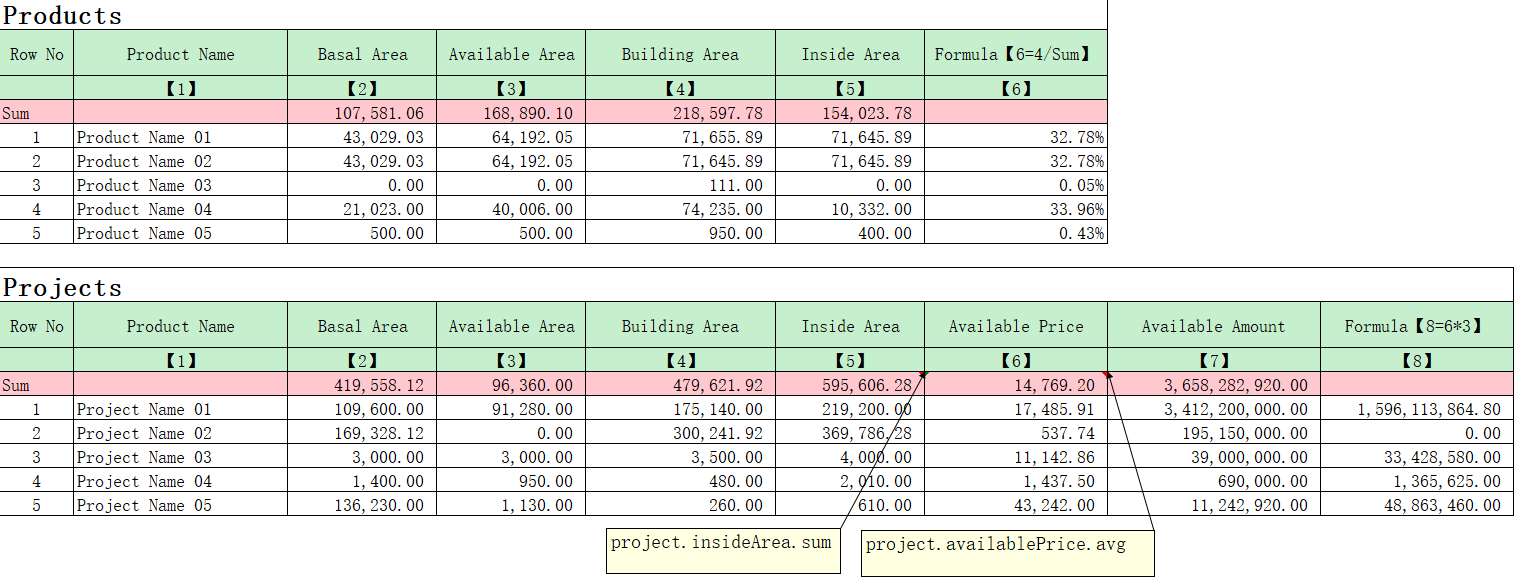
Export multiple tables in one Sheet. If you have such a requirement, please set the export parameter of the table that is not at the bottom in the background code to: setInserted(true). As shown in the figure above, the export parameter para corresponding to products should be set as follows: para.setInserted(true). You know, AutoExcel does not care about whether there is enough space for data export, it will only output continuously. So when your template space is not enough, you need to tell AutoExcel, and then AutoExcel will make enough space to hold your data before exporting.
A new naming rule is introduced here: DataSourceName.FieldName.AggregateType, used to total the specified fields. Currently, two aggregate types are supported: Sum and Avg.
Java code:
String templatePath = this.getClass().getResource("/template/Export.xlsx").getPath();
String outputPath = this.getClass().getResource("/").getPath() + "AutoExcel.xlsx";
List<TemplateExportPara> paras = new ArrayList<>();
paras.add(new TemplateExportPara("Project", DataGenerator.genProjects()));
TemplateExportPara para = new TemplateExportPara("Product", DataGenerator.genProducts());
para.setInserted(true);
paras.add(para);
AutoExcel.save(templatePath, outputPath, paras);
Horizontal fill

If you need to fill the data to the right instead of down, you just need to use setDataDirection(DataDirection.Right).
Java code:
String templatePath = this.getClass().getResource("/template/Export.xlsx").getPath();
String outputPath = this.getClass().getResource("/").getPath() + "AutoExcel.xlsx";
TemplateExportPara para = new TemplateExportPara("Product2", DataGenerator.genProducts());
para.setDataDirection(DataDirection.Right);
AutoExcel.save(templatePath, outputPath, para);
Export Directly
Export directly, that is, the export process does not require the use of templates, and is suitable for integration into the general export function of the back-end system. The code is very simple.
String outputPath = this.getClass().getResource("/").getPath() + "Export Directly.xlsx";
DirectExportPara para = new DirectExportPara(DataGenerator.genProjects(1));
AutoExcel.save(outputPath, para);
Effect:

Of course, you don't like this kind of title and title order, so you need to use FieldSetting to make your title readable and display in the order you like.
List<FieldSetting> fieldSettings = new ArrayList<FieldSetting>() {{
    add(new FieldSetting("projName", "Project Name"));
    add(new FieldSetting("projInfo", "Project Info."));
    add(new FieldSetting("saleStartDate", "Sales Start Date"));
    add(new FieldSetting("availablePrice", "Available Price"));
    add(new FieldSetting("availableAmount", "Available Amount"));
}};
String outputPath = this.getClass().getResource("/").getPath() + "Export Directly.xlsx";
DirectExportPara para = new DirectExportPara(DataGenerator.genProjects(), "Projects", fieldSettings);
AutoExcel.save(outputPath, para);
Final effect:

Of course, you can also export multiple sheets at once.
String outputPath = this.getClass().getResource("/").getPath() + "Export Directly.xlsx";
List<DirectExportPara> paras = new ArrayList<>();
paras.add(new DirectExportPara(DataGenerator.genProjects(200), "Projects",
        DataGenerator.genProjectFieldSettings()));
paras.add(new DirectExportPara(DataGenerator.genContracts()));
AutoExcel.save(outputPath, paras);
Custom Action
AutoExcel is committed to dealing with general scenarios of import and export. If there is a personalized demand, you should take back the control of Workbook and perform personalized processing according to your needs. The save method provides two Consumers, of which actionAhead will be called before the export operation starts, and actionBehind will be called after the export is completed. You can use these two Consumers to add the functions you want.
String templatePath = this.getClass().getResource("/template/Common.xlsx").getPath();
String outputPath = this.getClass().getResource("/").getPath() + "ExportWithTemplate.xlsx";
List<TemplateExportPara> paras = new ArrayList<>();
paras.add(new TemplateExportPara("BusinessUnit", DataGenerator.genBusinessUnit()));
Consumer<Workbook> actionAhead = Workbook -> {
};
Consumer<Workbook> actionBehind = workbook -> {
};
AutoExcel.save(templatePath, outputPath, paras, actionAhead, actionBehind);
Import
Import in V2.0.0 no longer uses templates, so you need to specify the mapping relationship between column names and field names through FieldSetting, which may be stored in your database. Supports importing multiple sheets at the same time, and can specify the title row index and data row index.
List<ImportPara> importParas = new ArrayList<ImportPara>() {{
add(new ImportPara(0, DataGenerator.genProductFieldSettings()));
add(new ImportPara(1, DataGenerator.genProjectFieldSettings(), 1, 5));
}};
String fileName = this.getClass().getResource("/template/Import.xlsx").getPath();
DataSet dataSet = AutoExcel.read(fileName, importParas);
List<Map<String, Object>> products = dataSet.get("Product");
List<Map<String, Object>> projects = dataSet.get("Project");
public static List<FieldSetting> genProjectFieldSettings() {
    List<FieldSetting> fieldSettings = new ArrayList<>();
    fieldSettings.add(new FieldSetting("projName", "Project Name"));
    fieldSettings.add(new FieldSetting("projInfo", "Project Info."));
    fieldSettings.add(new FieldSetting("basalArea", "Basal Area"));
    fieldSettings.add(new FieldSetting("availableArea", "Available Area"));
    fieldSettings.add(new FieldSetting("buildingArea", "Building Area"));
    fieldSettings.add(new FieldSetting("buildingsNumber", "Buildings Number"));
    fieldSettings.add(new FieldSetting("saleStartDate", "Sales Start Date"));
    fieldSettings.add(new FieldSetting("landAcquisitionTime", "Land Acquisition Time"));
    fieldSettings.add(new FieldSetting("availablePrice", "Available Price"));
    fieldSettings.add(new FieldSetting("availableAmount", "Available Amount"));
    fieldSettings.add(new FieldSetting("insideArea", "Inside Area"));
    return fieldSettings;
}

public static List<FieldSetting> genProductFieldSettings() {
    List<FieldSetting> fieldSettings = new ArrayList<FieldSetting>() {{
        add(new FieldSetting("projName", "Project Name"));
        add(new FieldSetting("basalArea", "Basal Area"));
        add(new FieldSetting("availableArea", "Available Area"));
        add(new FieldSetting("buildingArea", "Building Area"));
        add(new FieldSetting("buildingsNumber", "Buildings Number"));
    }};
    return fieldSettings;
}
Parameters of ImportPara:
- sheetIndex: required, sheet index
- fieldSettings: required, column name and field name mapping
- titleIndex: optional,title index, start form 0
- dataStartIndex: optional,data start index, start form 0
Quote:
Why use FieldSetting instead of using annotations to declare column names?
- Non-intrusive, does not affect the original code.
- When designing the system, in order to reuse the same configuration, such as page display, export, import, printing, etc., all of which display the same column name, we will store these configurations in a storage medium such as a database. Then load them when needed. Hard coding can also be avoided by this way, and dynamic configuration can be conveniently performed. FieldSetting is used to match this method. AutoExcel integrates import and export into your automation system as much as possible.
Million data test
Unit: ms
| | 10W rows and 10 columns of data | 100W rows and 10 columns of data |
| Export with template | 6,258 | 23,540 |
| Export directly | 5,711 | 24,952 |
| Import | 4,466 | 21,595 |
| Import + Type conversion | 4,823 | 26,279 |
Run the Sample Code
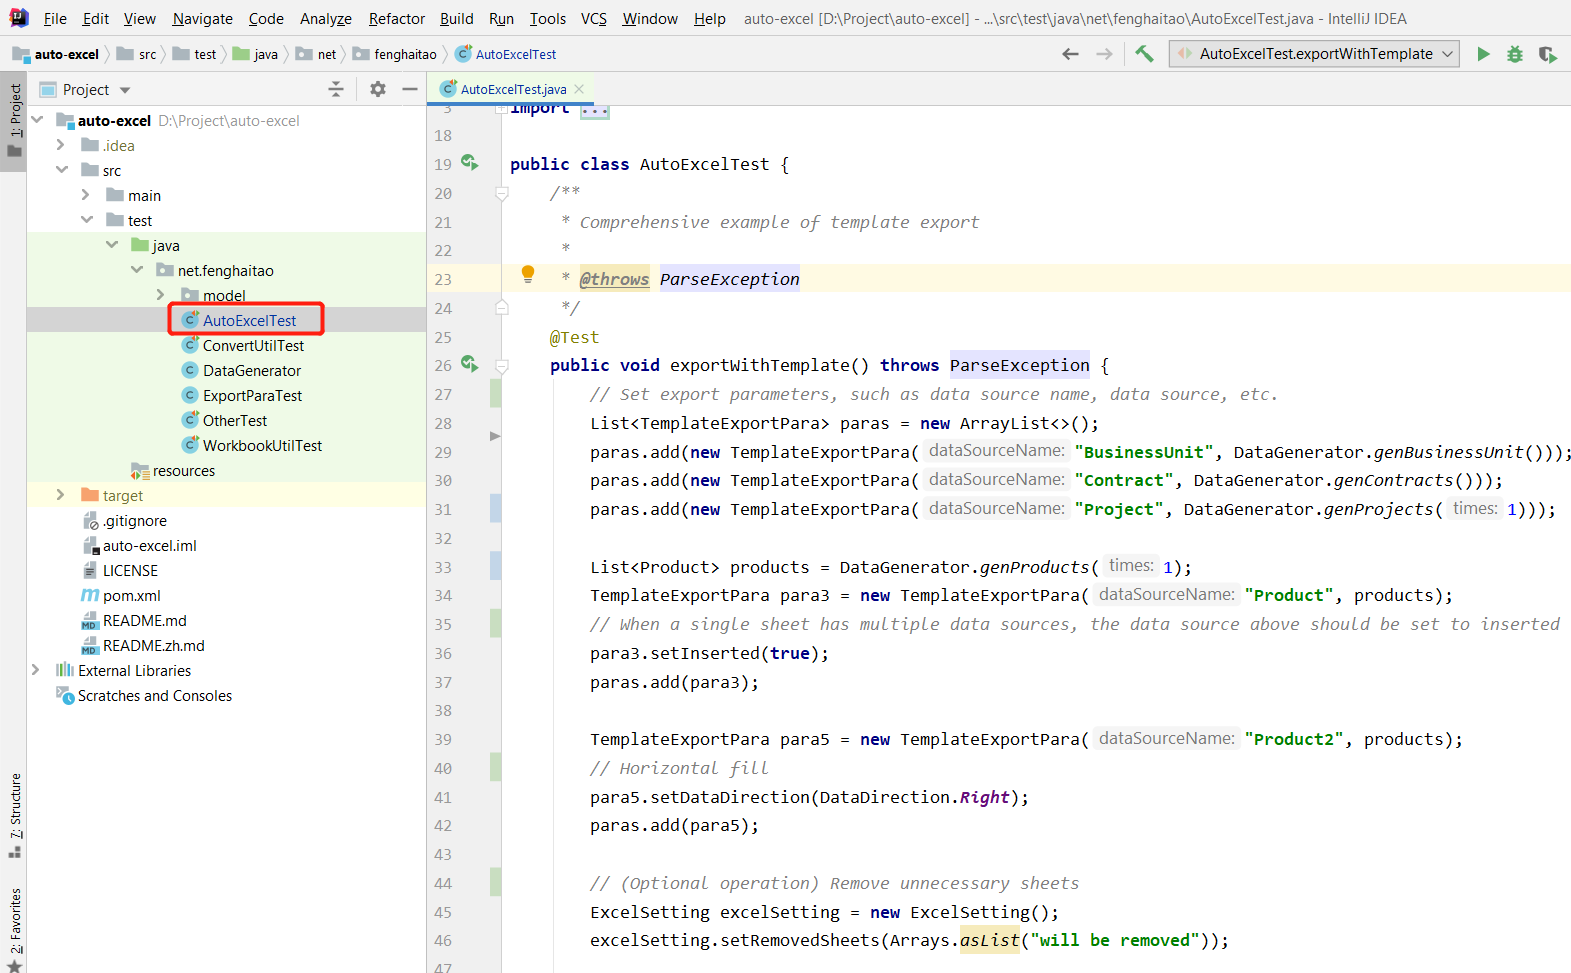
Please go to the unit test to get the complete sample code.
GitHub
History
- 8th October, 2020: Initial version
