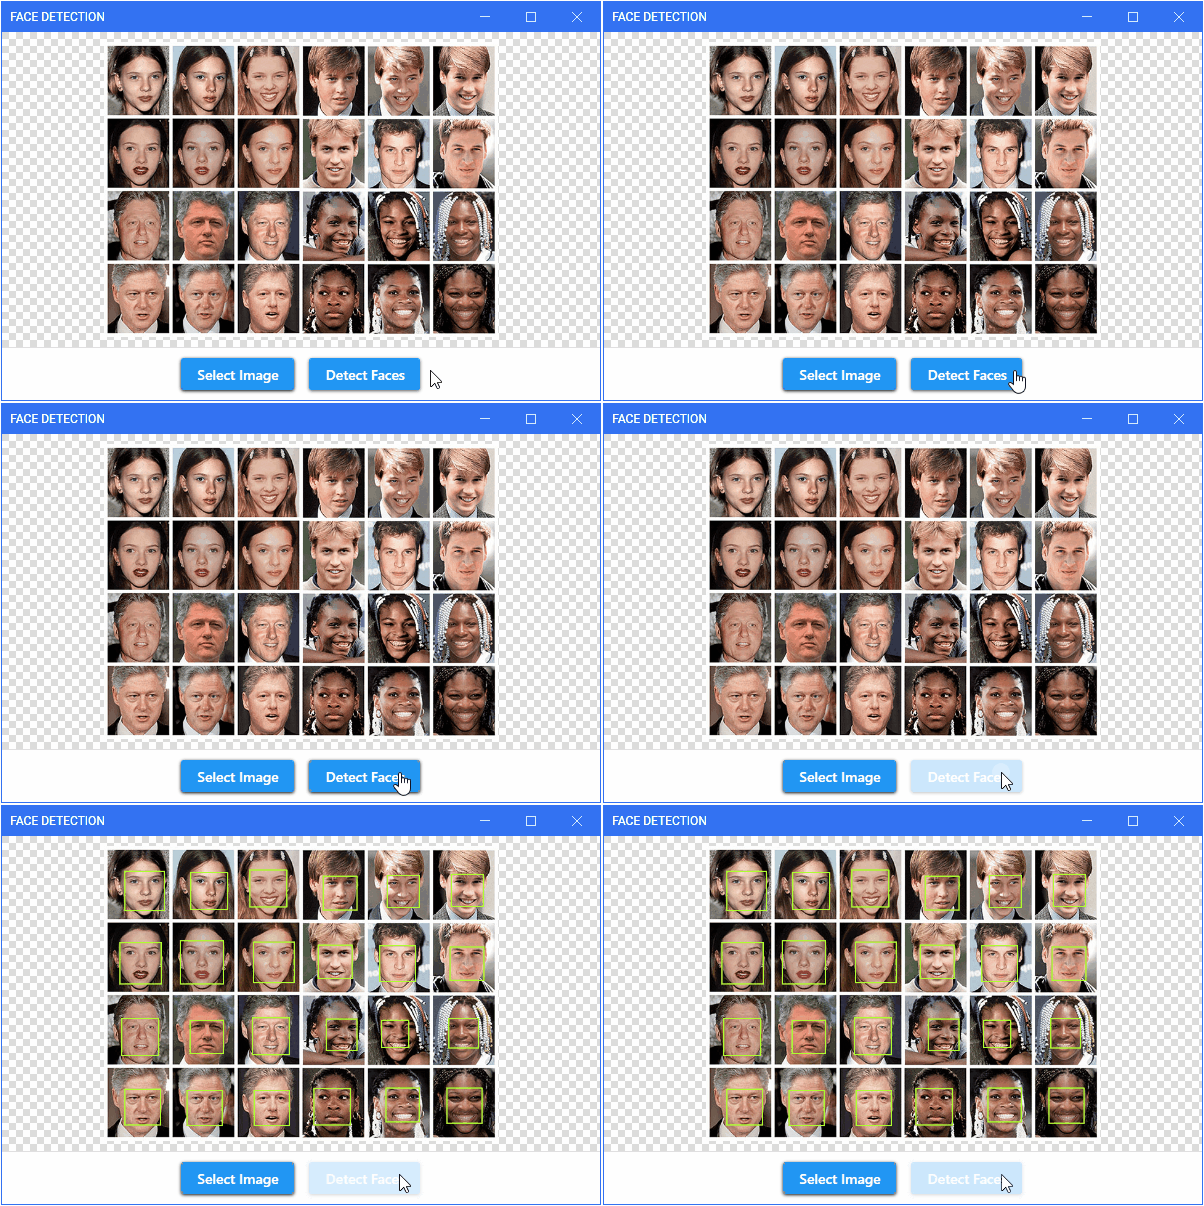
Learn how to use the UWP face detection API to detect faces in an image in a WPF application

Introduction
The Universal Windows Platform's Windows.Media.FaceAnalysis namespace contains APIs that can be used to detect faces in image files and video frames. The face detection API is one of the UWP APIs available to desktop applications, with this availability being made possible by the Windows 10 WinRT API Pack. This article will take a look at how to go about using the UWP face detection API in a WPF application, specifically to detect faces in an image file.
Prerequisites
To follow along, some familiarity with the MVVM pattern is required. To run the sample project, you should have the following installed:
- .NET Core 3.1
- Visual Studio 2019
Background
The sample application is a .NET Core WPF project that references the Microsoft.Windows.SDK.Contracts package (Windows 10 WinRT API pack), which enables desktop applications to access certain UWP APIs. The user can select an image file and click on the Detect Faces button to detect faces in the selected image.
Face Detection
To use the UWP face detection API, you have to import the Windows.Media.FaceAnalysis namespace. In the sample project, this is done in the FaceDetectionService class which contains a DetectFaces() method where the face detection process is executed.
public async Task<IList<DetectedFace>> DetectFaces(Stream fileStream)
{
    var stream = fileStream.AsRandomAccessStream();
    var bitmapDecoder = await BitmapDecoder.CreateAsync(stream);

    using SoftwareBitmap bitmap = await bitmapDecoder.GetSoftwareBitmapAsync();

    var bmp = FaceDetector.IsBitmapPixelFormatSupported(bitmap.BitmapPixelFormat)
        ? bitmap : SoftwareBitmap.Convert(bitmap, BitmapPixelFormat.Gray8);

    var faceDetector = await FaceDetector.CreateAsync();
    var detectedFaces = await faceDetector.DetectFacesAsync(bmp);

    return detectedFaces;
}
FaceDetector only works with a SoftwareBitmap so the target image is converted to one using a BitmapDecoder. A check of the bitmap pixel format is then done and if it's not one of those supported by the FaceDetector on the current device, a conversion is done. DetectFacesAsync() detects the faces in the SoftwareBitmap and returns a collection of DetectedFace objects.
Marking Faces
To mark the detected faces using bounding boxes, I'm making use of the Graphics class from the System.Drawing namespace.
public Bitmap DetectedFacesBitmap(Stream fileStream, IList<DetectedFace> detectedFaces,
    Color boxColor, int strokeThickness = 2)
{
    var bitmap = new Bitmap(fileStream);

    using (var graphics = Graphics.FromImage(bitmap))
    {
        using var stroke = new Pen(boxColor, strokeThickness);
        foreach (var face in detectedFaces)
        {
            BitmapBounds faceBox = face.FaceBox;
            graphics.DrawRectangle(stroke, (int)faceBox.X, (int)faceBox.Y,
                    (int)faceBox.Width, (int)faceBox.Height);
        }
    }
    return bitmap;
}
DetectedFace contains a property named FaceBox that provides the bounds of a detected face. The bounds are used when drawing rectangles on the image where the detected faces are located.
View Model
The sample project follows the MVVM pattern and contains only one view model – MainWindowViewModel. This view model contains two properties; one of type string that specifies the path of the selected image and the other of type Bitmap for the processed image. The view model also contains commands for executing image selection and face detection.
using System.Drawing;
using System.IO;
using System.Threading.Tasks;
using FaceDetection.Commands;
using FaceDetection.Services.Interfaces;

namespace FaceDetection.ViewModels
{
    public class MainWindowViewModel : ViewModelBase
    {
        private readonly IDialogService dialogService;
        private readonly IFaceDetectionService faceDetectionService;

        public MainWindowViewModel(IDialogService dialogSvc,
                                   IFaceDetectionService faceDetectionSvc)
        {
            dialogService = dialogSvc;
            faceDetectionService = faceDetectionSvc;
        }

        private string _selectedImage;
        public string SelectedImage
        {
            get => _selectedImage;
            set
            {
                _selectedImage = value;
                OnPropertyChanged();
            }
        }

        #region Select Image Command
        private RelayCommand _selectImageCommand;
        public RelayCommand SelectImageCommand =>
            _selectImageCommand ??= new RelayCommand(_ => SelectImage());

        private void SelectImage()
        {
            var image = dialogService.PickFile("Select Image",
                "Image (*.jpg; *.jpeg; *.png)|*.jpg; *.jpeg; *.png");

            if (string.IsNullOrWhiteSpace(image)) return;

            SelectedImage = image;
        }
        #endregion

        private Bitmap _facesBitmap;
        public Bitmap FacesBitmap
        {
            get => _facesBitmap;
            set
            {
                _facesBitmap = value;
                OnPropertyChanged();
            }
        }

        #region Detect faces Command
        private RelayCommandAsync _detectFacesCommand;
        public RelayCommandAsync DetectFacesCommand =>
            _detectFacesCommand ??= new RelayCommandAsync
                                    (DetectFaces, _ => CanDetectFaces());

        private async Task DetectFaces()
        {
            await using FileStream fileStream = File.OpenRead(_selectedImage);
            var faces = await faceDetectionService.DetectFaces(fileStream);
            FacesBitmap = faceDetectionService.DetectedFacesBitmap
                          (fileStream, faces, Color.GreenYellow);
            SelectedImage = null;
        }

        private bool CanDetectFaces() => !string.IsNullOrWhiteSpace(SelectedImage);
        #endregion
    }
}
View
Switching between the selected image and the processed image is done using a data trigger for the Image control in MainWindow.xaml:
<Image Margin="10">
    <Image.Style>
        <Style TargetType="Image">
            <Setter Property="Source" Value="{Binding SelectedImage, Mode=OneWay}"/>
            <Style.Triggers>
                <DataTrigger Binding="{Binding SelectedImage}" Value="{x:Null}">
                    <Setter Property="Source"
                            Value="{Binding FacesBitmap,
                            Converter={StaticResource BitmapConverter}}"/>
                </DataTrigger>
            </Style.Triggers>
        </Style>
    </Image.Style>
</Image>
Since FacesBitmap is of type Bitmap, it has to be converted to a BitmapSource. This is done using a converter.
public class BitmapToBitmapSourceConverter : IValueConverter
{
    public object Convert(object value, Type targetType,
           object parameter, CultureInfo culture)
    {
        if (value is null) return null;

        using var bitmap = (Bitmap)value;
        using var stream = new MemoryStream();
        bitmap.Save(stream, ImageFormat.Bmp);
        stream.Position = 0;
        var bmpImg = new BitmapImage();
        bmpImg.BeginInit();
        bmpImg.CacheOption = BitmapCacheOption.OnLoad;
        bmpImg.StreamSource = stream;
        bmpImg.EndInit();
        bmpImg.Freeze();
        return bmpImg;
    }

    public object ConvertBack(object value, Type targetType,
                              object parameter, CultureInfo culture)
    {
        return Binding.DoNothing;
    }
}
Conclusion
As you've seen, using the UWP face detection API is a very simple process. It's important to note that while the API is really good at detecting faces, it may not detect faces that are partially visible since the pixels may not be sufficient for the face detector to work with.

That's it! If you need to have a look at the rest of the code for the sample project, clone or download the repository using the download link at the top of this article.
History
- 7th October, 2020: Initial post
