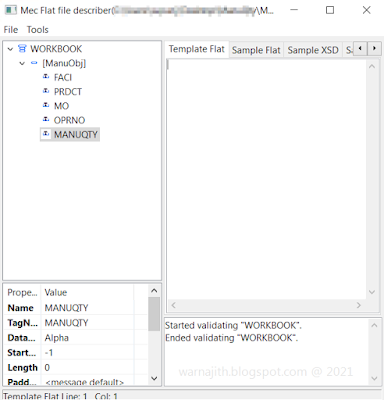
Integrating CSV files with MEC is a very old but frequently used method. A CSV file may have a header and the data as in the below format. If we use this file (converting FLAT To XML) directly as it is, it will feed the data with the header. In this post, I'm going to share one of the possible methods to get rid of the CSV header.
FACI,PRDCT,MO,OPERNO,MANUQTY
A01,Y3003-Y01-010,3000018,10,2
A01,Y3003-Y01-010,3000018,50,2
Using the Flat file definition tool I will define the following structure.

Then I will get the following XML message into the MEC process.
<WORKBOOK>
	<ManuObj>
		<FACI>FACI</FACI>
		<PRDCT>Product</PRDCT>
		<MO>MO</MO>
		<OPRNO>Operation No</OPRNO>
		<MANUQTY>ManuQty</MANUQTY>
	</ManuObj>
	<ManuObj>
		<FACI>A01</FACI>
		<PRDCT>Y3001-Y02-016</PRDCT>
		<MO>0003000164</MO>
		<OPRNO>0010</OPRNO>
		<MANUQTY>1</MANUQTY>
	</ManuObj>
	<ManuObj>
		<FACI>A01</FACI>
		<PRDCT>Y3001-Y02-016</PRDCT>
		<MO>0003000164</MO>
		<OPRNO>0040</OPRNO>
		<MANUQTY>1</MANUQTY>
	</ManuObj>
</WORKBOOK>
You can notice the XML message contains the header. To get rid of the header one method is;
- Read all the XML elements into a Java array in the Mapper.
- Then process the data from the first position of the Array (remember 0th position will have the header segment).
But here I will show you a different method that is using XSLT transformation. Very easy.
Steps are
- Define the XLST definition. You can reuse this definition with two small modifications. Change the "WORKBOOK" value in
<xsl:element name="WORKBOOK"> to the root element of your XML message. The change the xpath of <xsl:copy-of select=""/> to match your respetive xpath.
="1.0"
<xsl:stylesheet xmlns:xsl="http://www.w3.org/1999/XSL/Transform"
version="1.0">
<xsl:output indent="yes"/>
<xsl:template match="/">
<xsl:element name="WORKBOOK">
<xsl:copy-of select="WORKBOOK/ManuObj[position()>1]"/>
</xsl:element>
</xsl:template>
</xsl:stylesheet>
- Go to the Partner Admin, Manage->XSLT Definitions.., create the new XSLT Definition.
- Go the Process tab in your Partner Admin. Right click and select XSL Transform.
- Select the XSLT definition you created in Step 2.
- Make sure XSL Transform process step will be after the FLAT To XML process step in the process tab and Save. (You can add XML Transform after the XSL Transform to implement the logic, transformation you want).
- Test the process and see messages in Admin page.
Happy Coding.
