Here we: look at a brief history of how containerization started, explain what a modern container is, talk about how to build a container and copy an application you've written into it, explain why you'd want to push your container to a registry and how you can deploy straight from registries into production, and discuss deployment.
Long ago, in the early years of the Internet era, the world's largest retailers invested big to build their web operations and exploit the many opportunities in the booming online market. Going online meant that they could process orders around the clock, but it also created unprecedented operational challenges.
Since holiday shopping attracts many online users and hardware eventually crashes, these retailers had to purchase more servers than they usually needed. Buying a new bunch of servers was extremely expensive, but losing consumers on peak sales was a risk these companies could not afford.
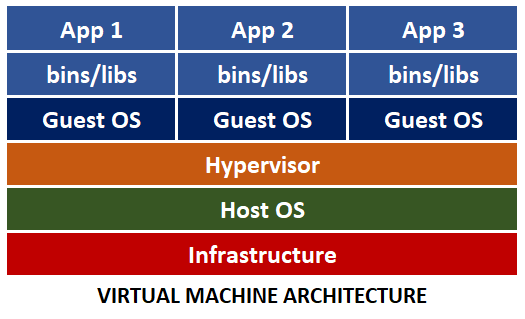
With products like VMWare and Virtual Box, virtual machines became a game-changer, enabling companies to make better use of hardware resources. Running multiple apps in one host machine meant that businesses didn't have to buy so many servers. It was like running "computers within computers."

Still, virtualization had its challenges. Developers worked on their local machines, which could be different from the virtual machines they deployed to. This mismatch between environments prompted the dreaded "works on my machine" excuses and frustrated developers, as they had to worry about failures that occurred outside the application.
Virtual machines would later give way to containerization, although the idea behind containers wasn't new. As early as 1979, the chroot system introduced process isolation and file access segregation in Unix systems. In 2000, FreeBSD jails partitioned a Linux computer into smaller systems, and in 2005, OpenVZ used Linux Kernel for system virtualization and isolation. Then, in 2008, Linux Kernel introduced control groups.
These were all steps toward the containers we use today. Eventually, Docker stood out from the competition for many reasons, including developer-oriented tools, easy configuration, great portability, and a robust management ecosystem.
Rise of the Modern Container
Containerization took the IT industry by storm with the popularization of Docker. Containers were similar to VMs, but without the guest operating system (OS), leaving a much simpler package.
The "works on my machine" excuses from developers are no longer an issue, as the application and its dependencies are all self-contained and shipped into the same unit called a container image. Images are ready-to-deploy copies of apps, while container instances created from those images usually run in a cloud platform such as Azure.
The new architecture lacks the hypervisor since it is no longer needed. However, we still need to manage the new container, so the container engine concept was introduced.

Containers are immutable, meaning that you can’t change a container image during its lifetime: you can't apply updates, patches, or configuration changes. If you must update your application, you should build a new image (which is essentially a changeset atop an existing container image) and redeploy it. Immutability makes container deployment easy and safe and ensures that deployed applications always work as expected, no matter where.
Compared to the virtual machine, the new container is extremely lightweight and portable. Also, containers boot much faster. Due to their small size, containers help maximize use of the host OS and its resources.
You can run Linux and Windows programs in Docker containers. The Docker platform runs natively on Linux and Windows, and Docker’s tools enable developers to build and run containers on Linux, Windows, and macOS.
You can't use a container to run apps living on the local filesystem. However, you can access files outside a Docker container using bind mounts and volumes. They are similar, but bind mounts can point to any directory on the host computer and aren't managed by Docker directly.
A Docker container accesses physical host hardware, like a GPU, on Linux but not on Windows. This is so because Docker on Linux runs on the kernel directly, while Docker on Windows works in a virtual machine, as Windows doesn't have a Linux kernel to directly communicate with.
Container: From Coding to Deployment
Let's say you're developing a containerized e-commerce app. As a developer, you build the app into containers. Next, you write a docker file containing the commands needed to set up and run the application in a container for each app or service. Then, you write a docker-compose.yml file to set up the relationships between the different container apps and services in a multi-container Docker application.
You run and test the container locally on your development machine by executing the docker run command specifying the local port, then by opening http://localhost:[PORT] in your browser.
To build and run your app, you can deploy it to your Docker host (VM or physical server), or deploy it as a composed application, either using a single command-line interface (CLI) command or with an integrated development environment (IDE) like Visual Studio.
Once your application or service is tested, the build process produces one or more container images. But what to do with them? This is where a repository like Azure Container Registry or Docker Hub comes in: once container images are generated, developers push them to a public or private registry. Then, they can pull the image into the data centers, into the cloud, or anywhere else where the application can run.
To learn how you can implement continuous integration and continuous deployment (CI/CD) that uses GitHub actions to push an image to a container registry, follow this YouTube playlist: Building CI/CD workflows using GitHub Actions.
Some advantages of using a registry are:
- You can tightly control who has access to your images and where they are stored.
- The registry can be the single source of truth for the images you want to run.
- You can scan containers for vulnerabilities as needed.
Suppose your application or service can operate in isolated containers without orchestration. In that case, you deploy your images straight from the container registry into production using a solution like Azure Container Instances (ACI), either manually or from your development pipeline.
Beyond Deployment: Orchestration with Kubernetes
When companies started migrating their solutions to containers, they realized that scaling applications is no trivial task. The Kubernetes platform soon emerged as the golden standard for running containerized applications, creating an unprecedented surge in interest from businesses wanting to explore containers.
Container orchestration automates many of the tasks required to run containerized workloads and services, which would demand a massive effort in a large-scale system. Kubernetes solves this challenge by managing the container's lifecycle, including provisioning, deployment, scaling, networking, and load balancing.
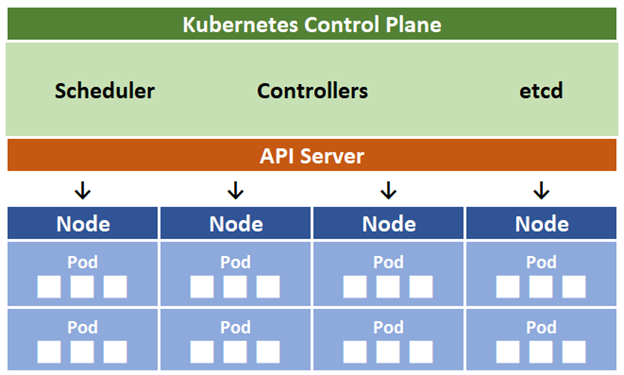
When you deploy Kubernetes, you get a cluster. A Kubernetes cluster comprises a group of machines called workers or nodes that run applications in containers. Every cluster must have at least one worker node. Within the worker nodes, the application workload is distributed along components called Pods.
The cluster's control plane manages the worker nodes and Pods. In production environments, the control plane and cluster usually spread across multiple machines and nodes, providing high availability and resilience.

You can create a local Kubernetes cluster with minikube or on a managed Kubernetes service. Kubernetes is a complicated technology that demands adequate knowledge in security, support skills, frequent upgrades, and attention to detail. A managed Kubernetes service such as Azure Kubernetes Service (AKS) offers lots of convenient management features that relieve you from those repetitive tasks so you can focus on your business.
CI/CD Pipelines with Kubernetes
Let's take a look at a CI/CD pipeline that containerizes your code, pushes it to a registry, and from there into production in a Kubernetes cluster.
It all starts with your code. After proper code review, unit testing, and other controls, the merge request merges into the main branch of your Git repository. This triggers an event that causes the build pipeline to build your app into container images. The build pipeline then pushes those images into your Azure Container Registry (ACR).
You can define policies, compliance, and rules for every object created in your Azure Container Registry. The CI/CD pipeline then pulls the container images from the ACR and deploys them as Pods inside a worker node in the Kubernetes cluster. The container images can replicate into multiple Pods inside multiple worker nodes, depending on the replica number you defined in the deployment configuration file.
From now on, your new code is already running in production on the Kubernetes cluster. Whenever you commit new code to your Git repository, the build pipeline repeats that process.
Kubernetes works by taking a group of virtual or physical machines, transforming them into a unified API surface for containers that developers can interact with, and orchestrating their application, regardless of the underlying physical machines.
In Kubernetes, your containers live inside Pods, which are the smallest deployment units. Kubernetes' ReplicationController helps ensure your application's Pod health across nodes. When you define a desired number of Pod replicas, the ReplicationController guarantees this number of replicas remains the same at all times. So, when a Pod fails, the controller takes notice and starts a Pod elsewhere in the cluster.
Azure Kubernetes Service enables you to maintain an efficient, cost-effective cluster by automatically adjusting the number of nodes that run your workloads. The cluster autoscale component detects when resource constraints occur, so the number of nodes in a node pool increases to meet your application demands. Likewise, when demand goes down, the number of nodes decreases, so you don’t have to pay for cloud resources you’re not using.
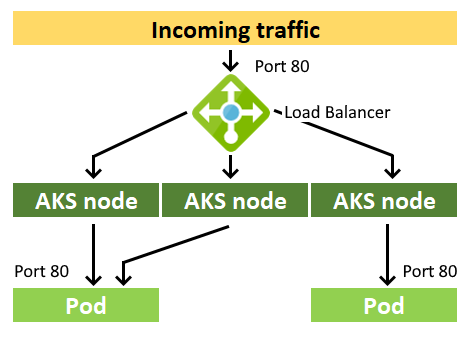
Besides creating extra nodes and Pods in the Kubernetes cluster, you must also ensure these new resources will be used to the same extent as the existing resources. A load-balancing component, such as the Azure Load Balancer, distributes flows from inside or outside the AKS virtual network, successfully scaling your applications and creating highly-available services.

Next Steps
You’ve just enjoyed a whirlwind tour of why containers are important: at present, they appear to be the future of enterprise application deployment. As the technology matures, more and more developers and DevOps teams will benefit from containerization’s increased portability, scalability, and efficiency.
Want to learn more? Explore the resources below:
- Learn to build and manage container-based applications with Kubernetes. Get this free three e-book bundle to learn the basics of Kubernetes - all in one place.
- Accelerate development with Kubernetes on Azure. Get started by learning how to deploy and manage container clusters at scale in this Packt e-book.
- Containers are foundational to cloud-native app development. Cloud Native Applications are based on microservices. Each application comprises small services that operate independently from each other, taking advantage of continuous delivery to achieve reliability and faster time to market.
- Learn how to use a public load balancer to expose your services with Azure Kubernetes Service (AKS).
