Great News! Your scrappy little space start-up just won a very competitive contract to populate Mars with hundreds of sensors to collect environmental and visual data! Bad News! It will take almost all the project budget to get the collection devices to the surface of Mars in the first place. You’re the lucky engineer tasked with building the sensors on the cheap! Harnesses the Portable Power of the Pi with AWS to create a remote sensor and camera.
Introduction
In this two-part project, we're going to explore AWS Greengrass and IoT devices. Specifically, we're going to turn the pile of parts below into an off-grid remote controlled image and data collection device. We'll be using a Raspberry Pi Zero, a Pi Camera, a cellular modem and some other bits and pieces along with AWS Greengrass version 2. Greengrass version 2 was released at the end of 2020 and while AWS still supports Greengrass v1, which they now lovingly refer to as the "classic edition", they are encouraging new development to use the version 2 path...and that's the path we'll take.
No Pi? No problem. In this first part, we'll use an EC2 instance as a stand-in for our Pi to understand the basics of Greengrass v2 and how we can build and deploy custom components. In the second part of this project, we'll be focused on the Pi version. For our physical device, I'm going to be using a Raspberry Pi Zero powered by a Lithium Ion battery back and a solar panel. We'll connect it to the internet with a cellular modem or as its called in the Pi world, a cellular hat. Then I'll cram all that stuff into a weatherproof box to see just how long the thing can say online in the elements.
If you'd like to watch the companion video version of this tutorial, head on over to A Cloud Guru's ACG Projects landing page. There, you will find this and other hands-on tutorials designed to help you create something and learn something at the same time. Accessing the videos does require a free account, but with that free account, you'll also get select free courses each month and other nice perks....for FREE!

The Completely Plausible Scenario
Well, I've got some good news and some bad news. The good news is that our scrappy space start-up just won a very lucrative contract to build and maintain a fleet of sensors on Mars!!! The bad news is that virtually all of our planned budget will be needed to actually launch and land the devices on the Red Planet. We've been tasked with building out a device management and data collection system on the cheap. The requirements are:
- Upon request, the device will need to capture a picture, collect environmental readings and store the results on the cloud
- Since data connections to Mars are not very stable, the solution will need to accommodate intermittent connectivity
- Must be self-powered
Ok, ok...now before all you space buffs start picking apart this premise, I'm going to ask you to suspend disbelief for a little while. Yes, I'm sure space radiation would ravage our off-the-shelf components and while I'll be using an cellular modem for connectivity, I'm quite sure there's not an 5G data network on Mars yet. Heck, we're not really a scrappy space start-up are we? But remember when we were a kids and played make-believe? Anything could happen in our imagination. Let's go back to that place for a little while.
The Architecture
For our architecture, we're going to use AWS Greengrass as our control plane and data plane. We'll outfit our Raspberry Pi (or our fake Pi EC2 instance) with the needed components to turn them into what Greengrass calls Core Devices. Core devices can act as data collection points themselves and they can also act as local proxies for other devices...sort of like a collection point or gateway back to Greengrass.
To communicate with our Core devices, we're going to use MQTT. MQTT is a lightweight messaging protocol used widely in IoT applications. If you're familiar with other message queueing design patterns, you'll be right at home with MQTT. It's queues are called topics and devices can subscribe and publish to topics to send and receive messages. This is how we will send instructions to our sensor and get a response back. We're also going to have our device upload the captured image to an S3 bucket.

Faking It with EC2
Let's get started. This project will be done two ways...the first part will be with an EC2 instance for those who don't have a Raspberry Pi. The second way will be with a Raspberry Pi Zero. For the EC2 version, we'll be using an T4g.nano ARM64 instance with a Debian 10 which is a reasonable stand-in for a Raspberry Pi 3 or 4. For the Raspberry Pi Zero, it uses an AMR6 architecture with a very small memory footprint, so it's going to require a little special treatment.
Getting our FakePi Ready
We can start by launching an T4g.nano EC2 instance and SSH into that instance. Do note that admin is the default user account for the Debian 10 AMI instead of ec2-user or ubuntu user that you might be used to. After you're in, do some updates and install some dependencies that we'll need.
$ sudo apt update && sudo apt upgrade -y && sudo reboot
$ sudo apt install unzip default-jdk-headless python3-pip cmake -y
Greengrass Prep Work
While that's installing, lets go do some other work.
- Create an S3 bucket. This bucket will be used for hosting our greengrass custom component artifacts as well as our data that our probe captures. Note: Be sure to create the bucket in the same region as you plan to use Greengrass...you'll save yourself some trouble-shooting.
- Create an IAM policy for boot-strapping. Since we're going to use the auto-provisioning feature of Greengrass, we need to create a policy which will allow our devices enough access to provision themselves. I'll call this policy
customGreengrassProvisionPolicy and we need to use the minimal permissions required in the AWS documentation. - Create an IAM policy to allow access to our S3 bucket. As we'll need our devices to get and put from our S3 bucket created above, we'll need to explicitly grant that permission to a Greengrass IAM role that will get created during the provisioning process. I'll call this policy
customGreengrassS3Access
{
    "Version": "2012-10-17",
    "Statement": [
        {
            "Effect": "Allow",
            "Action": [
                "s3:GetObject",
                "s3:PutObject",
                "s3:PutObjectAcl"
            ],
            "Resource": "arn:aws:s3:::_your_bucket_here_/*"
        }
    ]
}
- Create an IAM user account that will be used for auto-provisioning. We really just need the Access Key and Secret for this user account so save those for later use. We also need to assign the
customGreengrassProvisionPolicy that we created above to this user account.
Ready to Get Greengrass-ed
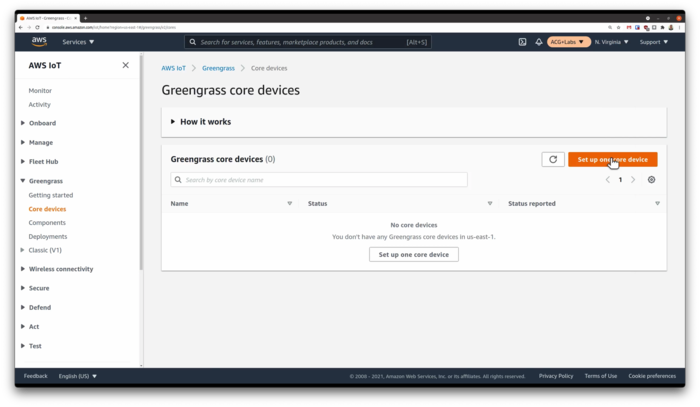
By this time, your EC2 instance should be ready to go. SSH back into the system if you're not already. From the AWS console, navigate to AWS IoT and then to the Greengrass section. Select Core devices then Setup one core device
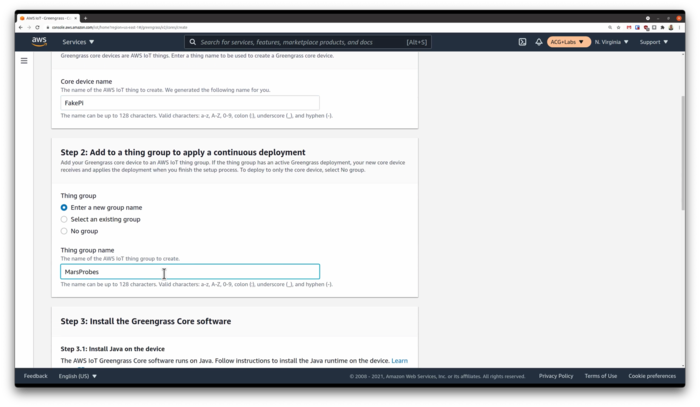
We're then presented with a setup screen. Add our intended device name and we can select an existing device group, create a new group or not assign this device to a group. We'll call our device FakePi and create a group called MarsProbes. The Group is important in that we can deploy components to the group and everything in that group gets the same deployments...which is pretty handy if you're dealing with thousands of devices.
The console will generate two command lines for you...one to download and upzip the Greengrass Core elements and the other to install and provision the device. Ultimately, we'll just copy and paste these command lines into our instance and execute. Before we do that, we need enable our instance to reach out and do stuff within AWS. Here's where the access key and secret from our GreengrassBootstrap user come into play.
Now, AWS will tell you the better way would be to use STS to generate temporary credentials and assume the Provisioning role we setup. Or, you can just directly set them as environment variables like I do below... In the end, you just want to get an access key and secret that you can export as environment variables. These won't be saved by the Greengrass install and will go away on the next logout or reboot so this is a pretty low risk activity.
$ export AWS_ACCESS_KEY_ID     = _your_access_key_from_the_GreengrassBootstrap_user
$ export AWS_SECRET_ACCESS_KEY = _your_secret_from_the_GreengrassBootstrap_user
Copy and paste both lines and execute. After Greengrass installs, you should see it show up in the console under the Greengrass Core Devices after a few minutes. You now officially have a Greengrass IoT Core device connected to AWS.
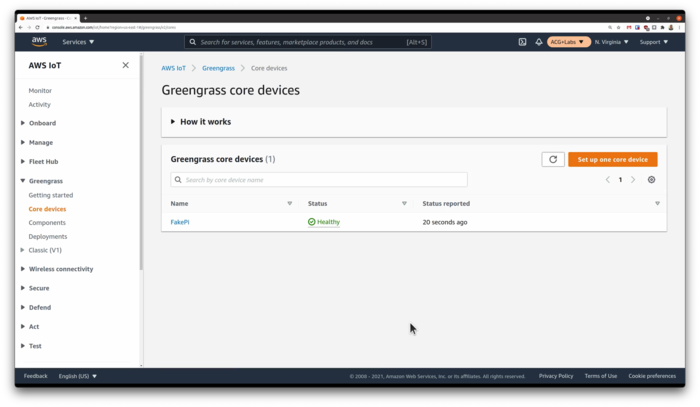
Our First Deployment
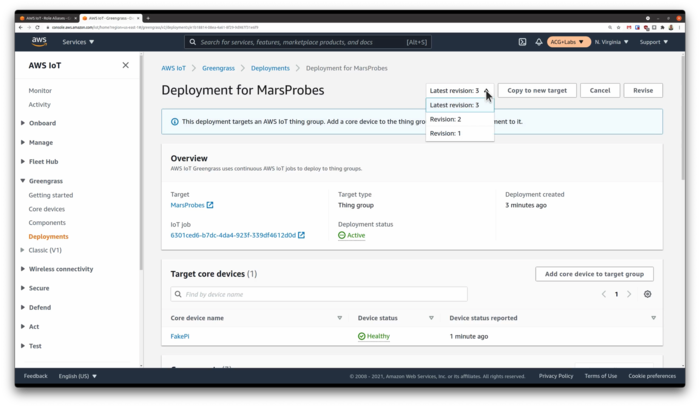
Now, because our device is pretty light on RAM, we're going to need to tweak the default Greengrass settings to let it run a little smoother. You can skip this step, but you might run into lots of swapping when the meager memory is used up by the JVM, which slows things way down. To make this adjustment, we need to revise our deployment such that it that sends a specific JVM configuration to the device. The component that we'll be setting is called aws.greengrass.Nucleus. From the Greengrass Console, let's select Deployments then select the deployment that contains our device...Deployment for MarsProbes in our case.
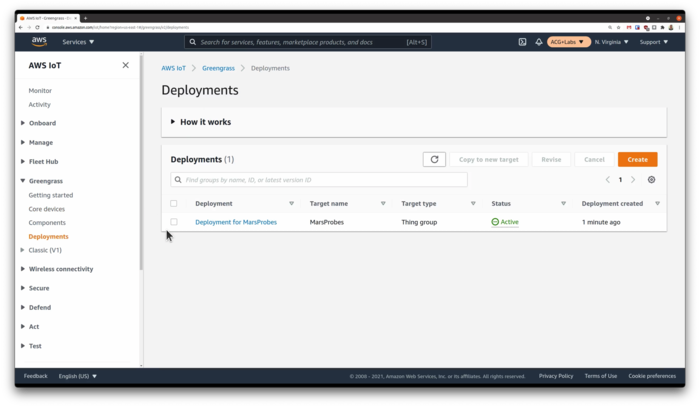
Once in the deployment, click Revise. Once in the Revise Deployment wizard, click Next to get to the Select Components screen. We're going to customize this deployment by going to the Public Components list and searching for the aws.greengrass.Nucleus component and checking it. Proceeding to Step 3 of the Revise Deployment wizard, we select the radio button beside aws.greengrass.Nucleus and click Configure component
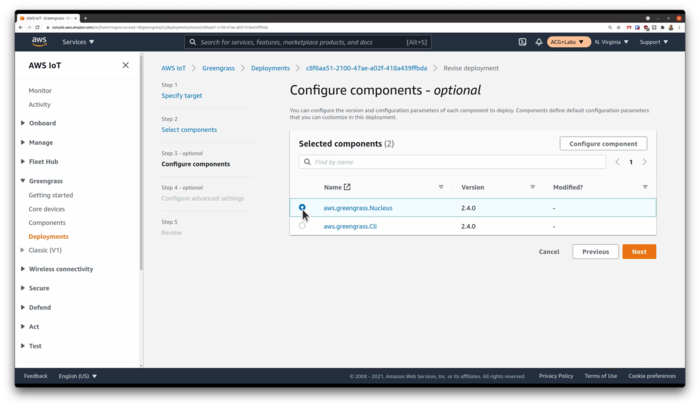
You'll be presented with a screen where we can merge custom configuration with the AWS-provided Public Components. You'll see on the left side of the screen is the default configuration. We need to add in some extra JVM options that we'll paste in the right side of the screen. This bit of config is the recommended configuration for a reduced memory footprint. The AWS docs do have an absolute minimum version but I ran into errors when I tried using that version. This reduced config seems to work nicely. Copy and paste the reduced memory allocation settings into the Configuration to merge section.
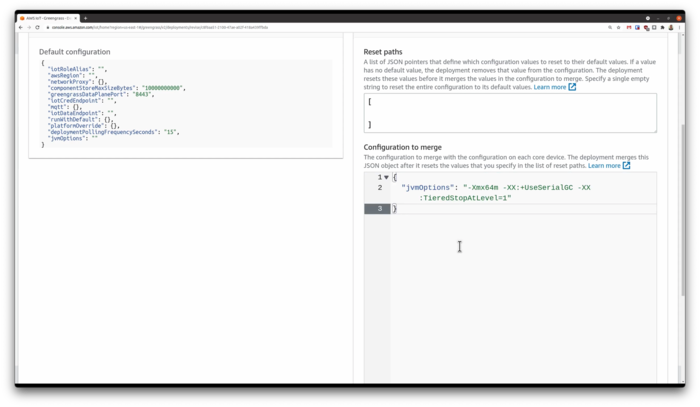
Continue through the wizard until you reach the Deployment screen and then click Deploy. Greengrass will immediately begin deploying the config change to your Greengrass devices...or device in our case. You can monitor the progress of the deployment in the console or on the device by watching the Java processes in top or you also can watch the Greengrass logs.
$ sudo tail -F /greengrass/v2/logs/greengrass.log
After things appear to quiet down in the log activity and our deployment status changes to Completed on the Deployment console page, we've deployed the new memory settings. Now, just for good measure, I prefer to reboot my device after that memory change. I have seen cases where the change didn't take effect, even after restarting the greengrass service. Rebooting seems to do the trick.
Our First (Custom) Deployment
Next, we are ready to build our custom component. For this EC2 example, I created a simple Python program artifacts/simpleSubPub/1.0.0/simpleSubPub.py that uses the AWS IoT SDK to listen to a topic and respond when something appears on that topic. A Greengrass component as two parts--the artifacts and the recipe. The artifact is the actual code and any associated libraries. The recipe is constructed in either JSON or YAML and describes all the dependencies, access and artifacts that our component needs to install and launch.
I put lots of comments in the simpleSubPub.py program so I'm not going to step through it here. One thing to note is the folder and naming convention--it's apparently important to follow the format of artifacts/componentName/componentVersion/. AWS has documented the recipe format but do take a moment to step through the recipes/simpleSubPub-1.0.0.json file to become familiar with the parts.
In the recipe, the Lifecycle section deserves a little attention. This section will tell Greengrass what to do to install and run our Python code. In our case, we need to use PIP to install some dependencies and the Run attribute contains our shell command to get our program kicked off. Notice the --user parameter on PIP and the -u on the python shell command... Our Greengrass processes will run as a special greengrass user account created during provisioning--ggc_user. We want to be sure that the dependencies and Python is being run within the scope of that user. This is important to note when troubleshooting...you might need to add that ggc_user to local device groups or grant certain filesystem privileges. There is a way to have Greengrass run the components as root, but that's generally a bad idea and violates the Principle of Least Privilege.
We now need to copy our artifacts (i.e. our simpleSubPub.py file) out to our S3 bucket. We can do that via the console or via the AWS CLI, which would look something like this:
$ aws s3 cp --recursive (local-path-to-repo)/artifacts/ s3:
If we had more items than just our single Python file, we would need to zip them up into an archive and copy that archive file to S3 into the proper location given the required naming and directory conventions. Do note that using an archive file requires a slightly different format for the Manifests section in the recipe and this is covered in the AWS documentation.
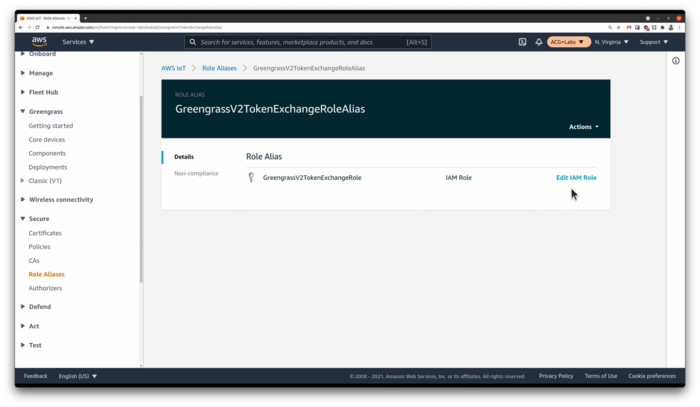
Once we have our artifacts copied out to S3, we need to be sure that our Greengrass processes can actually reach the S3 bucket to pull down the artifacts upon deployment. We can do this by adding our customGreengrassS3Access policy that we created earlier a role that was created for us upon provisioning for use by the Greengrass devices--the GreengrassV2TokenExchangeRoleAlias role. The devices don't use this role directly, but rather the aws.greengrass.TokenExchangeService that you might have noticed as a dependency in the recipe uses the role to generate temporary tokens for our devices to access AWS services. What we put in that GreengrassV2TokenExchangeRoleAlias role determines what on AWS our devices will be able to access.
From the AWS IoT console, we can go under Security and then Role Aliases. We should see the GreengrassV2TokenExchangeRoleAlias role. Clicking into that role, we will get to a screen that will take us to IAM so we can edit that role. We would just attach the customGreengrassS3Access policy to that role and now our devices can read and write to our S3 bucket.
Now everything is in place. From the Greengrass console, select Components and Create Component. Here's where we paste in our JSON or YAML recipe we just created. Our JSON file should contain everything AWS needs to get your component ready for deployment. We can then click Deploy and we're asked if we want to add this to an existing deployment or create a new one. Let's just add it to our existing one. Proceeding through the screens, we'll then see our new component under My Components and our existing customized Nucleus component under Public components. We want to leave that one checked, otherwise, Greengrass will think we want to remove Nucleus from the core device which would be bad. Next next next, then Deploy.
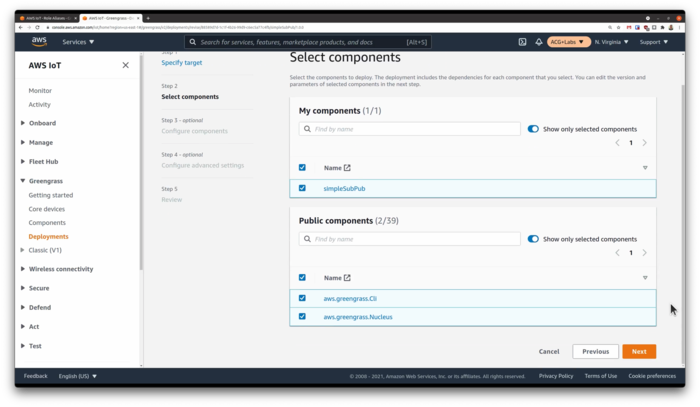
Same scenario as last time...you can watch the deployment from the greengrass.log, and also watch the component being deployed by watching the simpleSubPub.log file that gets created as soon as the deployment is far enough along.
$ sudo tail -F /greengrass/v2/logs/simpleSubPub.log
If you go into your deployment, you'll notice that they also has versions. You can revise deployments to set new parameters or customizations or you can add and remove components. If I wanted to remove the simplePubSub component, I could just revise my deployment and uncheck that component. It would then be removed. Now, what happens if your device is offline? Well, that's a strength of greengrass...it's designed to work with devices that have intermittent connection. The next time your device gets connected to AWS, it will receive it's set of instructions and do what it needs to do. You can test this by stopping your EC2 instance, setting up a deployment, then starting it back up at sometime in the future. Same thing goes of MQTT message as we'll see later with our Pi Zero path.
We Faked It...Did We Make It?
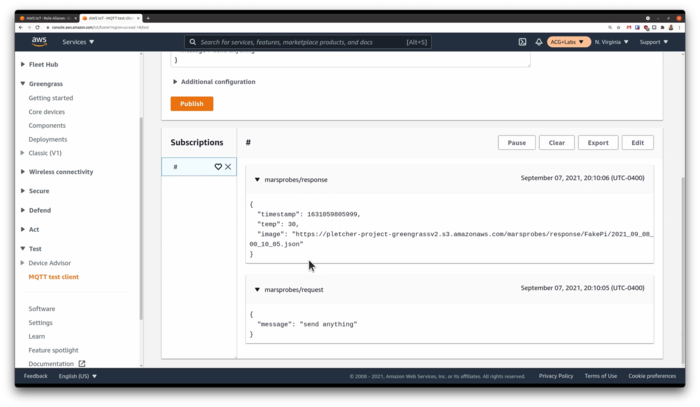
Once things calm down on the device and your Deployment console page reflects the deployment as Complete, we're ready to test things out. (Note: I have seen cases where the deployment gets stuck in Active despite all indications seem to point to a completed successful deployment. I just ignored these situations and carried on.) From the IoT Console, we can go to the Test section and click on the MQTT Test Client. First, let's subscribe to some topics...how about all topics so we can see everything. We just enter # in the topic filter. Now, we can send a message to the topic that our Python code is listening on...on the Publish to a topic tab we enter marsprobes/request and enter some message. If everything is working correctly, we'll get a response back with a URL to a file the component placed out on S3. High Fives all around!
What Next?
You're ready to move right on to Part 2 if you'd like the full Pi experience. For a video version of this complete tutorial, do head on over to A Cloud Guru's ACG Projects page. Accessing the videos does require a free account, but with that free account, you'll also get select free courses each month and other nice perks....for FREE!
