In this article, we are going to configure Microsoft SQL Server Reporting Services on the Windows machine.
What is SQL Server Reporting Services (SSRS)?
SQL Server Reporting Services (SSRS) provides a set of on-premises tools and services that create, deploy, and manage reports. You can design reports using data, tables, graphs, charts, and images. You can easily deploy reports on the local or remote server.
Pre-requisites
- Microsoft SQL Server installed on the machine (please check my article to install SQL Server here).
- Configure Named Pipe and TCP/IP Settings if your SQL Server Database Engine Instance is hosted on another machine (please check my article here).
Install SQL Server Reporting Services (SSRS)
Let us install and configure SQL Server Reporting Services on the local machine.
Step 1
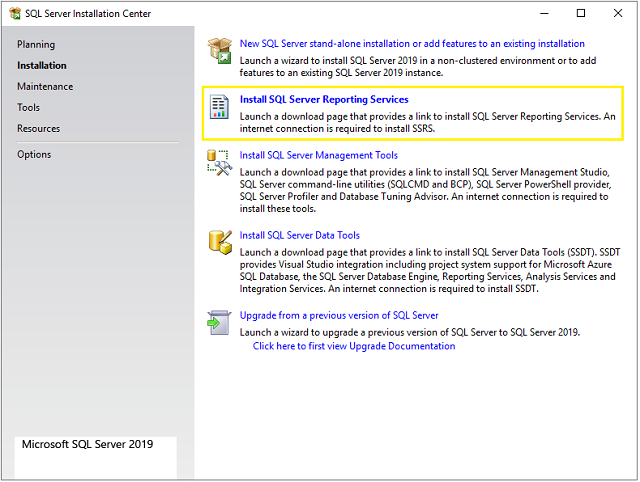
Let us first download installation media for SSRS. To download compatible installation media, first run SQL Server Setup as shown in this article. Go to the Install SQL Server 2019 Developer Edition section of the article and follow steps 1 and 2. You will see the below screen. Now click on the Install SQL Server Reporting Services link and it will launch a download page for SSRS. Download installation media for SSRS report from that page.

Step 2
Now double click and run the downloaded installation media. You will see the below screen. Click on the Install Reporting Services button.

Step 3
Next, you will see the below screen. Choose Express or Developer edition from Choose a free edition dropdown and click on the Next button.

Step 4
On the next screen, simply accept the license terms and click on the Next button.

Step 5
Now Install Reporting Services only option is already selected so just click on the Next button.

Step 6
Choose the installation location of your choice. I will go with the default location. Click on the Install button.

Step 7
It will start the installation of SSRS which will take some time.

Step 8
Once the installation is finished, click on the Configure report server button, or if you want to install it later, simply click on the Close button.

Great! We have successfully installed SQL Server Reporting Services. I recommend restarting your machine before configuring it.
Configure SQL Server Reporting Services
Now that you have installed SQL Server Reporting Services, let us configure it.
Step 1
Open Report Server Configuration Manager from the Start menu.

Step 2
Next, you will see the configuration wizard. First, you need to connect an SQL server instance for which you want to configure SSRS. Select an instance and click on the Connect button.

Step 3
Next click on the Service Account tab from the left panel. You will see the service account configuration window. Specify windows account to run the report server service. I recommend creating a new dedicated user with administrator privileges for this. I have created one with the name ReportAdmin. Enter your account and password and click on Apply button. It will configure the service account.

Step 4
Next click on the Web Service URL tab from the left panel. Here, you can configure the report server URL. We will use this URL to deploy SSRS reports on the report server. You can also configure ports (80 or 443 (SSL)) on which the report server will host. It will preview URLs in the bottom section. I will go with default settings. Click on the Apply button and it will configure the report server web service URL.

Step 5
Next click on the Database tab from the left panel. Here, we will configure the database for the report server. Click on the Change Database button.

Step 6
You will see Report Server Database Configuration Wizard. We are going to create a new database but if you have already an existing database for the report server, you can also configure it. For now, I will create a new report server database. Select the first option and click Next.

Step 7
Now specify details to connect SQL Server Instance on which you want to create report server database. I will go with my local instance and use SQL Server Account authentication. Click the Test Connection button. If the connection is successful, click on Next.

Step 8
Now specify the database name and click Next.

Step 9
Now specify the credentials to connect to the report server database. I will again use SQL Server authentication. Click Next.

Step 10
Next, you will see a summary of your selected settings. Verify and click on Next.

Step 11
It will configure the report server database. After all the steps are executed successfully, click Finish.

Step 12
Click on the Apply button to finalize the Database configurations.

Step 13
Next click on the Web Portal URL tab from the left panel. Here you can configure the web portal URL. We will use this URL to manage SSRS reports, data sources, report parameters, etc. It will preview URLs in the bottom section. I will go with default settings. Click on the Apply button and it will configure the report server web portal URL.

Step 14
Now open the browser and enter the URL you configured in the Web Service URL section in step 4 (in my case http://cloud-desire-01/ReportServer). You should see the below web page which shows the report server name and SSRS version information.

Step 15
Now open another browser window and enter the URL you configured in the Web Portal URL section in step 13 (in my case http://cloud-desire-01/Reports). You should see below web page which shows the web portal for SSRS.

Excellent! We have successfully configured SQL Server Reporting Services. Now you can deploy reports and data sources using Visual Studio or Report Builder tool.
Conclusion
As you can see, it is very easy to configure SQL Server Reporting Services if you follow the above steps accurately.
History
- 30th October, 2021: Initial version
