Unit testing your Web Service API should be just that: unit testing your API. With the wrong approach, though, API testing can take over your whole testing plan. A great unit testing strategy makes sure of two things: You create good tests and you just test your API.
"Testing code" is normally organized into a path that begins with unit testing, continues on to integration/end-to-end testing, finishing up with user acceptance testing. At the start of that path, unit testing does two things—it confirms:
- That the "code under test" (CUT) does the right thing when fed its inputs
- The CUT passes off the right data to whatever comes next in the processing chain
After that, you move on to integration testing where you confirm that the "passing off" works correctly (presumably only after unit testing "the next thing in the processing chain" to confirm that it does its job correctly).
With APIs, unit testing can be where the wheels fall off this plan. Because APIs are an interface to a processing chain, it’s easy to confuse unit testing an API with integration testing of that whole processing chain. An effective API testing strategy prevents that from happening.
To demonstrate how to effectively manage your API testing, I’m going to walk through an API unit testing strategy (using [Telerik Test Studio for APIs) to demonstrate what that an effective API strategy looks like in real-life terms.
API Unit Tests
Like any other set of tests, API testing follows the Arrange-Act-Assert pattern. However, unlike other tests, you can begin testing your Web Service API without writing any code—with Azure’s API Management service, for example you can define your API without writing any code at all. You begin your API testing, therefore, with the URLs that make up your API, not with your code.
Arrange
The URLs that make up a RESTful service’s API typically share a base, with all requests to the service use variations on that base. These two URLs, for example, might support all the basic CRUD operations on a customer service:
- http://customers: Retrieve all customers; add a customer with the system supplying the customer id
- http://customers/A123: Retrieve, update or delete a customer; add a customer, specifying the customer id (customer "A123," in this example)
For this case study I’ll use http://customers as my base URL. Test Studio for APIs supports that design by creating a project-level variable (called, by convention, base-url—though you can call the variable anything you want). This means that the two URLs I need to use for my basic CRUD operations look like this (Test Studio for APIs uses double French braces to mark variables in a test):
- {{base-uri}}: Retrieve all customers; add a customer with the system supplying the customer Id
- {{base-uri}}/A123: Retrieve, update or delete a customer; add a customer specifying the customer id
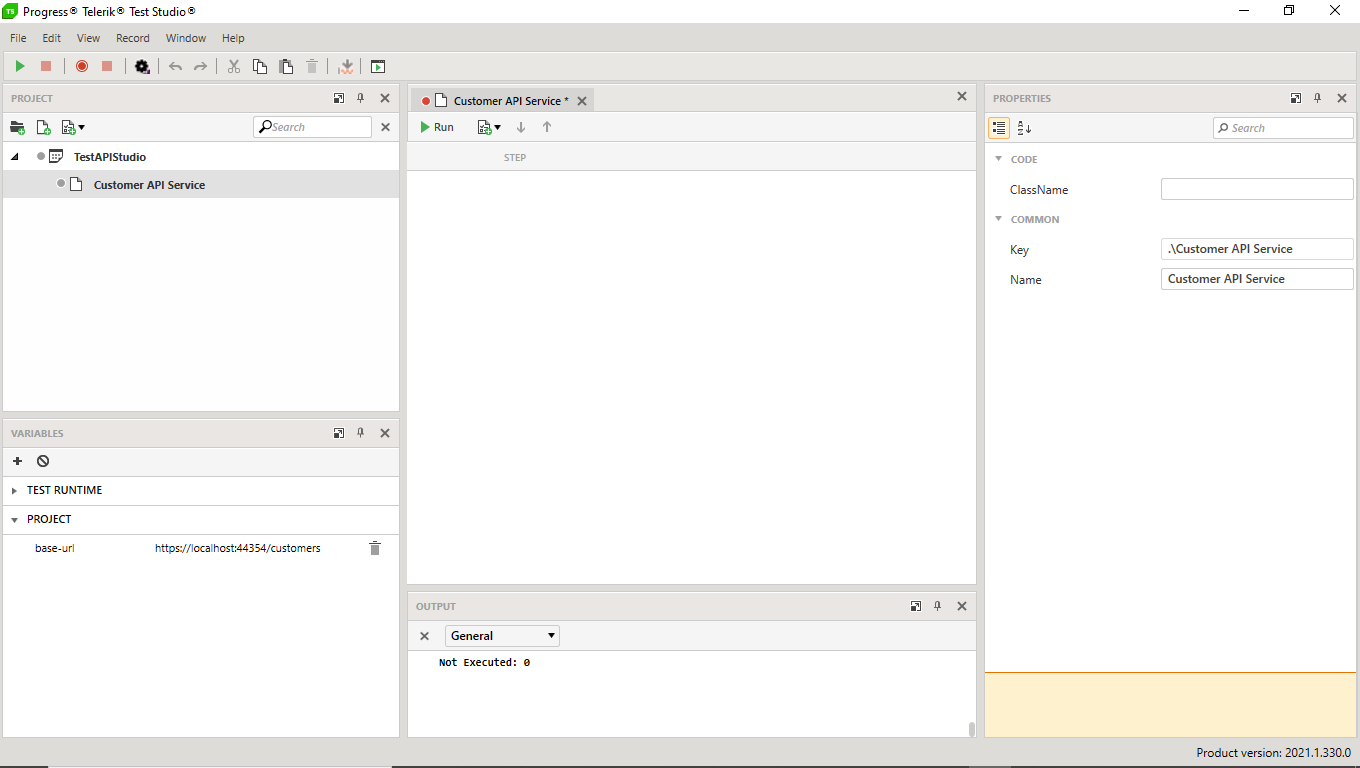
Setting up my project and creating my first test with its base URL looks something like this in Test Studio for APIs:
Act
The Act phase of an API test consists of issuing an HTTP request using the base URL, an HTTP verb (GET, POST, etc.) and, potentially, some values in the request body and/or header.
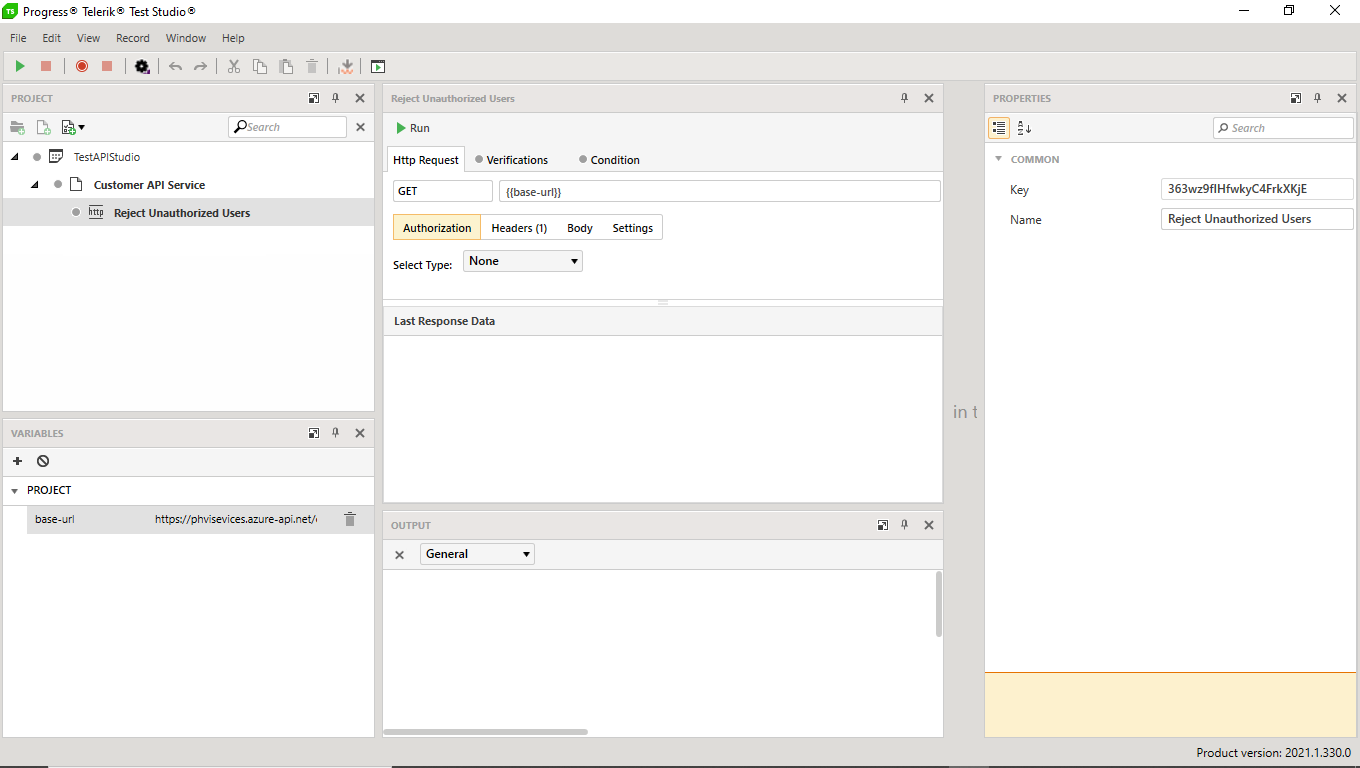
The obvious first test is a simple GET request with the base URL (a "get all customers" request in my customer service). To implement this first test in Test Studio for APIs, I would add an HTTP Request step to my project with its verb set to GET and its URL set to just the base-url variable. That first test looks something like this:
Assert
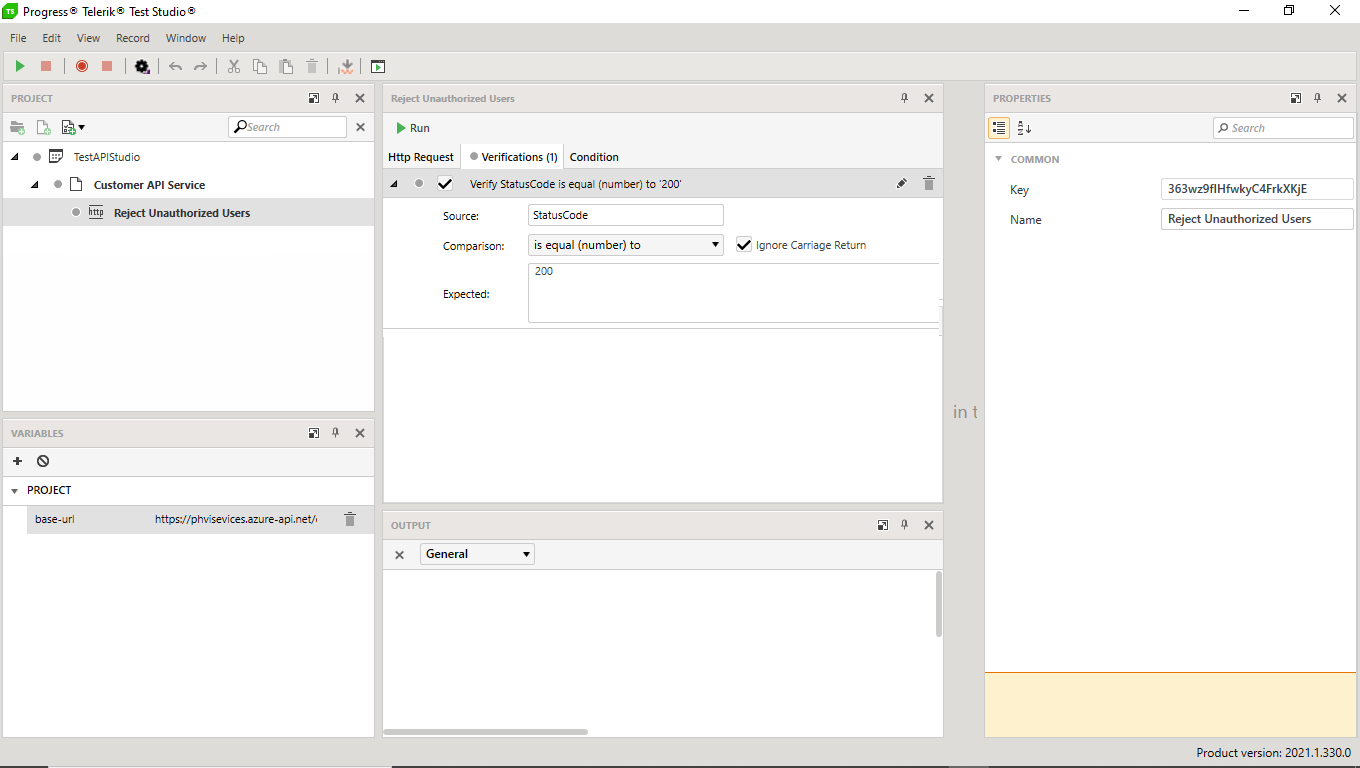
For a RESTful API test, the Assert phase begins with checking the HTTP response’s status code. In addition (if it makes a difference to the application), you can check the values in the response’s body or headers. In Test Studio for APIs, I use the settings in the verification tab for an HTTP request to check my results. At this point (remembering that there is no code associated with this API), I just want to check that the status code in the response is equal to 200:
Since the service isn’t even created yet, running this test may seem dumb. However, if I run this test and it succeeds, then I know that I have a useless test: It can’t detect failure. Running the test now is a quick and easy check on the quality of my test. Besides, in Test Studio for APIs, it’s easy to run the test: Just click the Run button.
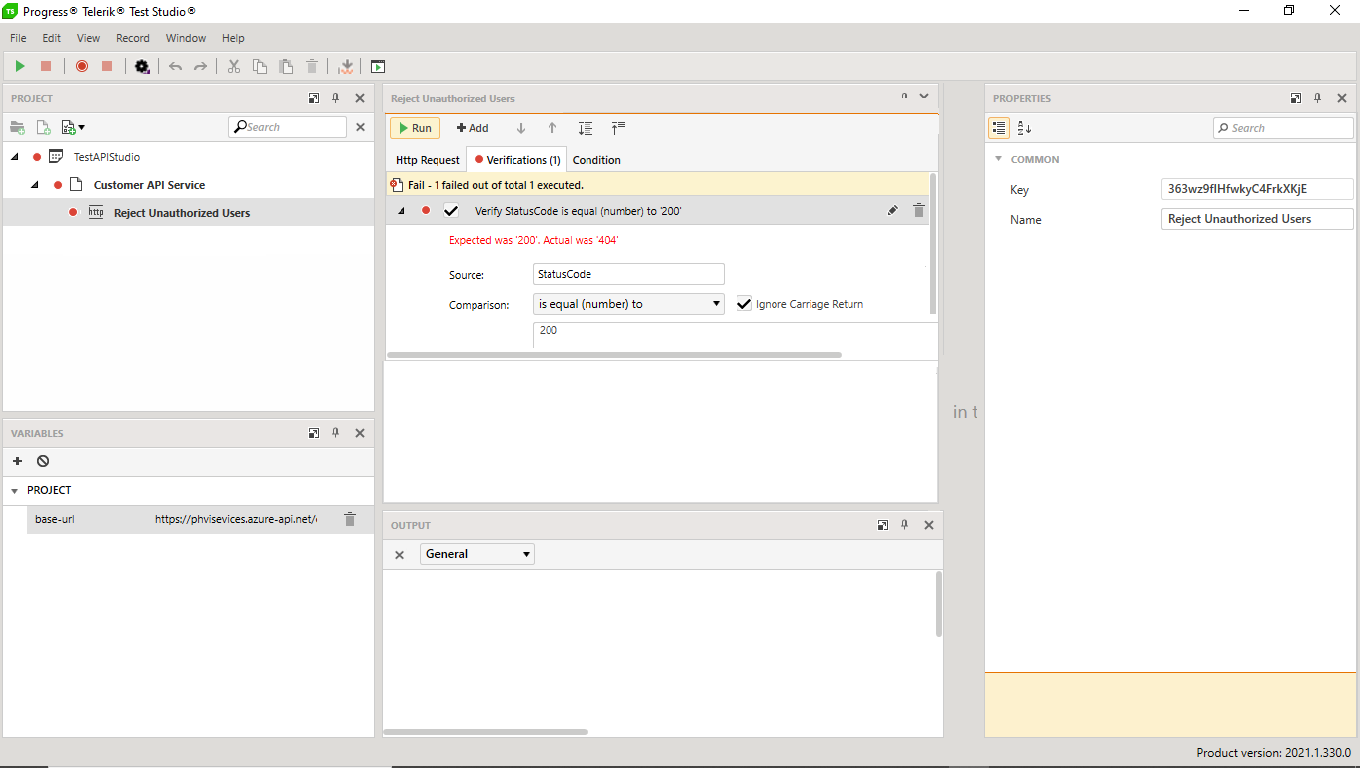
I do that and the test, not surprisingly, fails. Test Studio for APIs displays the traditional red stoplight icon beside the failing step, test and project:
Eventually, this test will become something useful (that’s the reason it has the name "Reject Unauthorized Users"). Right now, though, I’ve proved this test can distinguish between success and failure.
Testing Authentication
The next step is to start writing the API. That will vary depending on the development platform you’re using to build the service: With ASP.NET/ASP.NET Core/.NET, that next step will consist of creating controllers…but that’s all I’ll do. I won’t put any code in the controller’s methods beyond what’s required to get those controllers to compile (that may just be return statement that hands back a 200 status code). With Azure’s API Management, I’ll define the API and, perhaps, return a mock result using an inbound policy.
I don’t need any code at this point because all I want to test for is whether I can successfully access my API. To put it more precisely: This where I find out if I’m handling authentication correctly. Assuming my API has authentication/authorization in place (and it should), when I re-run my test, I should now get back a 401 Unauthorized status code.
At this point, then, in Test Studio for APIs, I update the status code on the verification tab to 401 so that rejection shows up as "passing the test." When I re-run my test now, I’ve proved that my service rejects unauthorized users.
Which leads to the obvious second test: Can authorized users access the service? If I’m using Basic authentication, Test Studio for APIs will, given a username and password, generate authentication headers (alternatively, it will generate a client id and secret to support OAuth).
Here’s a simpler example than those two that incorporates a basic subscription-type header into the request I’ll use for my second test:
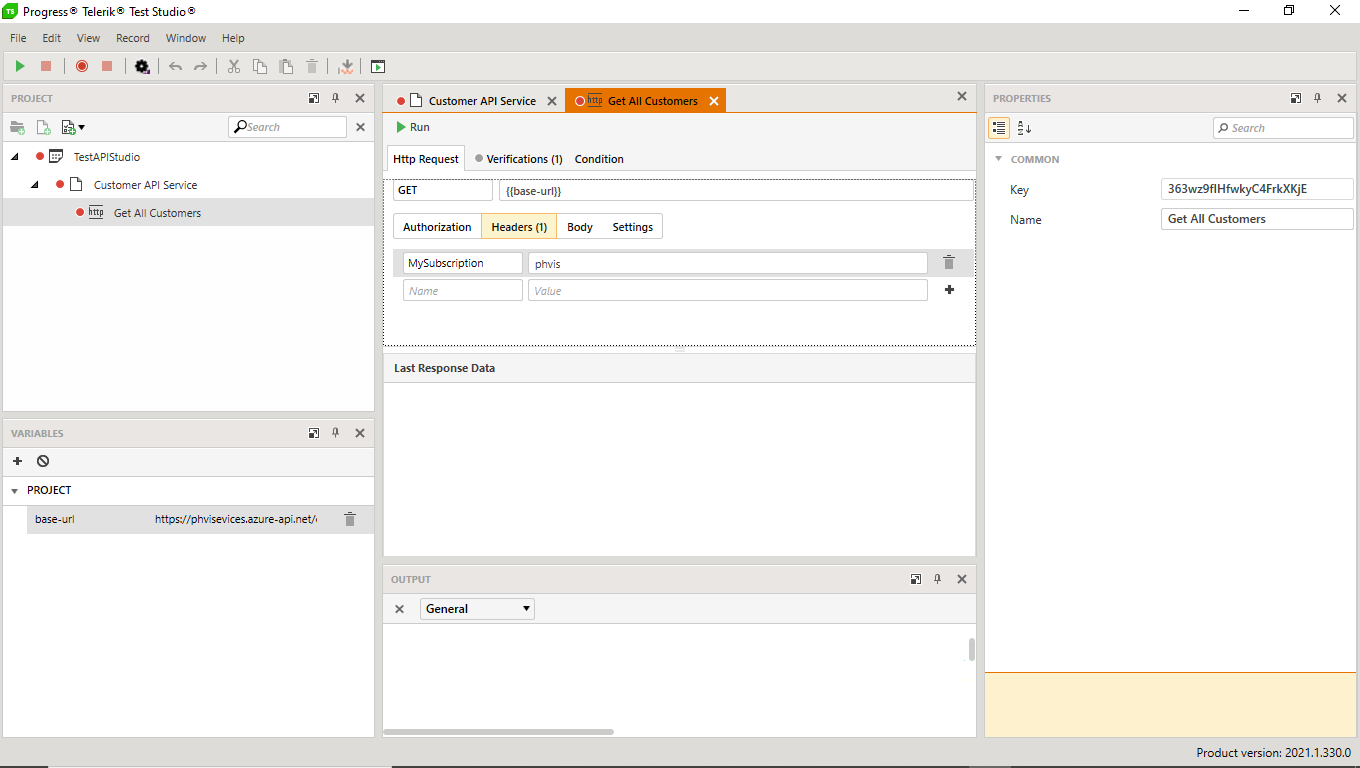
Now I’ll check for a status code that indicates that my request actually reached the service. The status code you get will vary depending on what tool you’re using to create your Web Service (an ASP.NET Web Service will return 200, for example). If you’re using Azure’s API Management and don’t set up an inbound policy, you’ll get a 500 status code because there’s no actual code hooked up to the service.
I can now prove that clients that don’t provide authentication can’t access my service and clients with appropriate authentication can. This is reassuring to know.
And, now, I’ll need to start writing some more code to implement my API. That’s because the next step in testing my API is to add tests to prove that authorized requests that aren’t valid (i.e., aren’t supported by the API) are rejected: A read-only service should reject update requests; requests with malformed URLs or badly formatted payloads should also be rejected.
My goal here is narrow, though: I just want prove my API returns the appropriate message for invalid requests and an "appropriate-looking" payload for valid requests (Test Studio for APIs lets me check the payloads being returned using both JSON paths and XPath). I don’t need the service to return a "real result."
This also means that I need both valid and invalid payloads to send to my API. OpenAPI based tools like Swagger can be helpful here in generating sample payloads to send to my service. A JSON Schema that describes expected response can also be useful here to validate the format of what’s returned from my API (in Test Studio for APIs, coded steps will let me leverage JSON schemas to validate my requests and responses).
Testing Interfaces
What I don’t want to do is test the API’s actual functionality. An API generally exists for one of four purposes:
- Call methods on some objects
- Write an item to a queue
- Raise an event
- Call another API
None of those are the responsibility of my API. When I’m testing my API, I just want to confirm that valid requests are accepted and invalid requests rejected (with the right message). At most, I want to ensure that a valid request generates a correctly formatted result.
At most, if the code behind my API code calls objects, I’ll create mock objects (in the Telerik world, I would use JustMock) to confirm that my API:
- Makes the right calls in the right order
- Passes any parameters it receives to those objects
- Properly formats/logs responses (including exceptions)
For a service that writes to a queue or raises an event, I’ll confirm that my API:
- Raises the right event
- Write the right data to the right queue
- Reports errors in raising events or writing to queues correctly
- Is backward-compatible with events raised or queue message written in the past
In Test Studio for APIs, I would use coded steps to check for those conditions.
It’s not, however, the responsibility of the API test to confirm the code behind the API (or any process triggered by the API) is working correctly. Someone should be unit testing those objects or processes independently of my API test.
More correctly, if the code behind my API raises an event or writes to a queue, there could be a potentially infinite number of processes reading from those queues or responding to those events (and I might not even be aware of all of those processes). Since I can’t possibly ensure that processes I don’t even know about are doing the "right" thing in my API test, I should give up on that idea early.
Integration Testing
Eventually, of course, we do have to prove that the business transaction my API is part of can be completed correctly—all the way from the client, through my API, and on to any backend processes. This is why we have integration and end-to-end testing.
That could involve returning to my API testing as part of my integration testing. For integration testing, I’ll need to create more complicated tests that, for example, wait for the whole processes to complete before checking results. In Test Studio for APIs, I can create multiple-step tests that include a Wait step to pause before checking to for the expected result. As my API tests proliferate and become more complex, I’ll need to start organizing those tests (in addition to letting me create dedicated test projects, Test Studio for APIs, for example, lets me set up folders to organize tests within projects).
Or I might not return to my API testing: I might begin my integration/end-to-end/user acceptance tests with the clients that call my API (in that case, I’ll use a tool like Test Studio. Either way, my focus and intent (and the content of my tests) is very different from what I’m doing when unit testing my API.
The only way to keep your API testing from expanding without end is to recognize when you’re doing unit testing and when you’re doing integration/end-to-end/user acceptance testing. The key thing to remember is that unit testing your API means just testing the API—not everything that goes on behind it
