Guess what do these assembly instructions with the same source and destination operands do?
Introduction
Today’s article is a fun quiz guessing what these 3 Intel x86 assembly instructions below actually do. These are the assembly instructions generated by the Visual C++ compiler. I came across these instructions in the code listing while learning windows debugger. In this article, let me tell you upfront that you will not learn something useful or be a better assembly coder. They are just interesting x86 trivia. For the purpose of the quiz, assume they are 32-bit (x86) instructions.
XOR EAX, EAX
For our first question, the instruction is bitwise exclusive OR operation with both operands and assigning the result to the destination operand. For the MASM and Intel format, the left operand is the destination operand while the right is the source operand. In the AT&T format, they are flipped. In our case, it does not matter which format we use because the operand is the same register. Since this article is based on Visual C++, which uses MASM, you can assume MASM/Intel format. Intel instruction set requires that one operand be a register type, so we cannot have both memory operands.
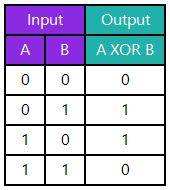
Take a moment to guess what it accomplishes? To help you with guessing the answer, here is the truth table of XOR.

Answer: It zeroes out the register! The Visual C++ optimizer generates this code because this operation is faster than moving a literal zero to the register.
TEST EBX, EBX
For our second question is the TEST instruction does a bitwise AND operation with both operands. The flags SF, ZF, PF are modified while the result of the AND is discarded. The OF and CF flags are set to 0, while AF flag is undefined. Then a conditional jump instruction is called based on the flags.
Guess what it accomplishes? To help you guess the answer, I present you the truth table of bitwise AND.

Answer: It is testing whether the operand is zero. JZ or JNZ follows after that.
MOV EDI, EDI
For the third question is MOV instruction moves the value of the source operand to the destination operand. When you Google it, you'll get many results to this useless instruction that appears at the beginning of every Windows API on 32-bit Windows. Guess what it accomplishes?
Answer: Nothing. It’s for hot patching use. During hot patching, this two-byte instruction is replaced with a two-byte short jump instruction with a range of -128 to 127. If the address of the patched function is farther than 127 bytes, this is useless. The space before a function is filled with a series of NOP (no operation) instructions. So the short jump instruction is to that location and from there onwards, do a long jump to the hot patched function.
I do not take words at face value. I have to find out for myself by making Visual C++ generate that MOV instruction. Follow these steps. Create a new Visual C++ console project named Test with the code below. Or you can download the sample project at the top of the article.
#include <cstdio>

int my_func(int n)
{
    n += 2;
    return n;
}

int main()
{
    int n = 10;
    n = my_func(n);
    printf("Value: %d\n", n);
}
To set up your Visual C++ to generate assembly, go to Project Properties -> Configuration Properties -> C/C++ -> Output Files -> Assembler Output and select "Assembly With Source Code (/FAs)".

To set up your Visual C++ to generate hotpatch instruction, go to Project Properties -> Configuration Properties -> C/C++ -> Command Line and add "/hotpatch" in Additional Options in x86/Win32 platform. Under x64 platform, hotpatch is the default without specifying. However, I cannot get Visual C++ to generate the hotpatch instruction for x64 platform. Drop me a comment below if you know what is going on.

To set up your Visual C++ to generate NOP instructions before the function, go to Project Properties -> Configuration Properties -> Linker -> Command Line and add "/FUNCTIONPADMIN" in Additional Options. This step is optional. But we are interested in what type of NOP instruction is generated.

Then build your project under x86/Win32 platform. In the Release folder, view Test.asm with your favorite text editor or Visual Studio.
?my_func@@YAHH@Z PROC
npad 2
push ebp
mov ebp, esp
mov eax, DWORD PTR _n$[ebp]
add eax, 2
mov DWORD PTR _n$[ebp], eax
mov eax, DWORD PTR _n$[ebp]
pop ebp
ret 0
?my_func@@YAHH@Z ENDP
NPAD is not a valid Intel x86 assembly instruction. Fire up Windows Debugger to open the Test.exe and use this command uf Test!my_func to unassemble my_func in the command window.

Instead of mov edi, edi, xchg ax, ax is the first instruction of my_func which occupied two bytes and is equivalent to “doing nothing”. NPAD 2 seems like a directive to the linker to pad the function with two-byte instruction.
Use this WinDbg command ub Test!my_func to unassemble my_func backward in the command window to show the instructions before my_func.

The eight padded CC instruction is called interrupt 3 which is DebugBreak. If a debugger is attached to the process, it will break as if a breakpoint reached. If no debugger is present, it is effectively a NOP. The space between functions is no man’s land, meaning no process shall execute those CC instructions.
I hope you have fun guessing what the instructions do, as much as I had fun researching/writing this article.
References
History
- 5th December 2021: First release
