This is Part 1 of a 3-part series that explores how to give our enterprise Java + Spring applications identities of their own via Azure AD managed identities. In this article, you will learn how to use the Azure Cloud App Service for a Spring Boot web app. The Spring Boot service will connect to an Azure SQL database, read data, and display it on a web page.
When developers think about identity, we usually think about user identity, authentication, and authorization. But that’s not the only type of identity enterprise developers should care about.
Our applications and services can have identities too, and we can use these identities to simplify our code and increase our app security.
This three-part series will explore how we can give our enterprise Java + Spring applications identities of their own via Azure AD managed identities. Throughout the series, we’ll demonstrate using these identities with apps hosted on Azure App Service and Azure Kubernetes Service. Then, we’ll explore obtaining key store credentials using these identities.
In this first article, we’ll guide you through using the Azure Cloud App Service for a Spring Boot web app. The Spring Boot service will connect to an Azure SQL database, read data, and display it on a web page.
We’ll demonstrate database authentication using managed identities, which enable us to create credentials for individual service instances. We'll create an identity, assign it to the app, and connect it to the required database.
Prerequisites
To follow this tutorial, you should be familiar with Java. You'll also need to set up a few things beforehand:
- Access to Azure Cloud Platform. It’s free to sign up for 12 months of access to popular services and offers a $200 credit.
- A locally-installed SQL server for application development
- Azure CLI installed on your local machine
You can find the complete application code on GitHub.
Creating a Spring Boot Application
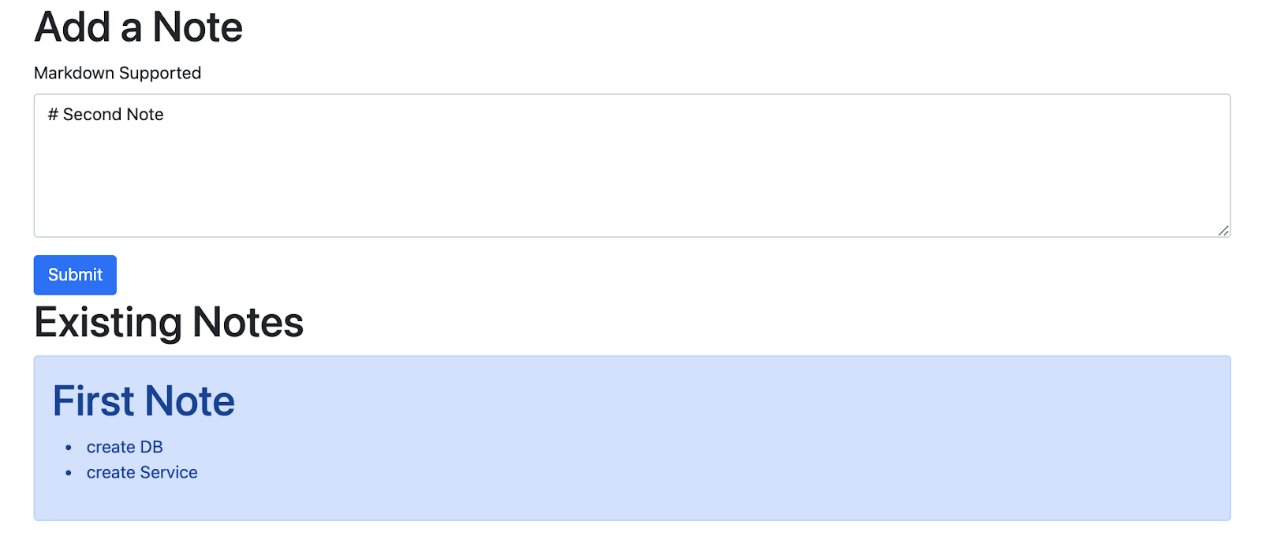
This demo Spring Boot application enables users to make notes. The application provides a simple text area to record the message using Markdown format. It then saves the user note in the database. The application’s webpage also displays the previously saved notes. However, features like editing and deleting a note are beyond our scope. Feel free to expand these capabilities yourself after completing this tutorial.
Start by generating the required project from start.spring.io. Click ADD DEPENDENCIES and select the following:
- Spring Web
- Thymeleaf
- Spring Data JPA
- Microsoft SQL Server
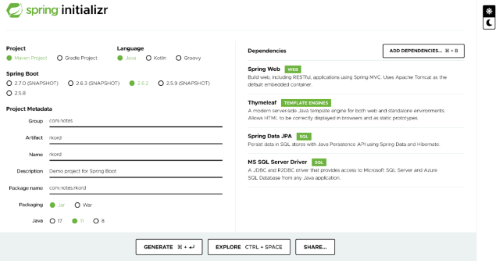
Next, specify the group, artifact, and name details on the left. Then, click Generate.
Extract the generated project and open it using your favorite integrated development environment (IDE) editor.
It will fail if you try to compile the source code using the Maven command ./mvnw clean install.
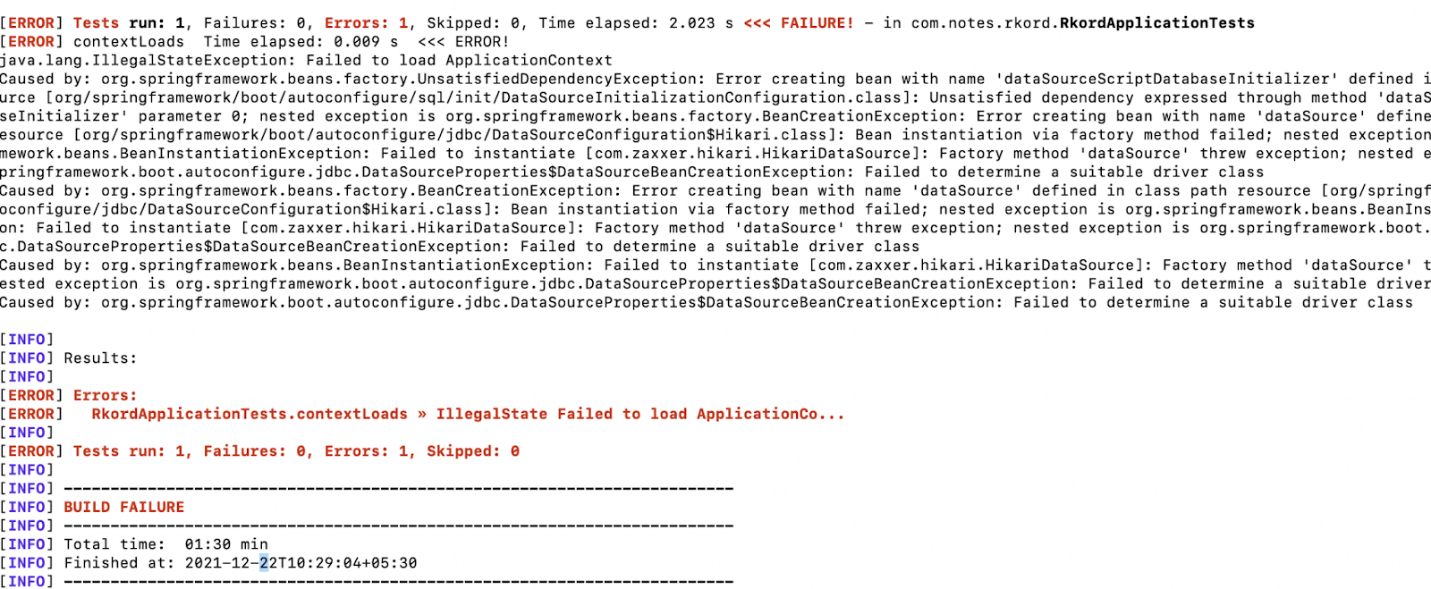
The tests fail because there is no connection to an SQL server instance. So, update the application.properties file with the SQL database details:
spring.datasource.url=jdbc:sqlserver:
spring.datasource.username=sa
spring.datasource.password=P@ssw0rd
spring.datasource.driverClassName=com.microsoft.sqlserver.jdbc.SQLServerDriver
spring.jpa.show-sql=true
spring.jpa.hibernate.dialect=org.hibernate.dialect.SQLServer2012Dialect
spring.jpa.hibernate.ddl-auto = create-drop
The above configuration should pass the tests, leading to a successful build.
Adding a Notes Entity
The application offers the features of saving and loading user-created notes. Consequently, we need an object to save the note and load it from the database. The project uses the JPA framework to define a Java class — also called an entity class — with the required annotations. The application does not create a schema. Instead, the entity annotations will generate the necessary table.
@Entity
@Table(name = "notes")
public class Notes {
@Id
@GeneratedValue(strategy = GenerationType.AUTO)
private Integer id;
private String message;
}
Alternatively, users can use a pre-defined schema for the application.
Adding a Notes Repository
The project also adopts the Spring Data programming model to remove the boilerplate code implementations associated with JPA. The model provides an abstraction called Repository to access the database. So, you only need to create an entity-specific interface by extending the JPA-specific Repository interface, JpaRepository.
public interface NotesRepository extends JpaRepository<Notes,Integer> {
}
Adding a Notes Controller
The Notes Controller is responsible for saving and displaying note data. You need a GET request to load data from the database and display it using HTML. Additionally, you require a POST request to save the data.
Moreover, the user submits the data as Markdown, which the application converts to HTML format before saving, using the CommonMark library. So, add the CommonMark library to the project’s POM dependencies:
<dependency>
  <groupId>org.commonmark</groupId>
  <artifactId>commonmark</artifactId>
  <version>0.18.1</version>
 </dependency>
Then, create a NotesController that can support the required GET and POST APIs, like this:
@Controller
public class NotesController {
@GetMapping("/")
public ModelAndView load() {
ModelAndView modelAndView = new ModelAndView("notes");
List<Notes> notes = notesRepository.findAll();
modelAndView.addObject("userNotes", notes);
return modelAndView;
}
@PostMapping("/note")
public String save(@RequestParam String markdownText) {
Node document = parser.parse(markdownText);
String html= renderer.render(document);
Notes note = new Notes();
note.setMessage(html);
notesRepository.save(note);
return "redirect:/";
}
}
The load method provides the Thymeleaf template, notes, and the associated notes data to the Spring servlet in the above APIs. The servlet then generates the required HTML and sends back the HTML in response.
Moreover, the save method first converts the markdownText to HTML using the CommonMark Parser. It then persists the generated HTML to the database before delegating it to the GET page using an internal redirect.
Creating Notes HTML
Lastly, add the following Thymeleaf template under the directory src/main/resources/template as notes.html. The template has these two sections:
- A form to add a new note. It has a single field named
markdownText with an area of five lines, which the application submits to the POST method. - Existing notes sections for displaying all created notes. We generate this section using a Thymeleaf iterator to determine each note text.
<!doctype html>
 <html lang="en">
 <head>
    <meta charset="utf-8">
    <meta name="viewport" content="width=device-width, initial-scale=1">
    <link href="https://cdn.jsdelivr.net/npm/bootstrap@5.0.1/dist/css/bootstrap.min.css"
    rel="stylesheet">
    <title>Rkord</title>
 </head>
 <body class="container">
 <h1>Add a Note</h1>
 <form class="row" action="/note" method="post">
    <fieldset>
        <div class="mb-3">
            <label for="markdownText"
            class="form-label">Markdown Supported</label>
            <textarea class="form-control" id="markdownText"
            name="markdownText" rows="5"></textarea>
        </div>
        <button type="submit"
        class="btn btn-primary">Submit</button>
    </fieldset>
 </form>

 <h1>Existing Notes</h1>
 <fieldset>
    <div class="mb-3" th:each="msg : ${userNotes}">
        <div th:utext="${msg.message}"
        class="alert alert-primary"></div>
    </div>
 </fieldset>
 </body>
 </html>
Our application is now ready. Run it using the spring-boot:run command. The command will start the web server on port 8080, and you can access the application in a browser using http://localhost:8080/.
Setting up Azure
To deploy the app successfully on the Azure Cloud Platform, you must configure the following services:
- Azure SQL Server
- Azure SQL Database
- Azure App Service
First, ensure your Azure account is associated with an available subscription model (Free, Paid, or Students). Open the Subscription view to validate the model or add a new appropriate model.
Azure organizes all service instances using the concept of resource groups. A resource group is a logical unit with zero or more resources. Start by creating a resource group using this command:
$ az group create --name rkord-notes-rg --location eastus
Making an Azure SQL Instance
Next, create an SQL Server instance by providing a name, location, and resource group. You must also specify admin credentials for the instance:
$ az sql server create  --resource-group rkord-notes-rg   --name rkorddb --location eastus
  --admin-user dbadmin --admin-password rk0rdP@ssw0rd
The above SQL server is empty. You must add an application-centric database before integrating it with the project:
$ az SQL DB create --resource-group rkord-notes-rg --name rkord --server rkorddb
  --tier Basic --backup-storage-redundancy Local
Azure Database has several usage models, each with specific pricing and availability. The above command creates a database for development and testing needs.
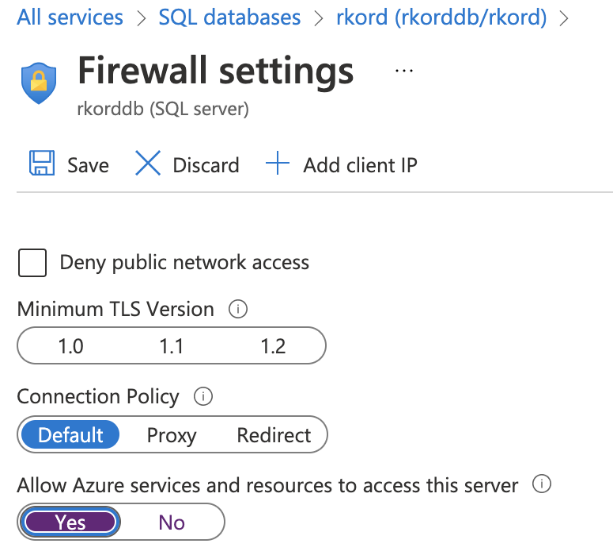
Azure also enables a firewall to control access to the database. Since the application will connect to Azure Database from the app service, you must allow access from the firewall. You can enable database access from all Azure services for development needs. Alternatively, it is best to create a virtual network with safelisted IP addresses for production environments.
Creating an App Service Instance
Azure App Service provides a scalable deployment platform. Create the service using the Azure portal. Specify the application name, runtime, location, and resource group.
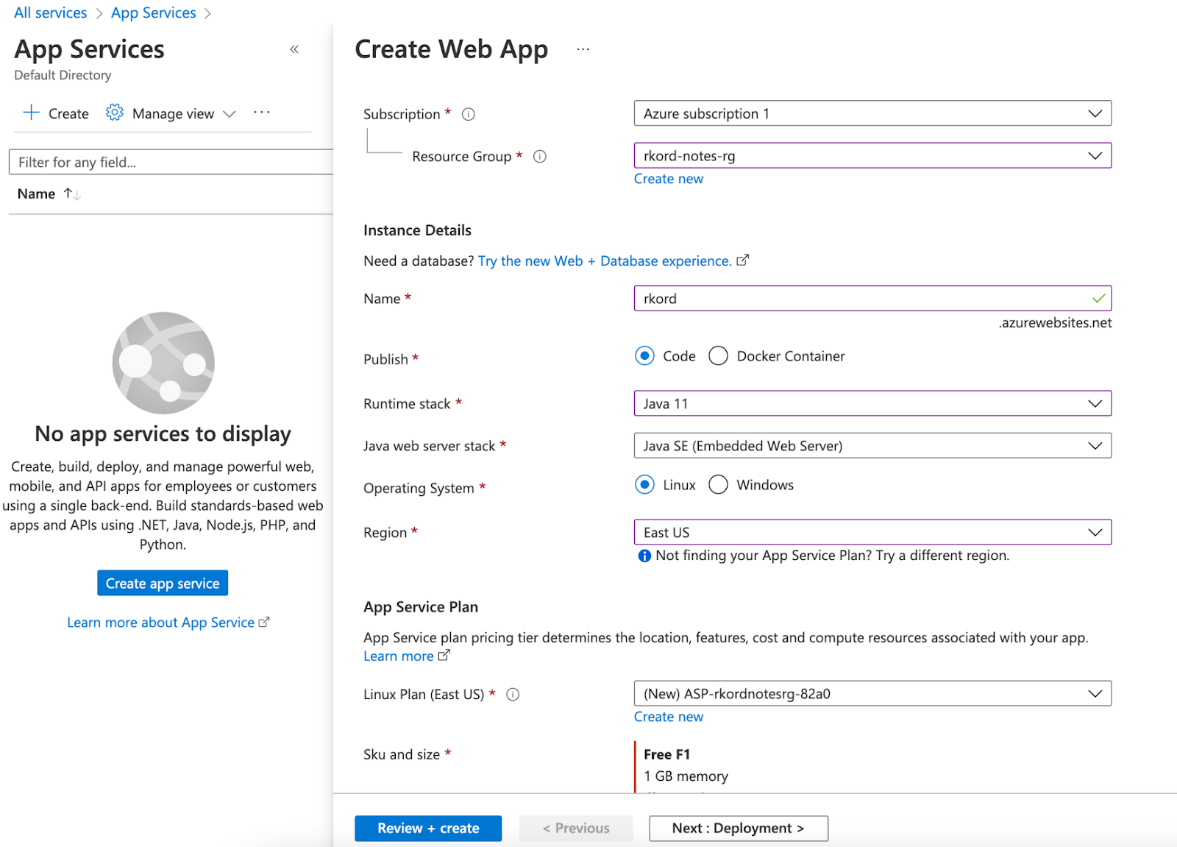
Azure offers several usage models for varied application uptime needs, like the database models. The above command creates an App Service for development and testing needs using the free model.
The App Service instance is now available for deployment. Rather than updating the deployment file from the Azure portal, you must configure azure-webapp-maven-plugin. Invoke the plugin using this command:
$ ./mvnw com.microsoft.azure:azure-webapp-maven-plugin:2.2.0:config
The plugin will invoke Azure APIs and show the App Service instances created above. You can either select the same instance or generate a new one.
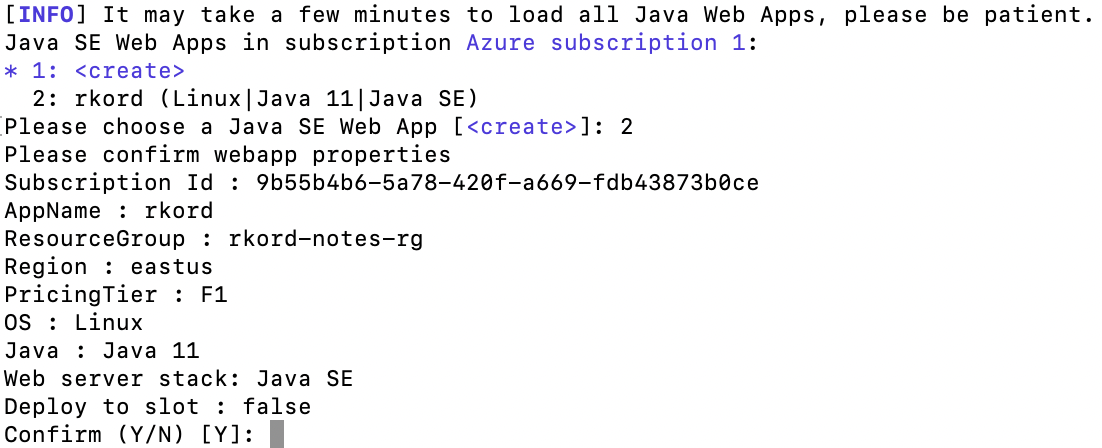
The above command updates the POM file with the selected configuration of azure-webapp-maven-plugin.
Next, update the database details in application.properties. Update the URL, database name, username, and password with the appropriate information. As the database is not accessible from the local workstation, the tests will fail using the modified application.properties file. So, move the older application.properties file to src/test/resources.
spring.datasource.url=jdbc:sqlserver:
database=rkord;encrypt=true;
trustServerCertificate=false;hostNameInCertificate=*.database.windows.net;loginTimeout=30;
spring.datasource.username=dbadmin
spring.datasource.password=rk0rdP@ssw0rd
spring.datasource.driverClassName=com.microsoft.sqlserver.jdbc.SQLServerDriver
spring.jpa.show-sql=true
spring.jpa.hibernate.dialect=org.hibernate.dialect.SQLServer2012Dialect
spring.jpa.hibernate.ddl-auto=create-drop
Deploy the application using the configured Maven plugin with this command:
$./mvnw package azure-webapp:deploy
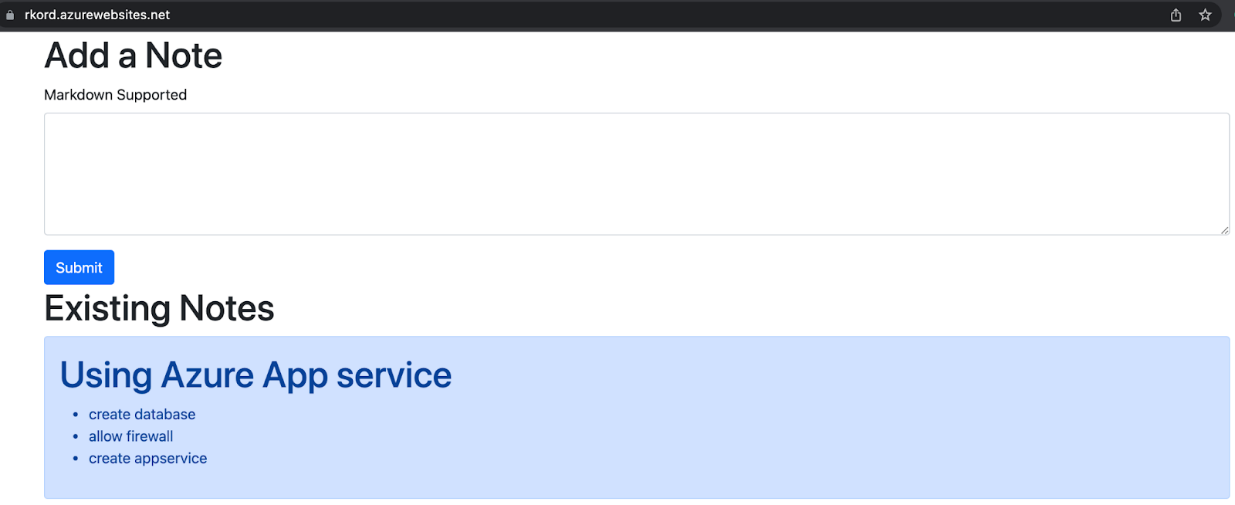
The plugin deploys and starts the application binary. So, it will be available on the associated Azure subdomain (https://rkord.azurewebsites.net/).
Configuring Managed Identity
We have successfully deployed the application to App Service in the section above. However, the database credentials are part of the application code. To secure our database, we should enable managed identity for the App Service and remove the credentials from the code.
Let's start by enabling managed identity for our App Service instance:
$ az webapp identity assign --resource-group rkord-notes-rg --name rkord
Once the identity is enabled, the application will present the App Service name as database credentials. Next, configure the database to allow access using the App Service name. So, log in to the database using Azure Cloud Shell. You must connect to the database using an admin account, and this account must be from Azure AD, so add an Azure AD user as a server admin from the Azure SQL Server management view.
$ sqlcmd -S rkorddb.database.windows.net -d rkord -U Dbadmin@xxxxxaccount.onmicrosoft.com
  -P "passQ@W1" -G -l 30
Execute the following statements to allow access from the App Service name (rkord).
CREATE USER [rkord] FROM EXTERNAL PROVIDER;
ALTER ROLE db_datareader ADD MEMBER [rkord] ;
ALTER ROLE db_datawriter ADD MEMBER [rkord] ;
ALTER ROLE db_ddladmin ADD MEMBER [rkord] ;
GO
Update the SQL server URL in the properties file (append Authentication=ActiveDirectoryMSI;). You must also remove the username and password properties.
spring.datasource.url=jdbc:sqlserver:
database=rkord;encrypt=true;trustServerCertificate=false;
hostNameInCertificate=*.database.windows.net;loginTimeout=30;Authentication=ActiveDirectoryMSI;
spring.datasource.driverClassName=com.microsoft.sqlserver.jdbc.SQLServerDriver
spring.jpa.show-sql=true
spring.jpa.hibernate.dialect=org.hibernate.dialect.SQLServer2012Dialect
spring.jpa.hibernate.ddl-auto=create-drop
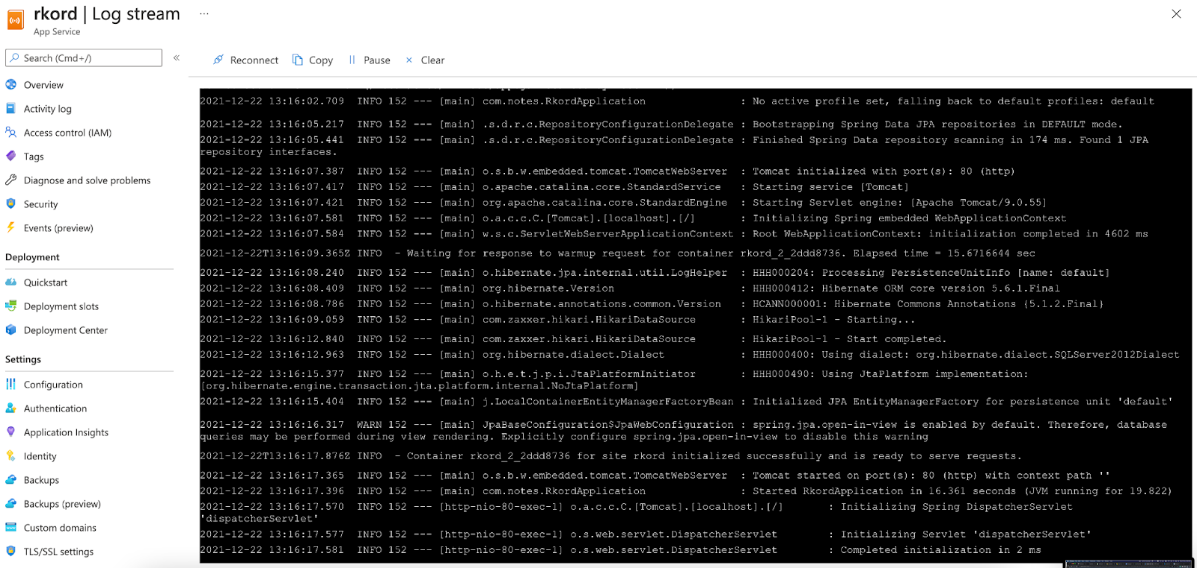
Then, build and deploy the application using Maven. The application should restart automatically.
Summary
We used the Azure App Service for web apps with SQL requirements. App Service provides managed identity to access an SQL database without specifying database credentials. Since the process eliminates the need for credentials, it eliminates the challenges of secured credentials exchange. Developers can remain focused on the business they need to support rather than handling deployment challenges like maintaining security and managing credential changes.
Managed identities work with a variety of services. Continue to the second article of this three-part series to learn how to use managed identities for Spring Boot applications on Azure Kubernetes Service.
To learn more about Java Azure Identity library, check out Azure authentication with Java and Azure Identity.
