This is Part 2 of a 3-part series that demonstrates how to build Microsoft Teams apps in Java, with a focus on bots. This article shows how to integrate Adaptive Cards into a Java Spring Boot chatbot, taking advantage of frameworks like Spring Data JPA to easily persist and retrieve data from a SQL Server database.
One of the challenges when designing applications is accommodating the variety of different devices people use. Each platform, whether desktop, web, or mobile, requires its own tooling and design considerations.
However, thanks to the Adaptive Cards UI framework, it is easy to create platform-agnostic interfaces exposed through chat tools like Microsoft Teams. Adaptive Cards free developers from building custom interfaces for multiple devices, and because Teams is already available for desktop, web, and mobile, developers are no longer required to maintain multiple apps.
In this post, we’ll build on the previous post’s introductory application to create a lunch-ordering bot, complete with rich UI displayed in Teams.
Prerequisites
To follow along in this article, you’ll need a Java 11 JDK, Apache Maven, Node.js and npm, an Azure subscription to deploy the final application, and the Azure CLI.
I’ve also used a scaffolding tool, Yeoman, to simplify setup. You can install it with the following command:
npm install -g yo
The chatbot template is provided by the generator-botbuilder-java package, which you’ll need to install with this command:
npm install -g generator-botbuilder-java
You now have everything you need to create your sample chatbot application.
Example Source Code
You can follow along by examining this project’s source code on its GitHub page.
Building the Base Application
Refer to the previous article in this series for the process of building and updating the base application. Follow the instructions under the headings “Creating the Sample Application” and “Updating the Sample Application” to create a Spring Boot project using Yeoman.
Adding New Dependencies
In addition to the updated dependencies mentioned in the previous article, you also need to add additional Maven dependencies to support your catering bot.
Add the following dependencies to the pom.xml file:
<dependencies>
    <dependency>
      <groupId>org.projectlombok</groupId>
      <artifactId>lombok</artifactId>
      <version>1.18.22</version>
      <scope>provided</scope>
    </dependency>
    <dependency>
      <groupId>io.pebbletemplates</groupId>
      <artifactId>pebble</artifactId>
      <version>3.1.5</version>
    </dependency>
    <dependency>
      <groupId>com.microsoft.sqlserver</groupId>
      <artifactId>mssql-jdbc</artifactId>
      <scope>runtime</scope>
    </dependency>
    <dependency>
      <groupId>com.google.guava</groupId>
      <artifactId>guava</artifactId>
      <version>31.0.1-jre</version>
    </dependency>
    …
</dependencies>
Building the Models
Your bot will interact with two frameworks while processing, saving, and retrieving lunch orders. The data required by these frameworks is defined in model classes, which are Plain Old Java Objects (POJOs) with some specialized annotations.
Start by building a model for use with the Adaptive Card framework. Each response from the UI presented in Teams includes the ID of the current card, the next card to display, and details about the options that were supplied by the end user.
The model classes have Lombok Data (@Data) annotations to reduce the amount of boilerplate code you need to write. The @Data annotation instructs Lombok to create getters and setters from the class properties, so you don’t need to code them manually.
Define the card response model in the CardOptions class:
package com.matthewcasperson.models;

import lombok.Data;

@Data
public class CardOptions {
  private Integer nextCardToSend;
  private Integer currentCard;
  private String option;
  private String custom;
}
Next, you need to define a model for the data saved in the database. Each lunch order is persisted in an SQL Server database. It captures the ID of the user that placed the order, their food and drink choices, and the time that the order was created.
As in the CardOptions class, use the Lombok @Data annotation to create the getter and setter methods. I’ve also used the Java Persistence API (JPA) @Entity annotation to indicate that this class is mapped to a row in a database table.
The @Id and @GeneratedValue annotations on the ID property define it as the primary key, with an automatically generated value.
Define your database model in the LunchOrder class:
package com.matthewcasperson.models;

import javax.persistence.Entity;
import javax.persistence.GeneratedValue;
import javax.persistence.GenerationType;
import javax.persistence.Id;
import lombok.Data;

@Data
@Entity
public class LunchOrder {

  @Id
  @GeneratedValue(strategy= GenerationType.IDENTITY)
  private Long id;
  private String activityId;
  private java.sql.Timestamp orderCreated;
  private String entre;
  private String drink;
}
Connecting to the Database
The database connection details are saved in the application.properties file. Replace the spring.datasource.url, spring.datasource.username, and spring.datasource.password properties with the details of your own database server. The example below shows a connection to a local SQL database server, but you can also connect to a database hosted in Azure if required:
MicrosoftAppId=<app id goes here>
MicrosoftAppPassword=<app secret goes here>
server.port=3978
# Replace the url, username, and password with the details of your own SQL Server database
spring.datasource.url=jdbc:sqlserver:
spring.datasource.username=catering
spring.datasource.password=Password01!
spring.datasource.driver-class-name=com.microsoft.sqlserver.jdbc.SQLServerDriver
spring.jpa.hibernate.ddl-auto=update
spring.jpa.show-sql=true
spring.jpa.properties.hibernate.format_sql=true
spring.jpa.properties.hibernate.dialect=org.hibernate.dialect.SQLServer2008Dialect
Build the Cards List
Each card sent by the bot is defined as an enum. A card is identified by a number (which matches the values stored in the currentCard and nextCardToSend properties in the CardOptions class) and has an associated JSON file that defines the Adaptive Card UI layout.
Your bot displays five cards: an entrée selection, a drink selection, an order review, a confirmation prompt, and a list of recent orders. Each of these cards is defined as an enum record in the Cards enum:
package com.matthewcasperson;

import java.util.Arrays;

public enum Cards {
  Entre(0, "cards/EntreOptions.json"),
  Drink(1, "cards/DrinkOptions.json"),
  Review(2, "cards/ReviewOrder.json"),
  ReviewAll(3, "cards/RecentOrders.json"),
  Confirmation(4, "cards/Confirmation.json");

  public final String file;
  public final int number;

  Cards(int number, String file) {
    this.file = file;
    this.number = number;
  }

  public static Cards findValueByTypeNumber(int number) throws Exception {
    return Arrays.stream(Cards.values()).filter(v ->
        v.number == number).findFirst().orElseThrow(() ->
        new Exception("Unknown Cards.number: " + number));
  }
}
Creating a Spring Repository
Your code will interact with the database through an interface known as a data repository. This interface exposes methods with specially crafted names that the Spring framework recognizes and converts into database actions.
So, the method called findByActivityId is recognized by Spring as a query filtered by the activityId column, and the method called findAll is a query that returns all records.
You don’t need to provide a concrete implementation of this interface because Spring handles that for us. All you need to do is reference the interface in your code, and your requests are automatically translated into database queries.
The interface to your database is called LunchOrderRepository:
package com.matthewcasperson.repository;

import com.matthewcasperson.models.LunchOrder;
import java.util.List;
import org.springframework.data.domain.Page;
import org.springframework.data.domain.Pageable;
import org.springframework.data.repository.CrudRepository;

public interface LunchOrderRepository extends CrudRepository<LunchOrder, Long> {
  List<LunchOrder> findByActivityId(String lastName);
  Page<LunchOrder> findAll(Pageable pageable);
}
Injecting State into the Bot
In order for your UI to process the multiple responses involved in ordering food and drink, reviewing the order, and listing previous orders, you must have some kind of persistent state that carries across from one response to the next.
The Bot Framework SDK provides two classes to maintain state: ConversationState and UserState. Instances of these classes have been made available to Spring and can be injected into the method that creates an instance of your Bot class. They are then passed to the bot through the constructor.
To give the bot access to the state classes, overwrite the getBot method in the Application class with the following code:
@Bean
public Bot getBot(final ConversationState conversationState, final UserState userState) {
    return new CateringBot(conversationState, userState);
}
Build the Catering Bot
With your models, enums, and repositories in place, you’re ready to start building the actual bot.
Start by creating a new class to extend the ActivityHandler class provided by the Bot Framework SDK.
However, note that you have extended a class called FixedActivityHandler — this was due to a bug in the ActivityHandler class, documented on StackOverflow. I would expect this bug to be resolved in future releases of the Bot Framework SDK, but for now, you’ll need to rely on the workaround described in the StackOverflow post:
public class CateringBot extends FixedActivityHandler {
Your class has a number of static and instance properties defining constants for the Adaptive Card MIME type, a logging class, a JSON parser, and the two classes associated with maintaining state:
private static final String CONTENT_TYPE = "application/vnd.microsoft.card.adaptive";

private static final Logger LOGGER = LoggerFactory.getLogger(CateringBot.class);

private static final ObjectMapper OBJECT_MAPPER = new ObjectMapper()

    .configure(DeserializationFeature.FAIL_ON_UNKNOWN_PROPERTIES, false);

private final ConversationState conversationState;

private final UserState userState;
Access to the database is provided by the LunchOrderRepository interface. By injecting an instance of the interface you created earlier, Spring provides you with an object that handles all of your database queries:
@Autowired

LunchOrderRepository lunchOrderRepository;
The constructor accepts the two state objects and assigns them to instance properties:
public CateringBot(final ConversationState conversationState, final UserState userState) {
  this.userState = userState;
  this.conversationState = conversationState;
}
The onMembersAdded method is called as new people join a conversation with the bot. This method is provided by the base template, but I’ve altered it slightly to respond with a message to inform the user that typing any message allows them to start placing a new lunch order:
@Override
protected CompletableFuture<Void> onMembersAdded(
    final List<ChannelAccount> membersAdded,
    final TurnContext turnContext
) {
  LOGGER.info("CateringBot.onMembersAdded(List<ChannelAccount>, TurnContext)");

  return membersAdded.stream()
      .filter(
          member -> !StringUtils
              .equals(member.getId(), turnContext.getActivity().getRecipient().getId())
      ).map(channel -> turnContext.sendActivity(MessageFactory.text(
          "Hello and welcome! Type any message to begin placing a lunch order.")))
      .collect(CompletableFutures.toFutureList()).thenApply(resourceResponses -> null);
}
The onMessageActivity method is called when a new message is posted. Your bot uses this as a signal to initiate the lunch ordering process:
@Override
protected CompletableFuture<Void> onMessageActivity(final TurnContext turnContext) {
  LOGGER.info("CateringBot.onMessageActivity(TurnContext)");
First, you get access to an instance of the LunchOrder class from the user’s state:
final StatePropertyAccessor<LunchOrder> profileAccessor = userState.createProperty("lunch");
final CompletableFuture<LunchOrder> lunchOrderFuture =
    profileAccessor.get(turnContext, LunchOrder::new);

try {
  final LunchOrder lunchOrder = lunchOrderFuture.get();
The ID of the user that initiated the conversation and the time of the order are captured:
lunchOrder.setActivityId(turnContext.getActivity().getId());
lunchOrder.setOrderCreated(Timestamp.from(Instant.now()));
You then respond with an Adaptive Card — a JSON document describing a user interface. These JSON files have been saved as resources in your Java application under the src/main/resources/cards directory.
Next, you return the createCardAttachment return value as a message attachment. You’ve passed the file associated with the first card in the UI sequence: the entrée prompt, which has the number 0:
    return turnContext.sendActivity(
        MessageFactory.attachment(createCardAttachment(Cards.findValueByTypeNumber(0).file))
    ).thenApply(sendResult -> null);
  } catch (final Exception ex) {
    return turnContext.sendActivity(
        MessageFactory.text("An exception was thrown: " + ex)
    ).thenApply(sendResult -> null);
  }
}
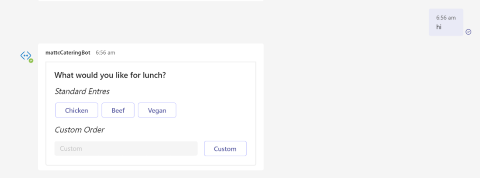
This is what the response looks like in a chat:
Responses made through the card UI trigger the onAdaptiveCardInvoke method.
Here, you save the user’s selection and send the next card as a response:
@Override
protected CompletableFuture<AdaptiveCardInvokeResponse> onAdaptiveCardInvoke(
    final TurnContext turnContext, final AdaptiveCardInvokeValue invokeValue) {
  LOGGER.info("CateringBot.onAdaptiveCardInvoke(TurnContext, AdaptiveCardInvokeValue)");
As before, you get access to the user’s state:
StatePropertyAccessor<LunchOrder> profileAccessor = userState.createProperty("lunch");
CompletableFuture<LunchOrder> lunchOrderFuture =
    profileAccessor.get(turnContext, LunchOrder::new);

try {
  final LunchOrder lunchOrder = lunchOrderFuture.get();
Each response has a verb associated with it. The verb is something you chose when building the card UI. In this example, all cards respond with the verb order:
if ("order".equals(invokeValue.getAction().getVerb())) {
The data returned by the response is converted to a CardOptions instance:
final CardOptions cardOptions = convertObject(invokeValue.getAction().getData(),
    CardOptions.class);
Identify the card that generated the response using the currentCard property. Set the appropriate properties in the CardOptions instance depending on whether it was the entrée card or drinks card that generated the response:
if (cardOptions.getCurrentCard() == Cards.Entre.number) {
  lunchOrder.setEntre(
      StringUtils.isAllEmpty(cardOptions.getCustom()) ? cardOptions.getOption()
          : cardOptions.getCustom());
} else if (cardOptions.getCurrentCard() == Cards.Drink.number) {
  lunchOrder.setDrink(
      StringUtils.isAllEmpty(cardOptions.getCustom()) ? cardOptions.getOption()
          : cardOptions.getCustom());
If the response was generated by the order review cards, you can save the order to the database:
} else if (cardOptions.getCurrentCard() == Cards.Review.number) {
  lunchOrderRepository.save(lunchOrder);
}
The final step is to return the next card in the sequence.
Microsoft provides the Adaptive Card Templating library to embed dynamic data in the JSON that represents an Adaptive Card. This library preprocesses JSON files and generates responses that can be sent to clients like Teams.
Unfortunately, there is no Java version of this library. Instead, you will use another templating library called Pebble Templates. Although the two templating libraries use different syntax, as long as the end result is valid JSON, the client is unaware of how the cards were produced.
Here, you find the JSON file for the next card and pass it to the createObjectFromJsonResource method, along with a Map of values for your templating library to replace in the JSON:
  final AdaptiveCardInvokeResponse response = new AdaptiveCardInvokeResponse();
  response.setStatusCode(200);
  response.setType(CONTENT_TYPE);
  response.setValue(createObjectFromJsonResource(
      Cards.findValueByTypeNumber(cardOptions.getNextCardToSend()).file,
      new HashMap<>() {{
        put("drink", lunchOrder.getDrink());
        put("entre", lunchOrder.getEntre());
        putAll(getRecentOrdersMap());
      }}));

  return CompletableFuture.completedFuture(response);
}
In the event of an unexpected verb or other exception, you respond with the exception details:
    throw new Exception("Invalid verb " + invokeValue.getAction().getVerb());

  } catch (final Exception ex) {
    LOGGER.error("Exception thrown in onAdaptiveCardInvoke", ex);
    return CompletableFuture.failedFuture(ex);
  }
}
Save the user’s state in the onTurn method:
@Override
public CompletableFuture<Void> onTurn(final TurnContext turnContext) {
  return super.onTurn(turnContext)
      .thenCompose(turnResult -> conversationState.saveChanges(turnContext))
      .thenCompose(saveResult -> userState.saveChanges(turnContext));
}
The createCardAttachment method take the filename of a JSON file (and optionally, the context used when processing templates) and returns an Attachment with the correct MIME type identifying an Adaptive Card:
private Attachment createCardAttachment(final String fileName) throws IOException {
  return createCardAttachment(fileName, null);
}

private Attachment createCardAttachment
        (final String fileName, final Map<String, Object> context)
    throws IOException {
  final Attachment attachment = new Attachment();
  attachment.setContentType(CONTENT_TYPE);
  attachment.setContent(createObjectFromJsonResource(fileName, context));
  return attachment;
}
The createObjectFromJsonResource method takes a JSON filename and template context, reads the content of the file, optionally transforms it, converts the generated JSON to a generic Map, and returns the result.
Interestingly, your code doesn’t send JSON to the client directly. All attachments are objects, and the Bot Framework SDK serializes those objects as JSON. This is why you first load the JSON, and then convert it back to a generic structure like a Map:
private Object createObjectFromJsonResource(final String fileName,
    final Map<String, Object> context) throws IOException {
  final String resource = readResource(fileName);
  final String processedResource = context == null
      ? resource
      : processTemplate(resource, context);
  final Map objectMap = OBJECT_MAPPER.readValue(processedResource, Map.class);
  return objectMap;
}
The processTemplate method uses the Pebble template library to inject custom values into loaded JSON files. The JSON files include template markers like {{entre}} or {{drink}}, which are replaced by the associated values in the context map. You can see this in the ReviewOrder.json template:
private String processTemplate(final String template, final Map<String, Object> context)
    throws IOException {
  final PebbleEngine engine = new PebbleEngine.Builder().autoEscaping(false).build();
  final PebbleTemplate compiledTemplate = engine.getLiteralTemplate(template);
  final Writer writer = new StringWriter();
  compiledTemplate.evaluate(writer, context);
  return writer.toString();
}
The readResource method uses Gson to load the contents of files embedded into the Java application:
private String readResource(final String fileName) throws IOException {
  return Resources.toString(Resources.getResource(fileName), Charsets.UTF_8);
}
The convertObject method is used to convert generic data structures like maps into regular classes:
private <T> T convertObject(final Object object, final Class<T> convertTo) {
  return OBJECT_MAPPER.convertValue(object, convertTo);
}
The getRecentOrdersMap method loads the last three orders and places their details into a map that can be consumed by the template library:
private Map<String, String> getRecentOrdersMap() {
  final List<LunchOrder> recentOrders = lunchOrderRepository.findAll(
      PageRequest.of(0, 3, Sort.by(Sort.Order.desc("orderCreated")))).getContent();

  final Map<String, String> map = new HashMap<>();

  for (int i = 0; i < 3; ++i) {
    map.put("drink" + (i + 1),
        recentOrders.stream().skip(i).findFirst().map(LunchOrder::getDrink).orElse(""));
    map.put("entre" + (i + 1),
        recentOrders.stream().skip(i).findFirst().map(LunchOrder::getEntre).orElse(""));
    map.put("orderCreated" + (i + 1),
        recentOrders.stream().skip(i).findFirst().map(l -> l.getOrderCreated().toString())
            .orElse(""));
  }

  return map;
}
Testing the Bot
Refer to the instructions in the first article in this series, in the “Deploy the Bot” and “Link to Teams” sections, to deploy the catering bot and integrate it with Teams.
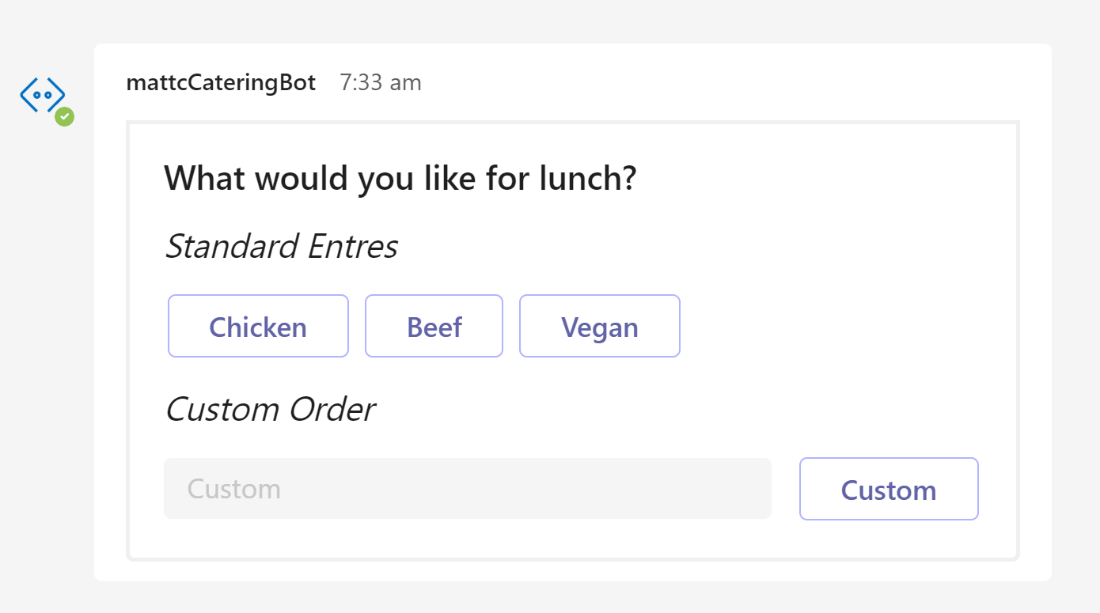
Once connected, type any message to view the first card, where you select an entrée:
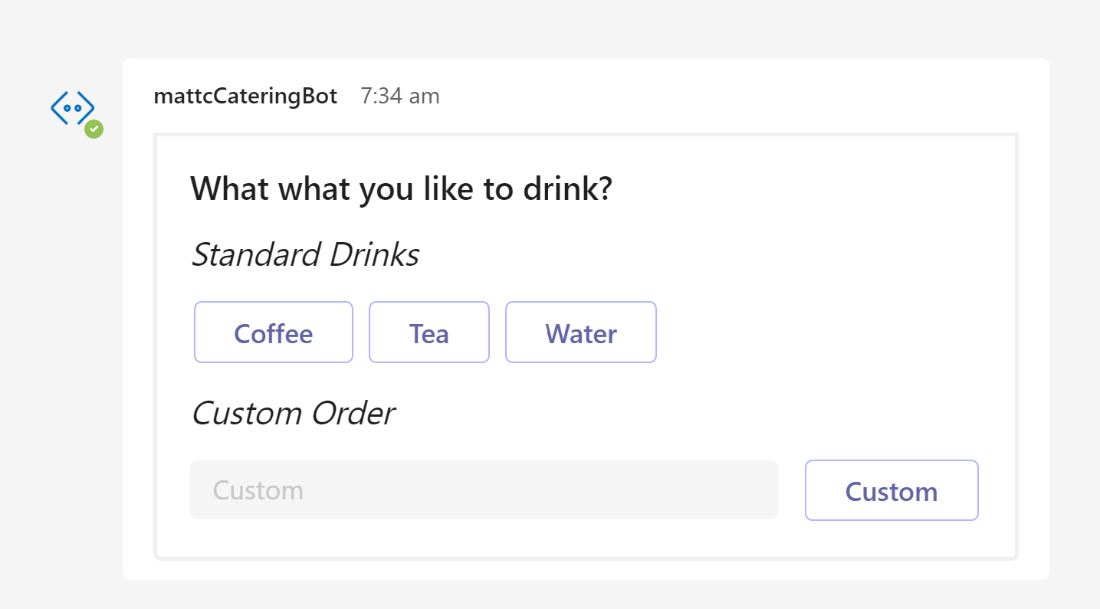
Then, select a drink:
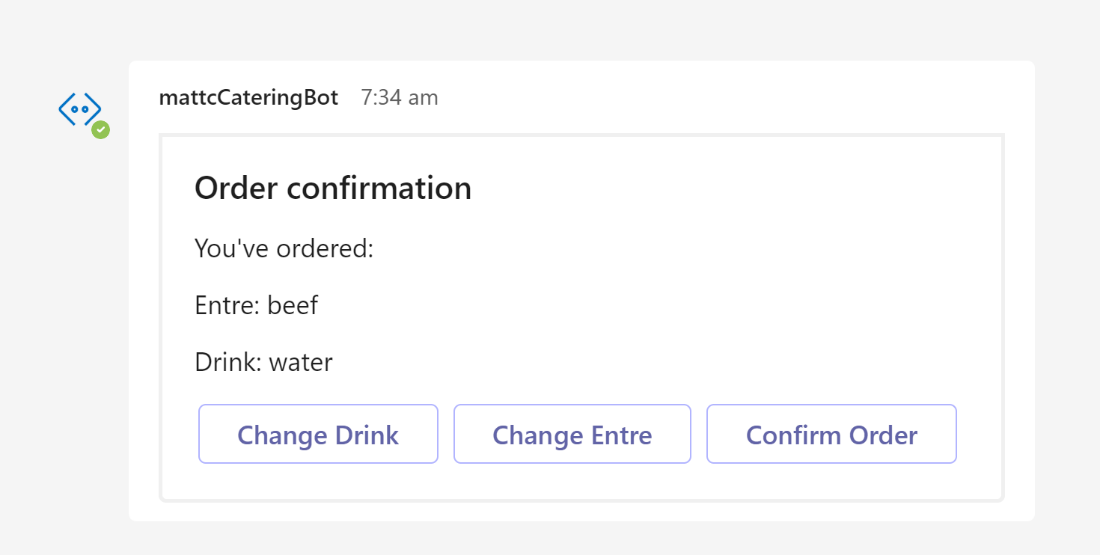
Confirm the order:
At this point, the order is saved in the database:
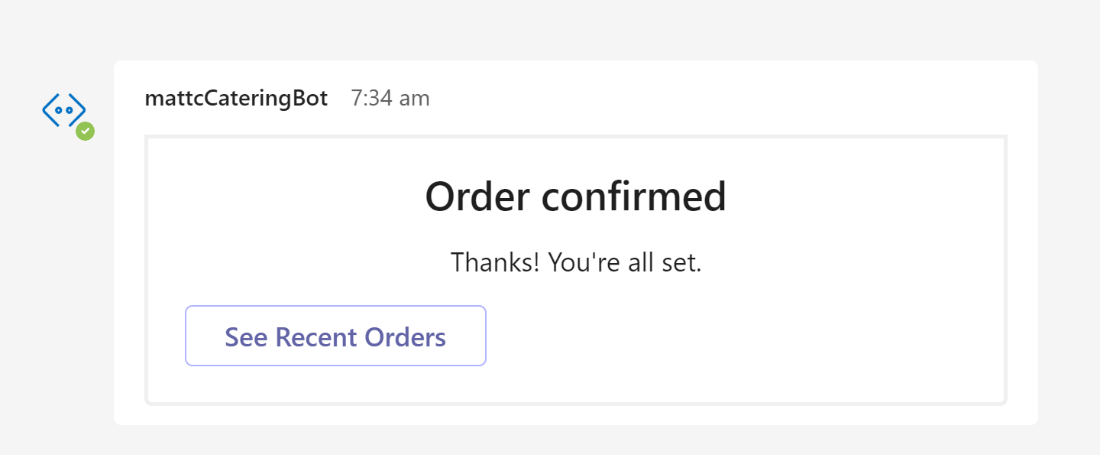
You can then view the list of previous orders:

Conclusion
Using the Adaptive Cards framework provides developers the opportunity to build engaging user interfaces that work across a wide variety of platforms. In this post, you saw how to integrate Adaptive Cards into a Java Spring Boot chatbot, taking advantage of frameworks like Spring Data JPA to easily persist and retrieve data from a SQL Server database.
To learn more about building your own bot for Microsoft Teams, check out Building great bots for Microsoft Teams with Azure Bot Framework Composer.
