In this post, we will cover most of the basics about working with arrays in TypeScript. We will learn how to create both empty and populated arrays, as well as how to add and remove items from the array.
First of all, I’d like to apologise for the delay in getting around to this post. There’s been a lot going on that’s got in the way but I haven’t forgotten about writing this series. On day 6, we learned how to use inheritance and abstract classes to show how we model “objects”. In this post, we are going to start looking into using arrays to manage multiple items.
What Is an Array?
We can think of an array as a handy way to create a collection of “things” that we can easily work with. Going back to my musical instrument example, we could think of the strings on a guitar as being an array of “strings” (musical strings here, rather than text strings). On a guitar, each string is a particular width depending on how high the tuning of that string is meant to be. Now, if we wanted to refer to these in our code, we could choose to create individual variables, e.g., string1, string2, and so on. This becomes very cumbersome to use and limits us when we have 7 string, 8 string, or even 12 string guitars.
With an array, we simply need a single array that we just add the individual strings into.
Declaring Arrays
There are a number of different ways in which we can create arrays. If we know the contents of our array upfront, an easy way of creating and populating our array is this.
const strings: number[] = [10, 13, 17, 26, 36, 46];
I have specified the type here, but this is not strictly necessary. We could leave out the number[] part and this would still create an array of numbers like the following:
const strings = [10, 13, 17, 26, 36, 46];
TypeScript is clever enough to know that this is an array of numbers so it won’t allow us to add a different type to this array.
Now, I did mention that there are other ways to declare an array. TypeScript also provides us with the ability to use something called a generic type to create an array. Don’t worry what a generic is for the moment, we will be covering generics in a lot more detail later on in this series. Anyway, an alternative way to declare the same populated array looks like this.
const genericString: Array<number> = [10, 13, 17, 26, 36, 46];
The Array<number> is the generic type for the array and is, functionally, identical to the original array declaration above.
Declaring Empty Arrays
We don’t always know what we want to put into our array. There are lots of situations where we want to add items into our array after we have declared them. If we are using the [] syntax for our array, then we would declare our array like this:
const emptyStrings: number[] = [];
If we want to use the Array<> syntax, we have two choices available to us. The first choice is to use.
const emptyGenericStrings: Array<number> = [];
Alternatively, as this is a type, we can use the new() syntax like this:
const emptyGenericStrings2: Array<number> = new Array<number>();
Adding Elements to Our Array
Obviously, when we create an empty array (or even a pre-populated one in most cases), we want to be able to add entries into it whenever we need. No matter which way we created the array, whether using the Array<> syntax or as a [] type, we use exactly the same method to add an element into it. The keyword that we use is push and it looks like this:
emptyGenericStrings.push(30);
If we want to add more than one element at a time, we can do so with the same command:
emptyGenericStrings.push(40,50,60);
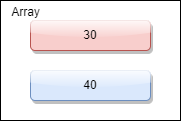
Whether we choose to add an entry at a time, or as multiple elements in one go, these elements are added at the end of our list. This means that after our first entry, our list array looks like this:

Array with our first entry added
Now, if we add push another entry into our array, it would look like this:

Array with two entries
Removing Array Entries
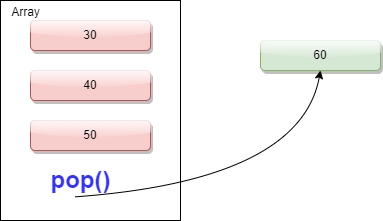
Over time, items become stale or unnecessary so we no longer need to keep them in our array. If we wanted to remove the very last entry, we use the pop command.
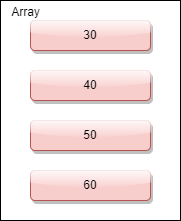
Suppose we started with this array.

Array with 4 elements
When the pop command is used, we are left with the first three elements like this:

Array with 3 elements left after pop
Having seen some lovely diagrams showing what the pop operation does, how would we actually use it? It’s as simple as the following:
const popString = [ 30, 40, 50, 60 ];
popString.pop();
Well, that’s simple enough, but how do we remove a single item from elsewhere in the list? This is slightly more complicated. What we need to do is find the index of the record that we want to remove using the indexOf function and then use the splice function to remove this element. In this example, we are creating an array of strings and then we are going to remove the item2 entry.
const sliceStrings = [ "item1", "item2", "item3", "item4", "item5" ];
const index = sliceStrings.indexOf("item2");
sliceStrings.splice(index, 1);
The second parameter in the splice call tells the code how many items to remove. If we wanted to remove item2 and item3, we could use splice(index, 2) to achieve this.
Note: The splice function returns the items you have removed from the array.
Suppose we wanted to remove multiple entries from an array. How would we go about doing this? There are multiple ways to achieve this. For these examples, we are going to spice things up a bit and show that arrays work with more than basic types. Let’s create a guitar type that we can add to an array. The type consists of a model name, and the number of strings the guitar has.
interface Guitar {
    model: string,
    strings: number
}
let guitars: Guitar[] = [];
We are going to create a helper method to simplify adding entries into our array and then add some entries.
function guitar(model: string, strings: number = 6): Guitar {
    return { model: model, strings: strings};
}
guitars.push(guitar('Fender Stratocaster'));
guitars.push(guitar('Gibson Les Paul Anniversary'));
guitars.push(guitar('Fender Villager', 12));
guitars.push(guitar('Dreadnought 12 String Acoustic', 12));
What I want to do now is remove any guitar that doesn’t have six strings. The first method we could use is to filter the array so that it gives us only the entries we want. We have to copy the filtered version back onto the original array so that it overwrites it.
guitars = guitars.filter((gtr) => gtr.strings === 6);
Now, while we could do this, it’s not one that I really recommend. The alternate method is to iterate (loop) over the array and remove the relevant entries. To do this, we have to start at the last entry and work our way back to the first entry, splicing the ones we want to remove. If we start at the beginning of our array, we run the risk of missing entries that sit next to each other.
for (let i = guitars.length -1; i >= 0; i--) {
    if (guitars[i].strings !== 6) {
        guitars.splice(i, 1);
    }
}
It may look a little bit weird that we start at the length -1. Instinctively, we would think that we would start at the length but, for historical reasons, arrays actually start at position 0 rather than 1. This means that we have an offset here that we have to take into account, which is why this is -1.
Inserting Items Into an Array
The last common array operation I want to touch on in this post is how to insert an item into an array at a set position, rather than adding it to the end. The ability to do this is straightforward. We are going to use the splice function, this time telling it to remove 0 elements. This function is very versatile because it gives us an extra parameter to specify the element we want to add. If I want to insert another guitar in the second position in the list, I simply do the following:
guitars.splice(1, 0, guitar('Ibanez Jem 777'));
Conclusion
So, there we have it. We have covered most of the basics about working with arrays in TypeScript. We know how to create both empty and populated arrays, as well as learning how to add and remove items from the array. In the next post, we are going to move away from working purely in the console and start working with TypeScript as a companion to web applications.
As always, the accompanying code is available on Github.
