To run the network with OpenVINO™ Toolkit, you need firstly convert it to Intermediate Representation (IR). To do it, you will need Model Optimizer, which is a command-line tool from the Developer Package of OpenVINO™ Toolkit. The easiest way to get it is via PyPi:
pip install openvino-dev
TensorFlow models are directly supported by Model Optimizer, so the next step is using the following command in the terminal:
mo --input_model v3-small_224_1.0_float.pb --input_shape "[1,224,224,3]"
It means you’re converting v3-small_224_1.0_float.pb model for one RGB image with size 224x224. Of course, you can specify more parameters like pre-processing steps or desired model precision (FP32 or FP16):
mo --input_model v3-small_224_1.0_float.pb --input_shape "[1,224,224,3]" --mean_values="[127.5,127.5,127.5]" --scale_values="[127.5]" --data_type FP16
Your model will normalize all pixels to [-1,1] value range and the inference will be performed with FP16. After running, you should see something like this below containing all explicit and implicit parameters like the path to the model, input shape, chosen precision, channel reversion, mean and scale values, conversion parameters, and many more:
Exporting TensorFlow model to IR… This may take a few minutes.
Model Optimizer arguments:
Common parameters:
    — Path to the Input Model: /home/adrian/repos/openvino_notebooks/notebooks/101-tensorflow-to-openvino/model/v3-small_224_1.0_float.pb
    — Path for generated IR: /home/adrian/repos/openvino_notebooks/notebooks/101-tensorflow-to-openvino/model
    — IR output name: v3-small_224_1.0_float
    — Log level: ERROR
    — Batch: Not specified, inherited from the model
    — Input layers: Not specified, inherited from the model
    — Output layers: Not specified, inherited from the model
    — Input shapes: [1,224,224,3]
    — Mean values: [127.5,127.5,127.5]
    — Scale values: [127.5]
    — Scale factor: Not specified
    — Precision of IR: FP16
    — Enable fusing: True
    — Enable grouped convolutions fusing: True
    — Move mean values to preprocess section: None
    — Reverse input channels: False
TensorFlow specific parameters:
    — Input model in text protobuf format: False
    — Path to model dump for TensorBoard: None
    — List of shared libraries with TensorFlow custom layers implementation: None
    — Update the configuration file with input/output node names: None
    — Use configuration file used to generate the model with Object Detection API: None
    — Use the config file: None
    — Inference Engine found in: /home/adrian/repos/openvino_notebooks/openvino_env/lib/python3.8/site-packages/openvino
Inference Engine version: 2021.4.1–3926–14e67d86634-releases/2021/4
Model Optimizer version: 2021.4.1–3926–14e67d86634-releases/2021/4
[ SUCCESS ] Generated IR version 10 model.
[ SUCCESS ] XML file: /home/adrian/repos/openvino_notebooks/notebooks/101-tensorflow-to-openvino/model/v3-small_224_1.0_float.xml
[ SUCCESS ] BIN file: /home/adrian/repos/openvino_notebooks/notebooks/101-tensorflow-to-openvino/model/v3-small_224_1.0_float.bin
[ SUCCESS ] Total execution time: 9.97 seconds.
[ SUCCESS ] Memory consumed: 374 MB.
SUCCESS at the end indicates everything was converted successfully. You should get IR, which consists of two files: .xml and .bin. Now, you’re ready to load this network to Inference Engine and run the inference. The code below assumes your model is for ImageNet classification.
import cv2
import numpy as np
from openvino.inference_engine import IECore
ie = IECore()
net = ie.read_network(model="v3-small_224_1.0_float.xml", weights="v3-small_224_1.0_float.bin")
exec_net = ie.load_network(network=net, device_name="CPU")
input_key = next(iter(exec_net.input_info))
output_key = next(iter(exec_net.outputs.keys()))
image = cv2.cvtColor(cv2.imread(filename="image.jpg"), code=cv2.COLOR_BGR2RGB)
input_image = cv2.resize(src=image, dsize=(224, 224))
input_image = np.expand_dims(input_image.transpose(2, 0, 1), axis=0)
result = exec_net.infer(inputs={input_key: input_image})[output_key]
result_index = np.argmax(result)
imagenet_classes = open("imagenet_2012.txt").read().splitlines()
imagenet_classes = ["background"] + imagenet_classes
print(imagenet_classes[result_index])
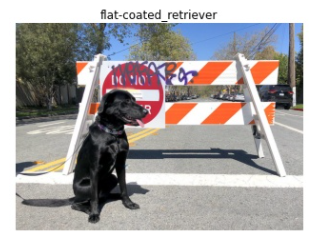
And it works! You get a class for the image (like this one below — flat-coated retriever). You can try it yourself with this demo.

If you want to try OpenVINO in a more limited way with even fewer changes to your code, check out our Integration with TensorFlow add-on.
