This is Part 2 of a 3-part series that demonstrates how to construct a complete end-to-end GitOps working using Terraform plans, GitHub, GitHub Actions, and Azure. In this article, you will see a hands-on tutorial that shows how to take a simple Terraform plan that deploys some simple Azure infrastructure (such as VMs), and commits the code to a GitHub repository. Then, you will learn how to make changes to the code in a fork or branch, commit the changes, and do code review on the changes using a pull request.
In the previous article, we looked at DevOps, a modern philosophy for working with people, processes, and tools to accelerate the pace of software development. We examined how it has adopted the software development practices of continuous integration (CI) and continuous deployment (CD). We also explored how DevOps spawned the new concept of GitOps, where a type of source code called Infrastructure as Code (IaC) is stored in Git source control as the single source of truth about what infrastructure is currently deployed.
There are many tools for IaC, but Terraform has gained the most traction everywhere I have worked, mainly because it ticks every box — even removing any need for additional configuration management (CM) tools such as Ansible in many use cases.
The primary function of Terraform is to deploy and manage the state of infrastructure. The Terraform workflow is as follows:

Write: Make changes to the infrastructure code (performed by a person)Init: Setup the working directory (performed by Terraform)Plan: Determine what needs to be created, updated, or destroyed to move from the current live stage to the new/desired state in the code (performed by Terraform)Apply: Make the changes to the live infrastructure (performed by Terraform)Destroy: Remove live resources no longer required (performed by Terraform)
In this article, we will take the theory we learned in the first article and learn how to apply it in a real-world scenario, provisioning the infrastructure for an Azure Function App using Terraform. We will then look at how we can utilize a Git workflow — branching, committing changes, and doing a core review on a pull request — as part of our GitOps processes.
Prerequisites
This is a hands-on tutorial that requires the following setup beforehand:
- Azure subscription (Free trial)
- Azure CLI installed (How to install)
- Terraform installed locally (Download)
- Note: The Terraform download is just a single binary file, not an installer. You will need to copy it to somewhere in your execution path.
- PowerShell
- An empty repository on GitHub (Instructions)
When you have created your Azure account, log in to the portal and head for the Subscriptions section by searching in the bar at the top of the page. Take a note of the Subscription ID assigned to it — you will need it later.

The complete code is available here and also included throughout the article to follow.
Step 1: Using the Azure Provider
Terraform is cloud-agnostic. It can provision infrastructure across many cloud services such as Azure, Amazon Web Services (AWS), and Google Cloud Platform (GCP). It can also be used to provision services from other SaaS providers and APIs, such as the Identity as a Service (IaaS) vendor Auth0, or observability service Datadog.
These plugins provided by services are called Terraform providers. A complete list of verified providers is available on the Terraform Registry.
A provider consists primarily of:
- Version number — These typically follow semantic versioning, so we know when to update.
- Resources — These are the new things we want to provision.
- Data sources — These are used to access resources that already exist. For example, we might need to get the details of a Key Vault to fetch secrets.
For working with Azure, there are three providers:
- Azure Resource Manager (ARM) — the basic provider that you will use to interact with Azure Cloud
- Azure Stack — for working with on-premises instances
- Azure Active Directory — Azure deals with Azure AD exclusively
Create a new file called main.tf in the root folder of your repository, and add the following lines of code. Note that required_providers are optional, but setting the version and source is strongly recommended.
terraform {
  required_providers {
      azurerm = {
        source  = "hashicorp/azurerm"
        version = ">=3.0.0"
      }
    }
}

provider "azurerm" {
  features {}
}
Best practice tip: For a large production system with lots of providers or provider versions, you should consider moving the providers to a separate file, provider.tf. This makes them easier to manage.
Step 2: Writing the Terraform Code
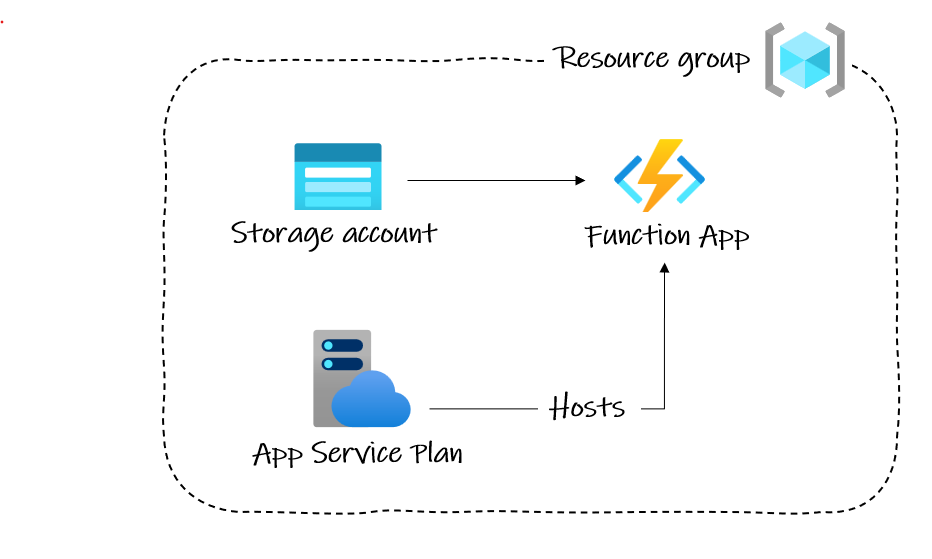
To deploy our serverless function code for the very simple web request, we need to provision the infrastructure for an Azure Function App.
An Azure Function App also requires additional infrastructure:
- Resource group — All resources in Azure must be inside a Resource Group.
- App Service plan — This defines your compute resources. Essentially, this plan decides what you pay for.
- Storage account — This is necessary for Function operations.
So, we’ll need to deploy these too!

We want to set the regional location for the resources, as well as a common prefix for their names. In more complex production systems, keep these organized in variable definition ‘tfvars’ files. To keep this example simple and contained in a single main.tf file, we will use local variables.
Add the following to the top of the file:
locals {
  location = "uksouth"
  prefix = "gitopsdemo"
}
At the bottom of our main.tf file, under everything we have added so far, paste in the code for the infrastructure that we will need:
resource "azurerm_resource_group" "main" {
  name     = "${local.prefix}-rg"
  location = local.location
  }

resource "azurerm_storage_account" "main" {
  name                     = "${local.prefix}storageacct"
  resource_group_name      = azurerm_resource_group.main.name
  location                 = azurerm_resource_group.main.location
  account_tier             = "Standard"
  account_replication_type = "LRS"
}

resource "azurerm_service_plan" "main" {
  name                = "${local.prefix}-asp"
  resource_group_name = azurerm_resource_group.main.name
  location            = azurerm_resource_group.main.location
  os_type            = "Linux"
  sku_name            = "Y1"
}

resource "azurerm_linux_function_app" "main" {
  name                       = "${local.prefix}-function"
  resource_group_name        = azurerm_resource_group.main.name
  location                   = azurerm_resource_group.main.location

  service_plan_id            = azurerm_service_plan.main.id
  storage_account_name       = azurerm_storage_account.main.name
  storage_account_access_key = azurerm_storage_account.main.primary_access_key

  site_config {}
}
That’s it for our Terraform.
We now have all of the infrastructure we need to deploy a Function App to Azure, declared in a single file. We can use it to easily provision (or re-provision) the same resources across multiple environments in a fraction of the time it would take to perform the task manually. All via automation if we wish, without any of the common risks, like configuration drift and inconsistencies.
Best of all, by declaring our infrastructure as code, we are on our way to practicing GitOps. We can now take advantage of Git developer tooling, including version history, branching, and pull requests with code reviews, to ensure the infrastructure described in the code matches what is actually provisioned in our live systems. Depending on the systems in place for developers at your organization, you might also link up your code changes with tools used to track project work, such as Azure DevOps Boards.
Step 3: Working with Git
Terraform greatly improves DevOps practices by tracking state. But problems with the state can, and do, occur. By using Git as the single source of truth for the current state of our infrastructure, we can mitigate that risk.
Go ahead and push your changes up to GitHub via the CLI or your favorite Git UI.
The Code Review
An essential control that GitOps borrows from software development is the pull request - where we want someone to manually check changes made to the code. This is commonly referred to as a code review.
We’re going to add Application Insights to our Function App now. As with application development, we will do this on a separate branch to avoid breaking the code currently in live on main. We’ll only merge it into the main branch after it has been code reviewed.
Create a new branch called add-app-insights locally in your Git UI, or on the command line with:
git checkout -b add-app-insights
Add a new resource:
resource "azurerm_application_insights" "main" {
  name                = "${local.prefix}-appinsights"
  resource_group_name = azurerm_resource_group.main.name
  location            = azurerm_resource_group.main.location
  application_type    = "web"
}
So that the Function App can talk to the Application Insights instance, add a new app setting to the function’s resource with the key:
resource "azurerm_linux_function_app" "main" {

  …

  app_settings = {
    AppInsights_InstrumentationKey = azurerm_application_insights.main.instrumentation_key
  }
}
Stage the updated main.tf commit the change, and push our new branch up to GitHub:
git add main.tf
git commit -m "Add app insights"
git push --set-upstream origin add-app-insights
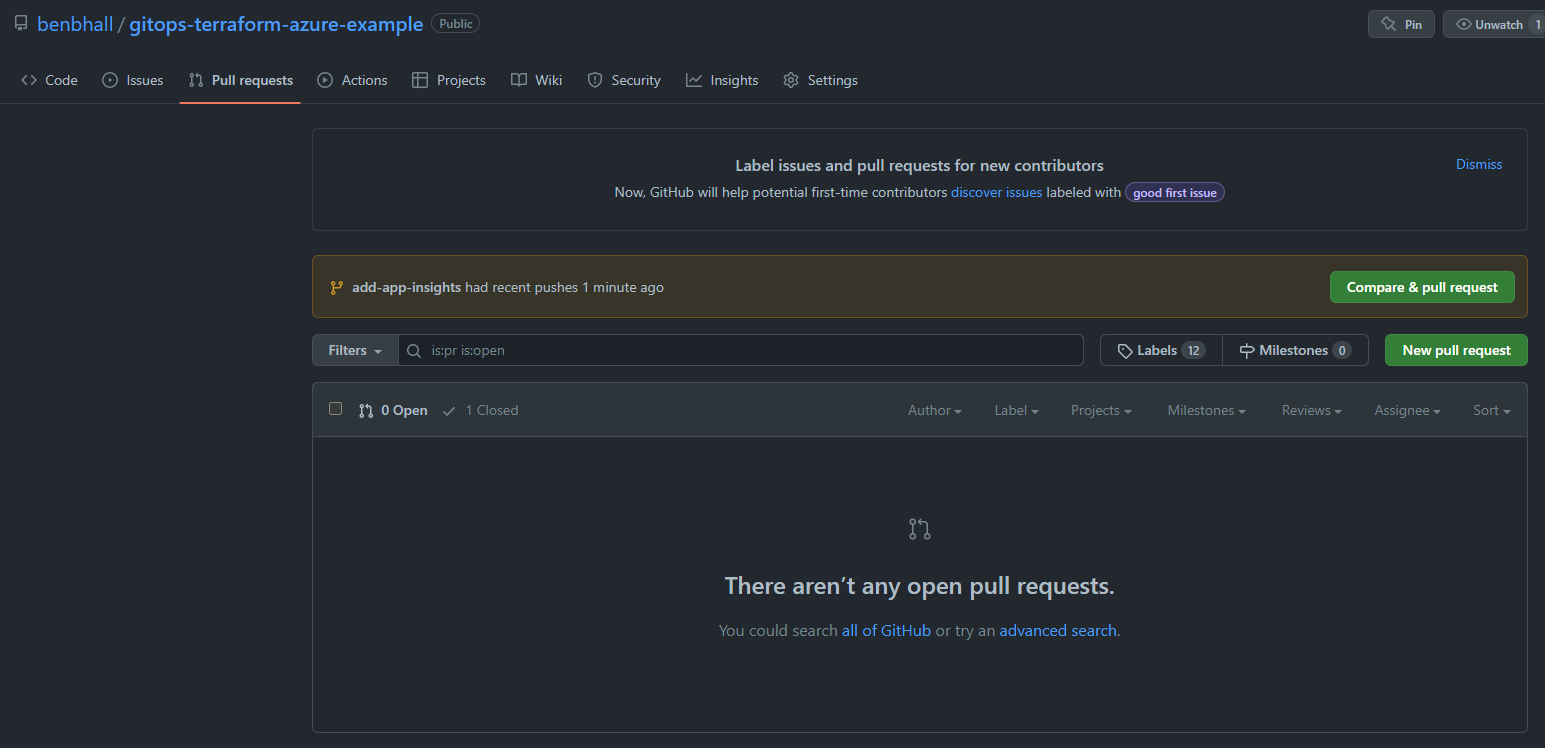
Navigate to your repository on the GitHub website and go to the Pull requests tab. It should have noticed your new changes and offer to Compare & pull request. Click that button.

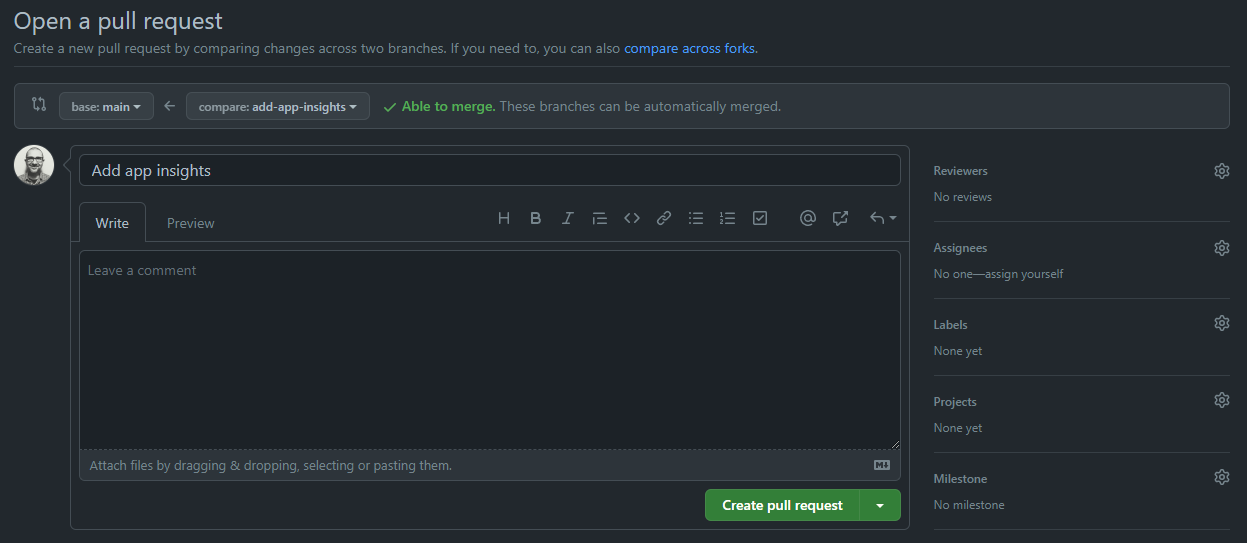
The screen to open a PR is your opportunity to explain any complex changes to the person reviewing it. In our case, it’s a self-explanatory addition so we can leave the comments blank.

It’s also a very good time to have one last check of the changes you are asking to pull into the main branch. I can’t count the number of times I’ve caught a mistake at this point.

Click the button to Create pull request when you’re happy to proceed.
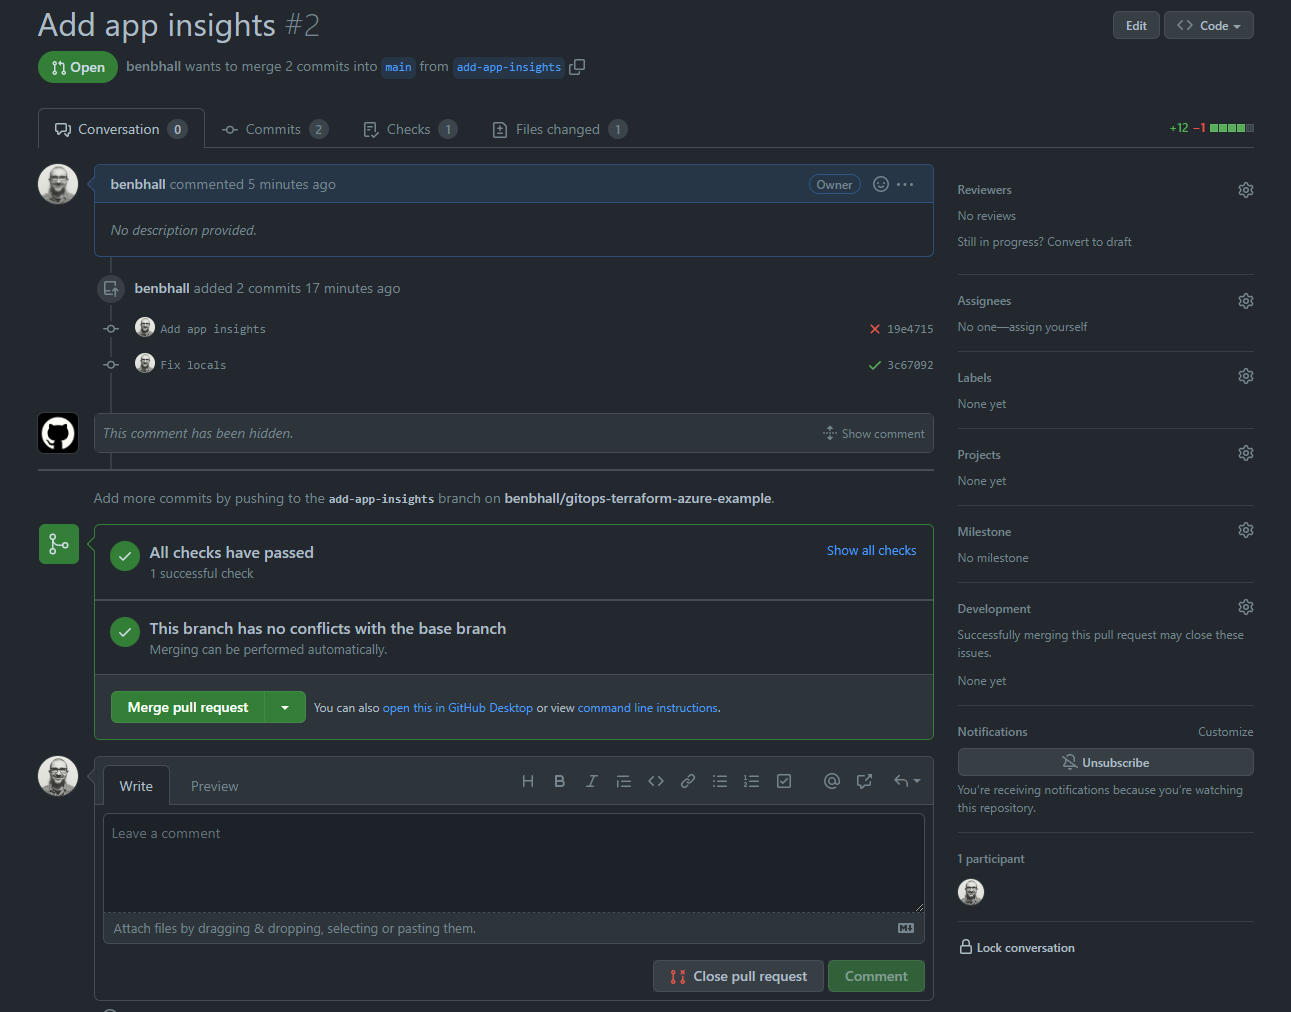
Another member (or members) of your team can then verify your code. When setting up the repository for a GitOps workflow, as with application code, it is a good idea to set rules to enforce the number of approvals required, who should approve, and other automated checks. We’ll explore this in the next article.

Then it can be merged into the main branch with Merge pull request.
We’ll look at using GitHub Actions to automatically deploy these changes to Azure in the next article.
Summary
In this article, you got some hands-on experience writing Terraform code to deploy simple Azure infrastructure. We also explored the Git workflow used by software developers to ‘gate’ infrastructure changes to our main branch, with main being the source of truth for what the desired state of our infrastructure is.
In the next article, we will construct a CI/CD pipeline that can use automated checks in addition to the code review process and provision the resources to Azure.
To learn more about GitOps and how you can use GitOps to manage the configurations of your applications deployed to Kubernetes, check out the resource How to use GitOps with Microsoft Azure.
