This article shows the quickest way to implement Open API documentation for Azure Functions. The example given has been shown for .NET 6 and Azure Function V4 but it should work for .NET Core 3 and Azure Function V2.
Introduction
To put it simply, OpenAPI is a standard approach that defines how you can describe your APIs for your consumers. It specifies certain styles in which you produce a document where the request format, response, error format and almost everything else that a developer would need to know before consuming your API is explained.
This article demonstrates the quickest way to implement Open API documentation for your Azure Functions. Using this approach, we need to write very little setup code unlike the other approaches as lot of it happens under the hood. The example below has been shown for .NET 6 and Azure Function V4 but it should also work for .NET Core 3 and Azure Function V2.
Major Benefits of API Documentation
The OpenAPI standard is widely popular and if you are planning to expose your APIs to external consumers, then it is almost expected that you will follow OpenAPI for your API design. Official link to OpenAPI can be found in the link below:
Also, once you have decided on the data exchange format for your APIs, if you generate an API document and share it with the consumer developers, they can start developing their applications without worrying about the completion status of your backend implementation of your APIs.
Using the Code
The steps shown in this handbook are pretty straightforward. The required code is shared as screenshots and can also be found on the repo shared.
Step 1: Create a New Azure Function Project
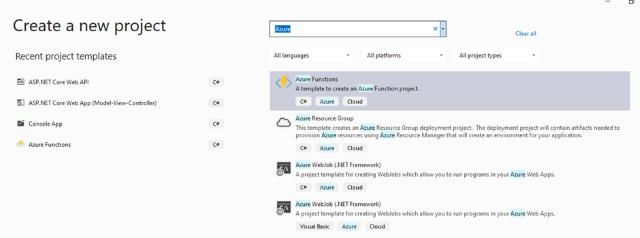
Step 2: Select HTTP Trigger with OpenAPI
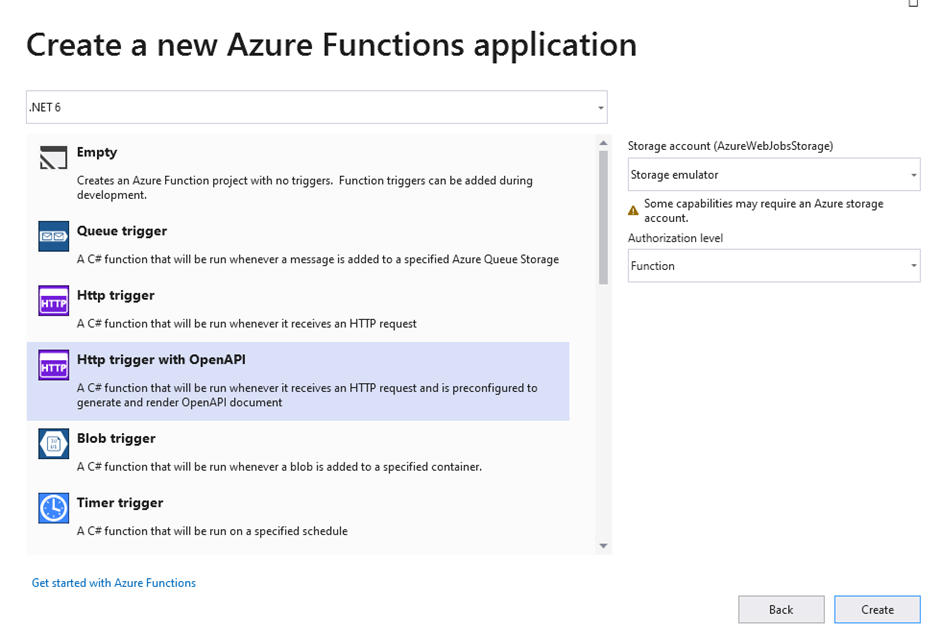
Step 3: Update Highlighted Package to Latest 1.3.0 Version

Step 4: Update Highlighted Package to Latest 4.1.1 Version

Step 5: Add a New Class OpenApiConfigurationOptions.cs
It is not mandatory to include the class OpenApiConfigurationOptions but it provides you the flexibility to customize additional informative content in your API Documentation. It is also possible to change the styling of the Swagger interface that it produces for your document as well but that is for another day.
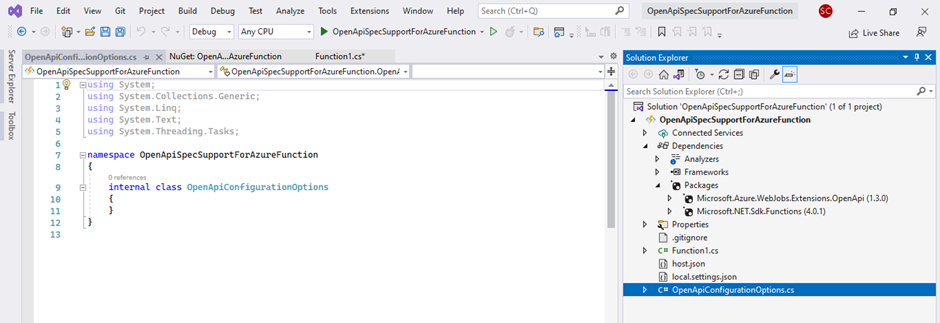
Step 6: Update the Body of the OpenApiConfigurationOptions.cs File as Below
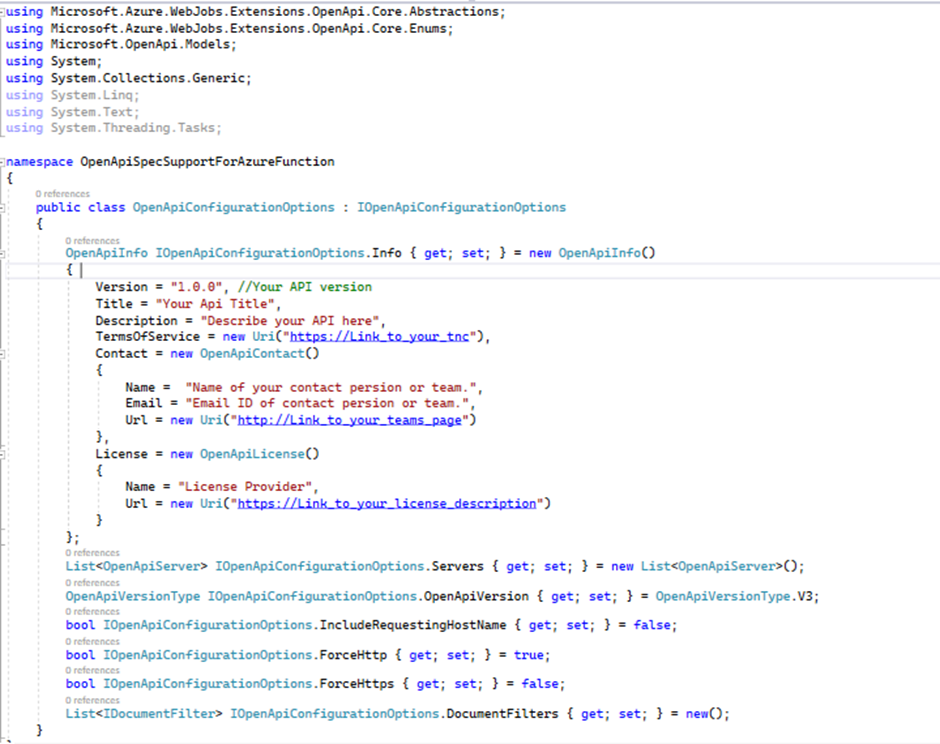
ForceHttp & ForceHttps
Set ForceHttp to true & ForceHttps to false if you have not configured HTTPS for your Azure Function. That means the Swagger URLs that will be generated for your document will only be available over HTTP.
Set ForceHttp to false & ForceHttps to true if you have configured HTTPS for your Azure Function. That means users will be redirected to HTTPS endpoint for the Swagger URLs even if they try opening over HTTP.
Set ForceHttp to false & ForceHttps to false if you have configured HTTPS for your Azure Function. That means users will be able to access endpoint for the Swagger URLs over HTTP as well as HTTPS.
Using the OpenApi Annotations
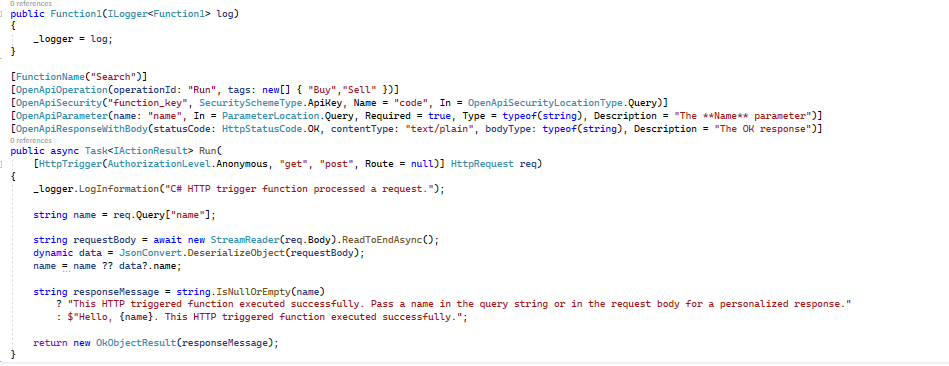
I will soon publish a separate article on how to use the various possible annotations in your functions to auto generate an API document. They are pretty much understandable by themselves and you can start playing around with them till then.
Step 7: Press F5 and Wait for the Azure Function to Start

Step 8: Hit the 5th URL in Your Local Browser and You Can See Your Swagger Interface

Conclusion
In these simple steps, you can easily create the framework for implementing your OAS document. The Open API Annotations on top of the Run method in the Function1.cs file help us in describing our API with great ease. Try playing around with all the available annotations to see what each one has to offer. I will post an article separately to explain each one of them separately.
Points of Interest
The error messages for this Microsoft.Azure.WebJobs.Extensions.OPenApi is not that self explanatory so keep the code in the OpenAPIConfigurationOptions class as described in this article and you should be good to go.
History
- 6th August, 2022: Initial version
