When strictly speaking about taking machine learning (ML) applications from R&D to production, MLOps is a critical component often overlooked. The solutions to this challenge are often best addressed on a case-by-case basis. In this article, I offer a general blueprint for building an MLOps environment in the cloud with open-source tools to ensure that we develop and deploy performant models (Figure 1). As the backbone for our ML component, I will leverage the Intel® AI Analytics Toolkit, specifically the Intel® Distribution for Python* and the Intel® Extension for PyTorch*, to drive higher performance during training and inference. After reading this article, you will have at your disposal the mechanisms to perform fast model experimentation, model management, and serving, all in a serverless cloud environment.
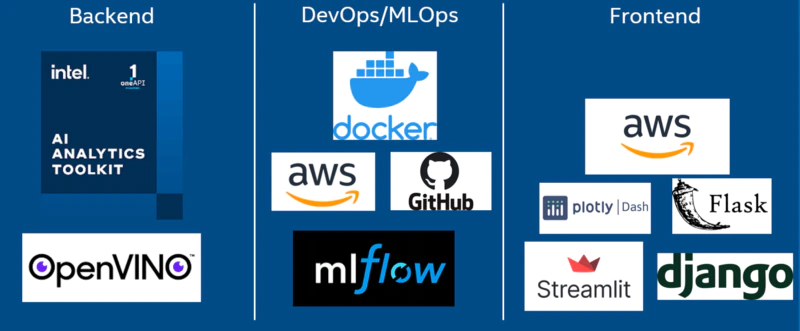
Figure 1. Image showing the various tools that play a role in the server-side, operational, and client-side components of a solution that utilizes this MLOps blueprint. We will not be focusing on Docker*, GitHub*, or any of the frontend components in this article.
MLOps — How Models Reach Escape Velocity
MLOps marries ML with the agility and resilience of DevOps — tying ML assets to your CI/CD pipelines for stable deployment into production environments. This creates a unified release process that addresses model freshness and drifts concerns. Without a proper MLOps pipeline, ML application engineers cannot deliver high-quality ML assets to the business unit. It becomes just one big science experiment inside of R&D.
The main reason there is a lack of investment in MLOps stems from a poor understanding of the impacts of model/data drift and how they can affect your application in production. Model drift refers to the degradation of model performance due to changes in data and relationships between input and output variables. Data drift is a type of model drift where the properties of the independent variables change. Examples of data drift include changes in the data due to seasonality, changes in consumer preferences, the addition of new products, etc. A well-established MLOps pipeline can mitigate these effects by deploying the most relevant models to your data environment. At the end of the day, the goal is to always have the most performant model in our production environment.
MLOps Solution — MLflow* ML Lifecycle Management Open Source Tool
MLflow* is an open-source ML lifecycle management platform (Figure 2). MLflow works with any ML library that runs in the cloud. It’s easily scalable for big data workflows. MLflow is composed of four parts:
- MLflow Tracking allows you to record and query code, data, configurations, and results of the model training process.
- MLflow Projects allows you to package and redeploy your data science code to enable reproducibility on any platform.
- MLflow Models is an API for easy model deployment into various environments.
- MLflow Model Registry allows you to store, annotate, and manage models in a central repository.
I will cover how to set up a password-protected MLflow server for your entire team.
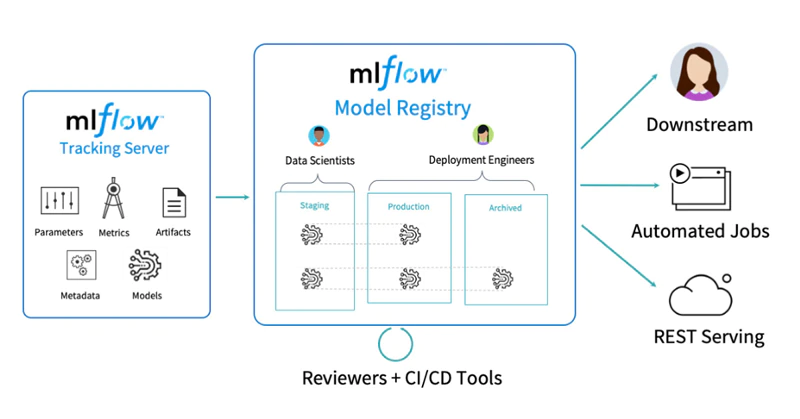
Figure 2. MLflow* trackking and registry components. (Image courtesy of Databricks.)
MLflow Server — AWS* Solution Infrastructure Design
The cloud component of our MLOps environment is very straightforward. I require the infrastructure to train, track, register and deploy ML models. The diagram below depicts our cloud solution, which consists of a local host (or another remote host) that uses various MLflow APIs to communicate with the resources in a remote host (Figure 3). The remote host is responsible for hosting our tracking server and communicating with our database and object storage.
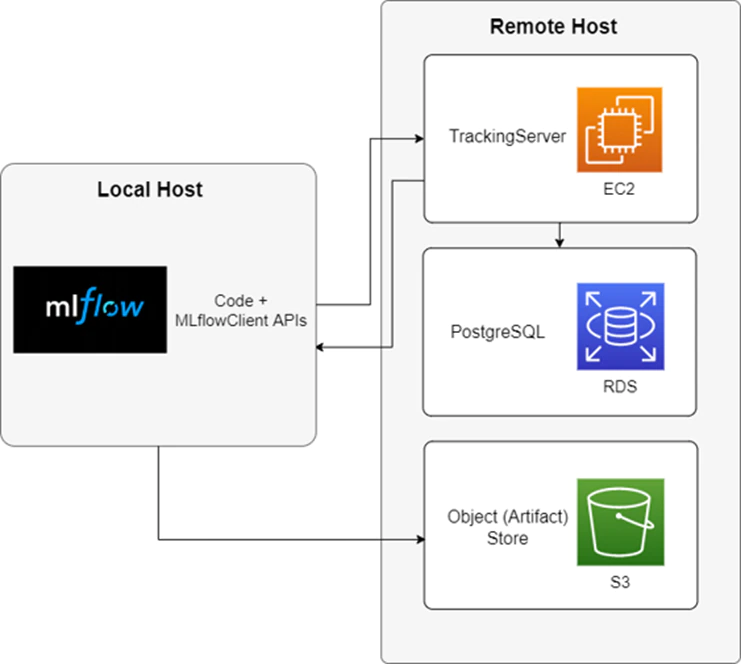
Figure 3. AWS* solution architecture depicting the components that reside on the remote and local hosts.
This article includes step-by-step instructions to set up this architecture. You will find that I leverage free-tier AWS services. This is not recommended if you are establishing a production-level environment.
Table 1 shows the resources used to set up the product demo. You are welcome to use this as a blueprint and adjust it to your needs. The selected instances are all 3rd Gen Intel® Xeon® Scalable processors with varying vCPU and GiB capacities.
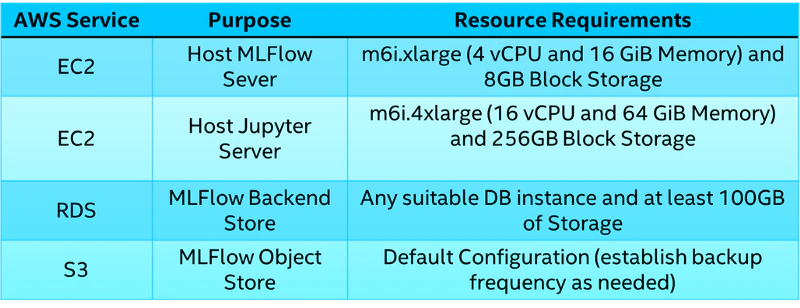
Table 1. The AWS* services and resource requirements for various components of this blueprint that have been tested in a general-purpose environment.
Machine Learning Frameworks — Intel® AI Analytics Toolkit
Our MLOps environment requires a set of performant ML frameworks to build our models. The Intel AI Analytics Toolkit provides Python tools and frameworks built using oneAPI libraries for low-level compute optimizations. By leveraging this toolkit, I can underpin our MLOps environment with the ability to deliver high-performance, deep learning training on Intel® XPUs and integrate fast inference into our workflow.
Table 2 illustrates an end-to-end ML lifecycle, and how each component is addressed in our MLOps blueprint. Components of this workflow where the Intel AI Analytics Toolkit help boost performance and drive down compute costs are highlighted in bold.
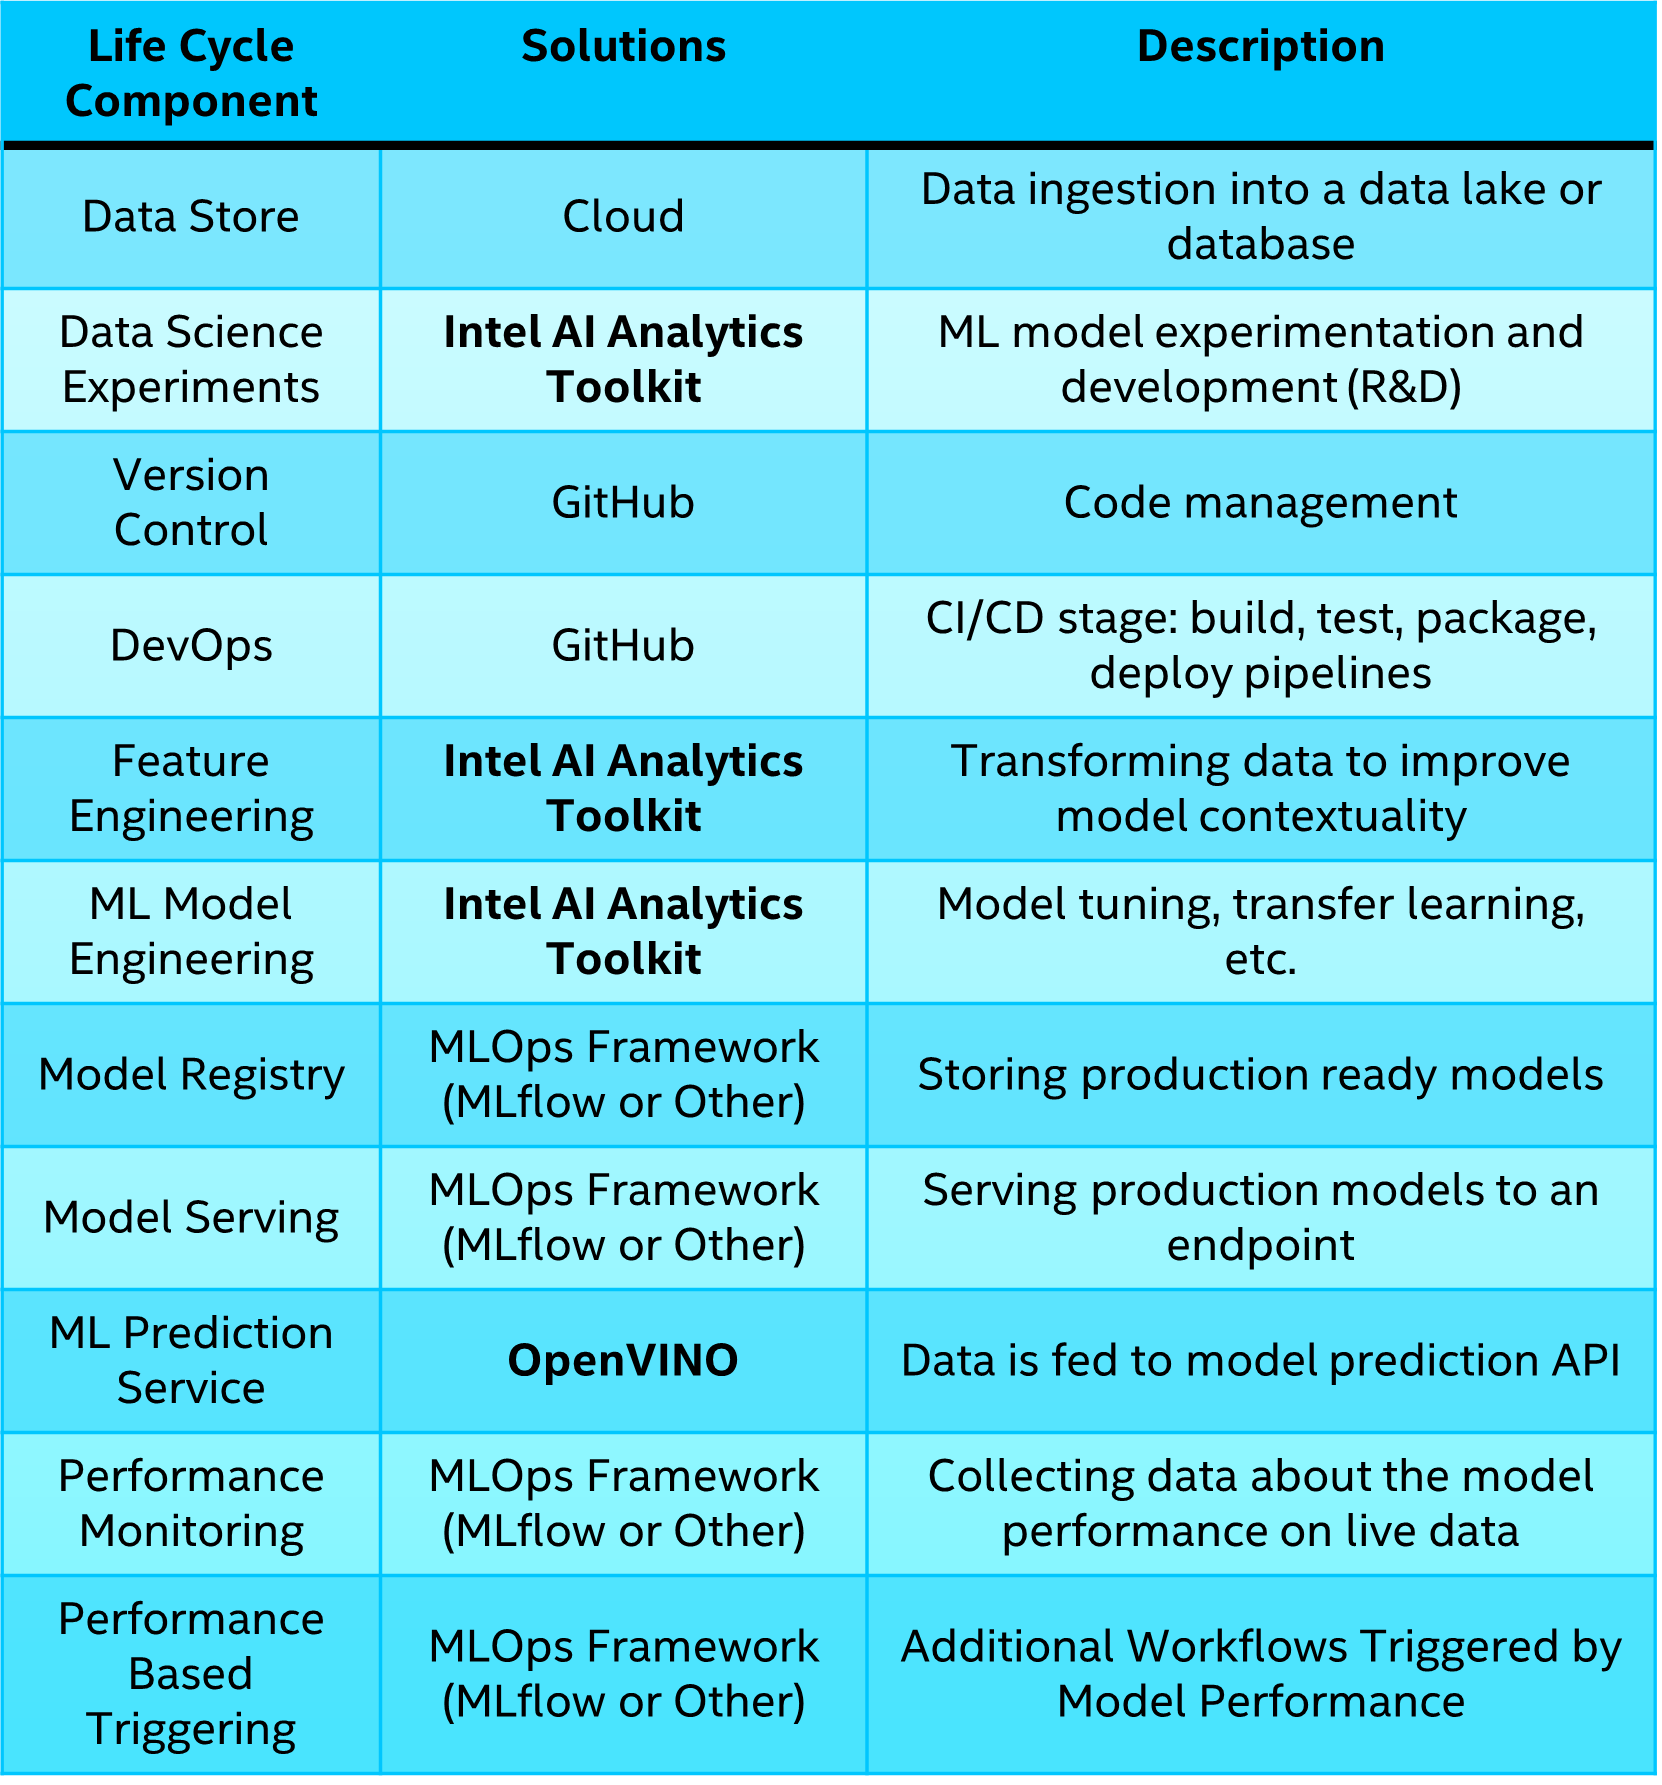
Table 2. End-to-end ML lifecycle solutions.
This article is not about setting up conda environments, but I provide an environment configuration script (aikit_ipex.yml ) below for your benefit. You can create the appropriate conda environment using the following command:
conda env create -f aikit_ipex.yml
name: aikit_ipex
channels:
  - conda-forge
  - intel
  - defaults
dependencies:
  - cpuonly
  - intelpython
  - intelpython3_core
  - ipykernel
  - jupyterlab
  - numpy
  - pandas
  - pip
  - python
  - scikit-learn
  - scipy
  - pip:
    - boto3==1.24.59
    - mlflow==1.28.0
    - seaborn==0.11.2
    - torch==1.12.1
    - torchvision==0.13.1
Setting up the MLflow Remote Host
Setting Up the Host Machine with AWS EC2
- Go to your AWS management console and launch a new EC2 instance. I selected an Amazon Linux OS*, but you’re welcome to use another Linux and Windows OS* from the list.
- Create a new key pair if you don’t already have one. You will need this to SSH into your instance and configure various aspects of your server.
- Create a new security group and allow SSH, HTTPS, and HTTP traffic from Anywhere (0.0.0.0/0). For maximum security, however, it is recommended that you safelist specific IPs that should have access to the server instead of having a connection that is open to the entire internet.
- The EC2 storage volume for your server doesn’t need to be any bigger than 8–16 GB unless you intend to use this instance for other purposes. My recommendation would be that you leave this instance as a dedicated MLflow server.
Setting Up the S3 Object Store
Your S3 bucket can be used to store model artifacts, environment configurations, code versions, and data versions. It contains all the vital organs of your MLflow ML management pipeline.
- Create a new bucket from the AWS management console.
- Enable ACLs and leave all public access blocked. ACLs will allow other AWS accounts with proper credentials to access the objects in the bucket.
Setup the AWS RDS Postgres Database
This component of the MLflow workflow will be in charge of storing runs, parameters, metrics, tags, notes, paths to object stores, and other metadata.
- Create a database from the AWS management console. I will be working with a PostgreSQL database. Select the Free Tier.
- Give your database a name, assign a master username, and provide a password for this account. You will be using the information to launch your MLflow server.
- Select an instance type. Depending on how much traffic you intend to feed through the MLflow server (i.e., how many times you will be querying models and data), you might want to provide a beefier instance.
- You will also need to specify the storage. Again, this will depend on how much metadata you need to track. Remember, models and artifacts will not be stored here, so don’t expect to need excessive space.
- Public access is essential to allow others outside your virtual private cluster to write/read the database. Next, you can specify the safelist IPs using the security group.
- You must create a security group with an inbound rule that allows all TCP traffic from anywhere (0.0.0.0/0) or specific IPs.
- Launch RDS.
Install the AWS CLI and Access Instance with SSH
AWS CLI is a tool that allows you to control your AWS resources from the command line. Follow this link to install the CLI from the AWS website. Upon installing the AWS CLI, you can configure your AWS credentials to your machine to permit you to write to the S3 object store. You will need this when incorporating MLflow into scripts, notebooks, or APIs.
- From your EC2 instance Dashboard, select your MLflow EC2 instance and click Connect.
- Navigate to the SSH client tab and copy the SSH example to your clipboard from the bottom of the prompt.
- Paste the SSH command into your prompt. I’m using Git Bash from the folder where I have stored my .pem file.
- Install the following dependencies:
sudo pip3 install mlflow[extras] psycopg2-binary boto3
sudo yum install httpd-tools
sudo amazon-Linux-extras install nginx1 - Create a nginx user and set a password:
sudo htpasswd -c /etc/nginx/.htpasswd testuser - Finally, I will configure the nginx reverse proxy to port 5000:
sudo nano /etc/nginx/nginx.conf
Using nano, I can edit the nginx config file to add the following information about the reverse proxy:
location / {
proxy_ass http://localhost:5000/;
auth_basic "Restricted Content";
auth_basic_user_file /etc/nginx/.htpasswd;
}
Your final script should look something like the console nano printout in Figure 4.
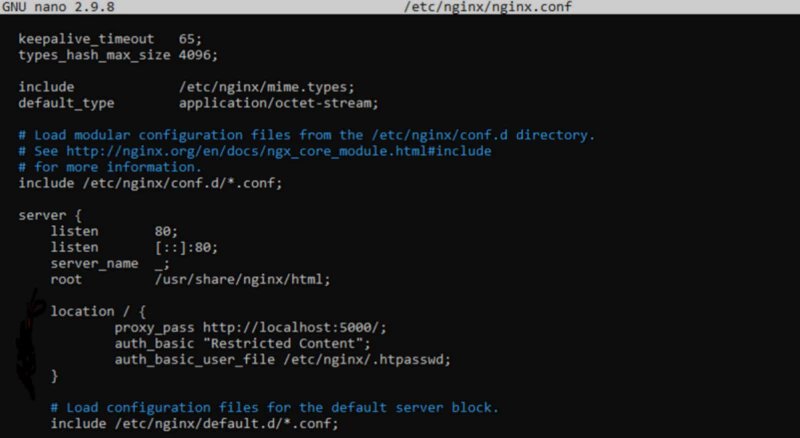
Figure 4. nano print of our proxy server nginx.conf after adding the server location information.
Start the nginx and MLflow Servers
Now you can start your nginx reverse proxy server and run your MLflow remote servers. This part requires you to retrieve some information from the AWS management console.
- Start our nginx server:
sudo service nginx start - Start your MLflow server and configure all components of your object storage (S3) and backend storage (RDS):
mlflow server --backend-store-uri
postgresql://MASTERUSERNAME:YOURPASSWORD@YOUR-DATABASE-
ENDPOINT:5432/postgres --default-artifact-root s3://BUCKETNAME --
host 0.0.0.0
Where can you find this info?
- MASTERUSERNAME — The username that you set for your PostgreSQL RDS DB.
- YOURPASSWORD — The password you set for your PostgreSQL RDS DB.
- YOUR-DATABASE-ENDPOINT — This can be found in your RDS DB information within the AWS management console.
- BUCKETNAME — The name of your S3 bucket.
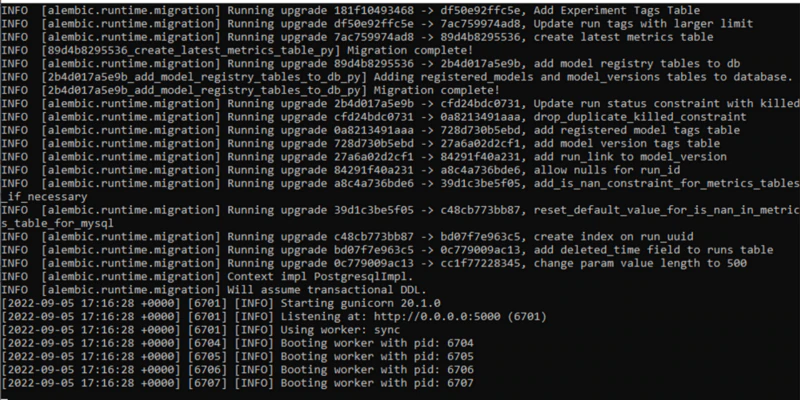
Once executing this command, you should get a massive printout and information about your worker and pid IDs:
Shut Down Your MLflow Server or Run in the Background
If you would like to shut down your MLflow server at any time, you can use the following command:
sudo fuser -k <port>/tcp
If you want to run it in the background so that you can close the terminal and continue running the server, add nohup and & to your MLflow server launch command:
nohup mlflow serer --backend-store-uri
postgresql://MASTERUSERNAME:YOURPASSWORD@YOUR-DATABASE-
ENDPOINT:5432/postgres --default-artifact-root s3://BUCKETNAME --
host 0.0.0.0 &
Access the MLflow UI from Your Browser
Now that you have set up your entire MLflow server infrastructure, you can start interacting with it from the command line, scripts, etc. To access the MLflow UI, you need your EC2 instance’s IPV4 Public IP address.
- Copy and paste your IPV4 Public IP. (This can be found inside your EC2 management console.) Ensure that you add http:// before the IP address.
- You will be prompted to enter your nginx username and password.
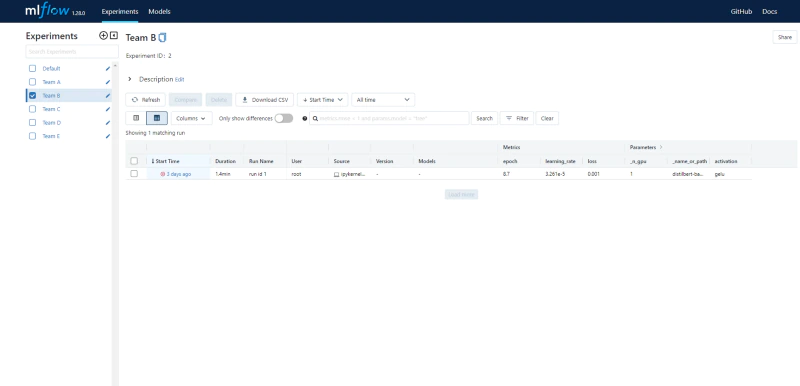
- Voilà! You can now access and manage your experiments and models from the MLflow UI:
Adding MLflow to Your Code and Intel® AI Reference Kit Example
MLflow Tracking Server
The first thing you need to do is to add MLflow credentials and configure the tracking URI inside of your development environment:
import mlflow
tracking_uri =''
client = mlflow.tracking.MlflowClient(tracking_uri=tracking_uri)
os.environ['MLFLOW_TRACKING_USERNAME'] = 'testuser'
os.environ['MLFLOW_TRACKING_PASSWORD'] = 'password'
os.environ['MLFLOW_TRACKING_URI'] = traking_uri
Now let’s train a model to classify images using a VGG16 model (please visit the Intel® AI Reference Kit visual quality inspection repository to see the rest of the source code):
experiment_name = 'Team A'
mlflow.set_experiment(experiment_name)
mlflow_artifact_path='artifacts'
run_id = 'run 1'
with mlflow.start_run(run_name=run_id) as run:
model = CustomVGG()
class_weight = torch.tensor(class_weight).type(torch.FloatTensor).to(DEVICE)
criterion = nn.CrossEntropyLoss(weight=class_weight)
optimizer = optim.Adam(model.parameters(), lr=LR)
model, optimizer = ipex.optimize(model=model, optimizer, dtype=torch.float32)
start_time = time.time()
trained_model = train(data_loader=train_loader, model=model, optimizer=optimizer, criterion=criterion, device=DEVICE, target_accuracy=TARGET_TRAINING_ACCURACY, data_aug=data_aug)
train_time = time.time()-start_time
mlflow.pytorch.log_model(pytorch_model=trained_model, artifact_path=mlflow_artifact_path)
mlflow.log_metrics('Training Time', train_time)
latest_run_id = run.info.run_id
mlflow.end_run()
MLflow Model Registry
After performing ML experimentation and defining a few models worth putting into production, you can register them and stage them for deployment. In the block below, I use the model’s run ID and the experiment name to add a model to the MLflow Model Registry. I then move this model into a “Production” stage, load it, and use it as a prediction service for identifying pills with anomalies:
import mlflow.pyfunc
model_uri=f"runs:/{current_run_id}/{mlflow_artifact_path}"
name='Team A'
await_registration_for=5
mlflow.register_model(model_uri, name, await_registration_for)
client.transition_model_version_stage(name="Team A", version=8, stage="Production")
model_name = 'Team A'
stage = 'Production'
model_uri= f"models:/{model_name}/{stage}"
mlflow_model = mlflow.pytorch.load_model(model_uri)
predict_localize(mlflow_model, test_loader, DEVICE, thres=HEATMAP_THRESH, n_samples=3, show_heatmap)
The model I deployed into production is working great (Figure 5)!

Figure 5. Model deployed to identify anomalous (the first two images) and normal (the image on the right) pills.
Conclusion
This article explored a general cloud-based MLOps environment that leverages Intel’s AI Analytics Toolkit to compose an accelerated, end-to-end ML pipeline. This pipeline is a significant first step in ensuring that you always serve the most performant models in your production environment. The intent of this article is not to propose a cookie-cutter environment. As the reader and engineer implementing the pipeline, it is essential to recognize where changes need to be made to consider your compute, security, and general application requirements.
See Related Content
Technical Articles
Blogs
On-Demand Webinars & Workshops
Get the Software
Intel® AI Analytics Toolkit
Accelerate end-to-end machine learning and data science pipelines with optimized deep learning frameworks and high-performing Python* libraries.
Get It Now
See All Tools
