The basics of rendering a clock in Scalable Vector Graphics (SVG) is demonstrated in this article.
Table of Contents
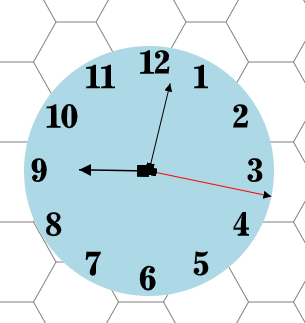
In my previous article, SVG Grids, I presented some simple Scalable Vector Graphics concepts: square, triangle and hexagon grids, scrolling, simple animation and object dragging. In this article, we will create an analog clock:
The code presented here builds on the demonstration code that I wrote in the previous article, so I won't go over the "Basic Application Setup" as you can read that in the previous article.
This article is sort of similar to one I wrote in 2004, A Vector Graphics Rendered Animated Clock, but does not VG.net nor has cool styling of the clock hands or clock face. This article focuses on the barebones basics. Also, readers may find some of the content here to be a repeat of a 2018 article I wrote, Build a Prototype Web-Based Diagramming App with SVG and Javascript, however the intention in this series of articles is to do more interesting things and using TypeScript, not JavaScript.
To begin with, line ends are defined as marker elements in the svg defs section:
<svg id="svg" width="400" height="400" xmlns="http://www.w3.org/2000/svg">
<defs>
<marker id="boxstart" viewBox="0 0 10 10" refX="0" refY="5"
markerWidth="8" markerHeight="8" orient="auto">
<path d="M 10 0 L 0 0 L 0 10 L 10 10 z" />
</marker>
<marker id="trianglestart" viewBox="0 0 10 10" refX="0"
refY="5" markerWidth="8" markerHeight="8" orient="auto">
<!--
<path d="M 10 0 L 0 5 L 10 10 z" />
</marker>
<marker id="triangleend" viewBox="0 0 10 10" refX="10"
refY="5" markerWidth="8" markerHeight="8" orient="auto">
<!--
<path d="M 0 0 L 10 5 L 0 10 z" />
</marker>
</defs>
</svg>
I've defined three markers:
- A box
- A triangle start which would be connected to the "start" of the line
- A triangle end, which would be connected to the "end" of the line
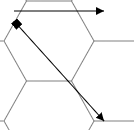
We can create a couple lines that demonstrate how the markers are applied with the marker-start and marker-end tags:
SvgElementController.appendChild(group, "line", {
  x1: x1, y1: y1, x2: x2, y2: y2,
  fill: "#FFFFFF", stroke: "black", "stroke-width": 1,
  "marker-end": "url(#triangleend)"
});
and:
SvgElementController.appendChild(group, "line", {
  x1: x1, y1: y1, x2: x2, y2: y2,
  fill: "#FFFFFF", stroke: "black", "stroke-width": 1,
  "marker-start": "url(#boxstart)",
  "marker-end": "url(#triangleend)"
});
which renders as:
As an aside, in order to drag these lines around on the canvas, we need a wider invisible line as the "selector" object, and this requires that we create a group to contain both the invisible "selector" and the line itself. The complete function therefore looks like this:
private createLine(x1: number, y1: number, x2: number, y2: number,
id: string, additionalProps: {} = null): void {
const group = SvgElementController.createElement("g", {}, id);
SvgElementController.appendChild(group, "line",
{ x1: x1, y1: y1, x2: x2, y2: y2, stroke: "black",
"stroke-width": 10, "stroke-opacity": "0", "fill-opacity": "0" });
let props = { x1: x1, y1: y1, x2: x2, y2: y2, fill: "#FFFFFF",
stroke: "black", "stroke-width": 1 };
props = Object.assign(props, additionalProps ?? {});
SvgElementController.appendChild(group, "line", props);
const ctrl = Controllers.appController.registerSvgElementController
(id, new GroupController());
ctrl.init(group);
Controllers.mouseController.wireUpEvents(id);
}
and the two lines in the screenshot are created by calling createLine with some starting coordinates:
this.createLine(10, 10, 100, 10, "line1", { "marker-end": "url(#triangleend)" });
this.createLine(10, 20, 100, 120, "line2",
     { "marker-start": "url(#boxstart)", "marker-end": "url(#triangleend)"});
Now we have a couple "pointy" lines that we can use as the template for the clock.
Creating the clock and animating it involves three function calls:
const clockGroup = this.createClock(100, 100, 350, 350, "clock");
this.showTime(clockGroup);
this.startClock();
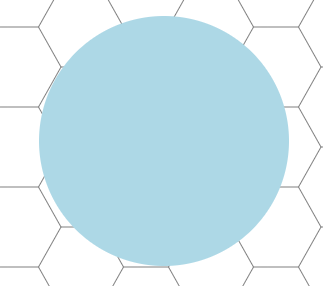
We'll start with the clock face, a very boring light blue circle:
private createClock(x1: number, y1: number, x2: number,
y2: number, id: string): HTMLElement {
const group = SvgElementController.createElement("g", {}, "clockGroup");
group.setAttribute("transform", `translate(0, 0)`);
const cx = (x1 + x2) / 2;
const cy = (y1 + y2) / 2;
const r = (x2 - x1) / 2;
SvgElementController.appendChild(group, "circle",
{ r: `${r}`, fill: `lightblue`, stroke: "none", "stroke-width": 1,
cx: `${cx}`, cy: `${cy}` }, id);
const ctrl = Controllers.appController.registerSvgElementController
(id, new GroupController());
Controllers.appController.registerSvgElementController
("clockGroup", new GroupController());
ctrl.x1 = x1;
ctrl.y1 = y1;
ctrl.x2 = x2;
ctrl.y2 = y2;
ctrl.init(group);
Controllers.mouseController.wireUpEvents("clockGroup");
return group;
}
Here, we see that we are grouping all the elements of the clock so that the entire clock, as a group of circles, lines, and numbers, can be moved around on the grid.
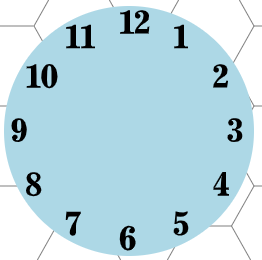
The numbers are added by continuing the code before the return statement, and some magic numbers are used to position the digits inside the circle:
const innerr = r - 17;
const xoffset = 10;
const yoffset = -12;
for (let n = 1; n <= 12; ++n) {
if (n >= 10) {
let el = SvgElementController.appendChild
(group, "path", { d: this.svgNumbers[1] });
let x = cx + Math.sin(Math.PI * 2 * n / 12) * innerr - xoffset;
let y = cy - Math.cos(Math.PI * 2 * n / 12) * innerr - yoffset;
el.setAttribute("transform", `translate(${x},
${y}) scale(0.002, -0.002) rotate(0)`);
el = SvgElementController.appendChild(group, "path",
{ d: this.svgNumbers[n - 10] });
x = cx + Math.sin(Math.PI * 2 * n / 12) * innerr + 15 - xoffset;
y = cy - Math.cos(Math.PI * 2 * n / 12) * innerr - yoffset;
el.setAttribute("transform", `translate(${x},${y})
scale(0.002, -0.002) rotate(0)`);
} else {
let el = SvgElementController.appendChild
(group, "path", { d: this.svgNumbers[n] });
let x = cx + Math.sin(Math.PI * 2 * n / 12) * innerr - xoffset;
let y = cy - Math.cos(Math.PI * 2 * n / 12) * innerr - yoffset;
el.setAttribute("transform", `translate(${x},${y})
scale(0.002, -0.002) rotate(0)`);
}
}
The numbers, represented as SVG paths, were obtained from https://svgsilh.com/tag/number-1.html and are, as per that website, "Free SVG Image & Icon. All contents are released under Creative Commons CC0" (read about CC0) and the comments in the SVG files indicate that they were created by potrace 1.15, written by Peter Selinger 2001-2017.
The path for each digit is a dictionary lookup, showing the entry for the digit "1" here:
private svgNumbers = {
1: 'M4495 12298 c-604 -535 -1486 -866 -2660 -998 -331 -37 -854 -70 \
-1104 -70 l-101 0 -2 -415 -3 -416 30 -29 30 -29 735 -4 c620 -3 753 -7 850 \
-21 149 -22 254 -50 316 -86 82 -46 123 -142 161 -372 16 -95 18 -371 21 \
-3663 2 -2593 0 -3591 -8 -3675 -44 -446 -177 -714 -416 -838 -279 -144 -663 \
-202 -1350 -202 l-330 0 -27 -28 -27 -28 0 -389 0 -389 27 -28 27 -28 3386 0 \
3386 0 27 28 27 28 0 390 0 390 -27 26 -28 26 -390 5 c-415 5 -557 17 -779 62 \
-212 43 -367 103 -480 187 -156 115 -260 347 -312 693 -17 114 -18 350 -21 \
5005 l-3 4884 -27 28 -27 28 -410 -1 -411 0 -80 -71z',
...etc...
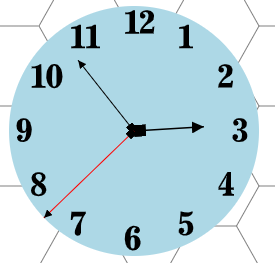
The hour hand is a shorter and thicker line, the minute hand thinner and longer, and the second hand is red and reaches to the extent of the clock face and the three hands are created thus:
private showTime(clockGroup: HTMLElement): void {
  const handPositions = this.getHandPositions();

  const hourHand = SvgElementController.appendChild(clockGroup, "line", {
    x1: handPositions.cx, y1: handPositions.cy,
    x2: handPositions.hrx, y2: handPositions.hry,
    fill: "#FFFFFF", stroke: "black", "stroke-width": 1.5,
    "marker-start": "url(#boxstart)",
    "marker-end": "url(#triangleend)"
  }, "hourHand");

  Controllers.appController.registerSvgElementController
              (hourHand.id, new LineController());

  const minuteHand = SvgElementController.appendChild(clockGroup, "line", {
    x1: handPositions.cx, y1: handPositions.cy,
    x2: handPositions.mx, y2: handPositions.my,
    fill: "#FFFFFF", stroke: "black", "stroke-width": 1,
    "marker-start": "url(#boxstart)",
    "marker-end": "url(#triangleend)"
  }, "minuteHand");

  Controllers.appController.registerSvgElementController
              (minuteHand.id, new LineController());

  const secondHand = SvgElementController.appendChild(clockGroup, "line", {
    x1: handPositions.cx, y1: handPositions.cy, x2: handPositions.sx,
                          y2: handPositions.sy,
    fill: "#FFFFFF", stroke: "red", "stroke-width": 1,
    "marker-start": "url(#boxstart)",
    "marker-end": "url(#triangleend)"
  }, "secondHand");

  Controllers.appController.registerSvgElementController
                            (secondHand.id, new LineController());
}
We're not allowing the clock hands to be dragged around the surface, so the earlier createLine function is not used, nor do we need a wider "selector" line. Also, in anticipation that we will be needing to recompute the coordinates of the hands as the clock "ticks", we have this supporting interface and function:
interface ITime {
  cx: number;
  cy: number;
  hrx: number;
  hry: number;
  mx: number;
  my: number;
  sx: number;
  sy: number;
}
The interface is simply a definition to provide intellisense for the hand's starting coordinates and the hour, minute, and second hand end coordinates. The function itself involves some basic trigonometry and tweaking of the radius to adjust the line lengths of each hand:
private getHandPositions(): ITime {
const clock = this.getController("clock");
const x1 = clock.x1;
const y1 = clock.y1;
const x2 = clock.x2;
const y2 = clock.y2;
const cx = (x1 + x2) / 2;
const cy = (y1 + y2) / 2;
const r = (x2 - x1) / 2;
const date = new Date();
const hours = date.getHours() % 12;
const minutes = date.getMinutes();
const seconds = date.getSeconds();
const millseconds = date.getMilliseconds();
const hinnerr = r - 55;
const minnerr = r - 35;
const sinnerr = r;
const n12 = hours * 60 + minutes;
const hrx = cx + Math.sin(Math.PI * 2 * n12 / (60 * 12)) * hinnerr;
const hry = cy - Math.cos(Math.PI * 2 * n12 / (60 * 12)) * hinnerr;
const mx = cx + Math.sin(Math.PI * 2 * (minutes / 60 + seconds / (60 * 60))) * minnerr;
const my = cy - Math.cos(Math.PI * 2 * (minutes / 60 + seconds / (60 * 60))) * minnerr;
const sx = cx + Math.sin(Math.PI * 2 * (seconds + millseconds / 1000) / 60 ) * sinnerr;
const sy = cy - Math.cos(Math.PI * 2 * (seconds + millseconds / 1000) / 60) * sinnerr;
return { cx: cx, cy: cy, hrx: hrx, hry: hry, mx: mx, my: my, sx: sx, sy: sy };
}
Note the comment - use can render the clock with a smoothly moving second hand or an older style "tick" for every second. The more interesting aspect of this is to combine fractional minute as part of the hour hand so the hour hand renders "between" the hours. Similarly, the minute hand combines the seconds as a fractional component, again so that the minute hand moves smoothly in a micro-movement through the seconds of each minute. Lastly, the second hand, for smooth movement, incorporates the fractional milliseconds of each second.
This function starts the clock and updates it every 10ms, forever:
private startClock(): void {
  new Interval(10, () => {
    const handPositions = this.getHandPositions();

    const hourHand = this.getController("hourHand");
    hourHand.setx2(handPositions.hrx);
    hourHand.sety2(handPositions.hry);

    const minuteHand = this.getController("minuteHand");
    minuteHand.setx2(handPositions.mx);
    minuteHand.sety2(handPositions.my);

    const secondHand = this.getController("secondHand");
    secondHand.setx2(handPositions.sx);
    secondHand.sety2(handPositions.sy);
  }).start();
}
If you have changed the calculation of the second hand to "tick", then change the interval here to 1000 ms (1 second) as there's no need to run the timer at 10 ms.
The SvgElementController class implements the "set" methods:
public setx2(x: number) {
  const svgObject = document.getElementById(this.elementID);
  this.x2 = x;
  svgObject.setAttribute("x2", x.toString());
}

public sety2(y: number) {
  const svgObject = document.getElementById(this.elementID);
  this.y2 = y;
  svgObject.setAttribute("y2", y.toString());
}
This is the same class as described in the previous article and I'm showing the code here for completeness:
export class Interval {
  public counter = 0;
  private id: number;
  private ms: number;
  private callback: () => void;
  private stopCount?: number;

  constructor(ms: number, callback: () => void, stopCount?: number) {
    this.ms = ms;
    this.callback = callback;
    this.stopCount = stopCount;
  }

  public start(): Interval {
    this.id = setInterval(() => {
      ++this.counter;
      this.callback();

      if (this.stopCount && this.stopCount == this.counter) {
        this.stop();
    }
    }, this.ms);

    return this;
  }

  public stop(): Interval {
    clearInterval(this.id);

    return this;
  }
}
The basics of rendering a clock in Scalable Vector Graphics (SVG) is demonstrated in this article. The code is not designed to render multiple clocks but it should be easy enough to adjust the code if you wanted to do this. At the moment, I will readily admit that much of this is prototype code and will be cleaned up in subsequent articles.
- 8th March, 2023: Initial version
