
.NET is an open-source framework to build cross-platform applications for mobile, desktop, Internet of Things (IoT), and the web. The .NET platform also supports containerization and cloud-native solutions.
The traditional .NET Framework provided the Windows Presentation Foundation (WPF) as a comprehensive UI framework for building modern desktop apps. Through the Model-View-ViewModel (MVVM) architectural design pattern, WPF separates the user interface (UI) design (created using XAML markup) from the app’s logic.
This flexibility boosted the appeal of a clean separation of concerns for cross-platform mobile development. Specifically, Xamarin.Forms introduced a way to translate XAML code to platform-specific (iOS or Android) controls while the apps share their logic through reusable view models. Microsoft adapted this approach for .NET Multi-platform App UI (.NET MAUI), helping developers quickly implement applications for various platforms, including Windows, iOS, Android, and macOS.
Other frameworks enable cross-platform development, too, such as the Qt framework for C++ development. A CodeProject article demonstrated how the Qt framework for Windows 11 on Arm64, running natively, can run applications faster than X64, using emulation. The approach also benefits from other Arm64 advantages, including low power consumption and system-on-the-chip (SoC) architecture. Now, in .NET versions that natively support Arm64, these benefits are available to C# developers unfamiliar with C++.
This article demonstrates how to use WPF with .NET 8.0 to implement a desktop application that runs on Arm64. The application performs intense computational work and reuses square matrix multiplication, implemented in the first part of this series. It displays the time needed for the computations on a label and renders this in a chart. You can create a chart with the Syncfusion.SfChart.WPF library, which you install as a NuGet package. Ultimately, you can translate everything you learn here about the WPF app design to .NET MAUI.
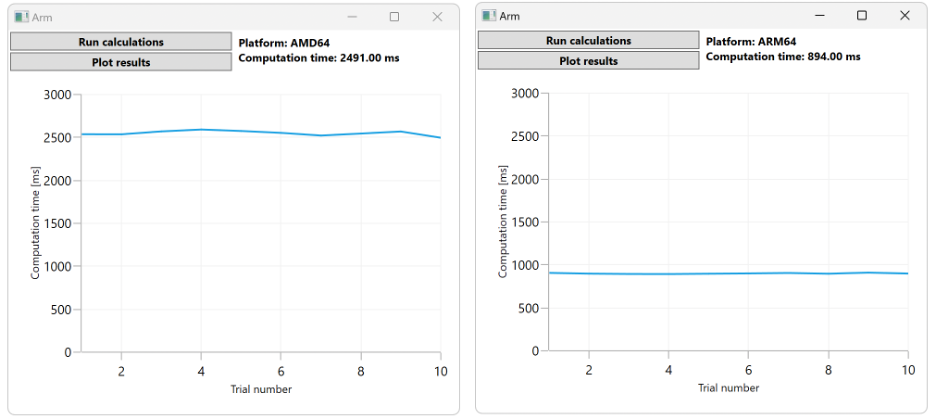
The article uses the MVVM design pattern for implementation and compiles the application for the x64 and Arm64 platforms. Running both applications demonstrates that Arm64 offers a nearly 2.8 times performance boost over x64 for matrix multiplication, as the figure below shows. This performance boost is from running Arm64 natively compared to using an emulator to translate x64 code.
This tutorial implements many MVVM features manually to provide a good foundation for beginners. You can use the MVVM Community Toolkit to accelerate development. This approach helps you avoid manually implementing various interfaces by replacing the code with dedicated attributes.
Check out this article’s companion code, which developers tested using Windows Dev Kit 2023.
Project Setup
Start by downloading Visual Studio 2022 Community Preview (available as version 17.7.0 preview 2). Next, install the .NET desktop development workload.
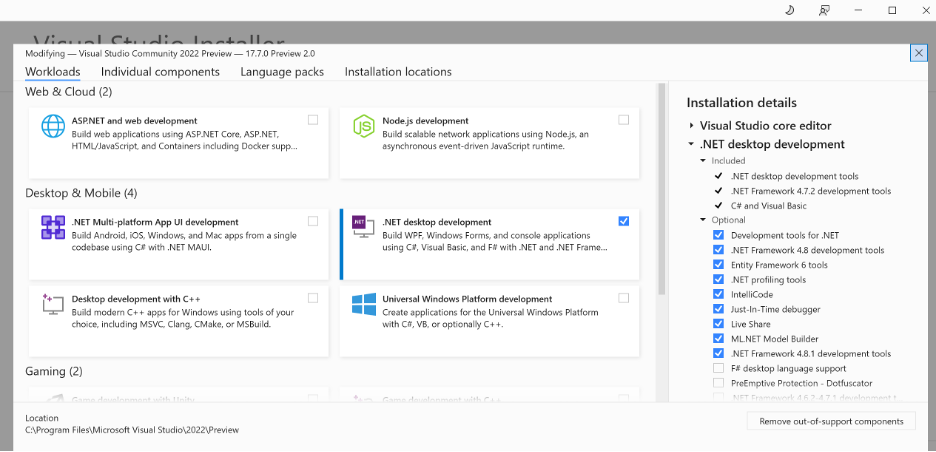
Download .NET 8.0 SDK for Visual Studio, including .NET 8.0 for x86, x64, and Arm64. This article uses .NET SDK 8.0.100 preview 5. Also, install the x86 .NET SDK — Visual Studio 2022 requires it to render WPF views in design mode.
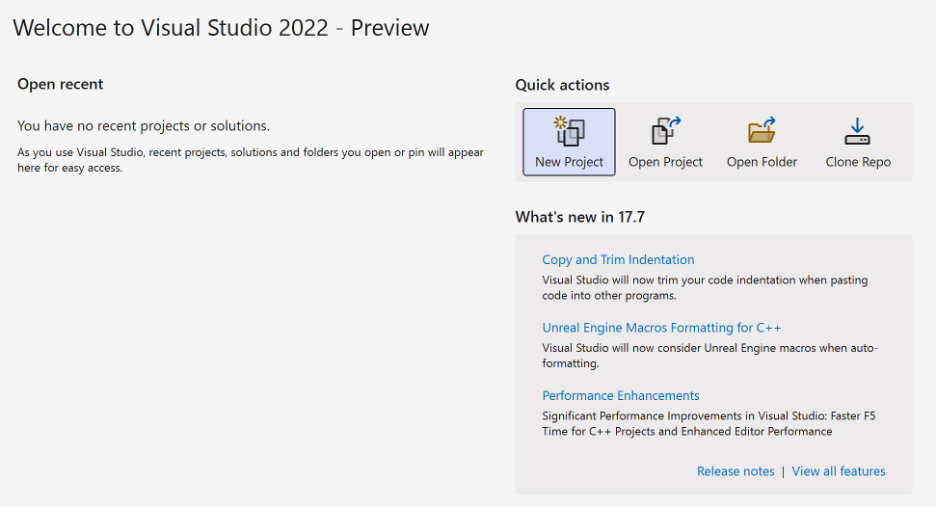
Now, open Visual Studio 2022 and click the New Project icon in the Quick actions pane.
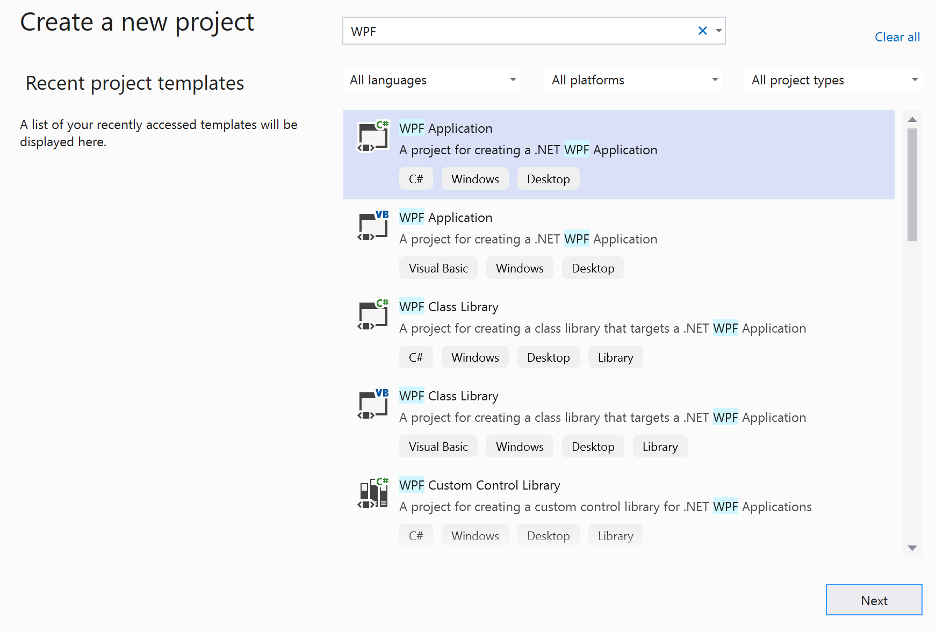
In the Create a new project window, type “WPF” in the search box. Then, select the C# WPF Application project template, and click Next.
Configure the project as follows:
- Project name: Arm64.DesktopApp.WPF
- Location: Select any location you want.
- Solution name: Arm64.DesktopApp
Click Next for the last step (Additional information). Select .NET 8.0 (Preview) from the Framework drop-down list. Finally, click Create. You see the screen containing the XAML declarations in the MainWindow.
Before designing the UI, you need to install the Syncfusion.SfChart.WPF NuGet package.
In Visual Studio 2022, open View > Solution Explorer. In Solution Explorer, right-click Dependencies under Arm64.DesktopApp.WPF. Next, from the context menu, select Manage NuGet Package. This action opens the NuGet Package Manager.
On the Browse tab, in the NuGet Package Manager, type “Sf chart WPF”. Then, select Syncfusion.SfChart.WPF and click Install.
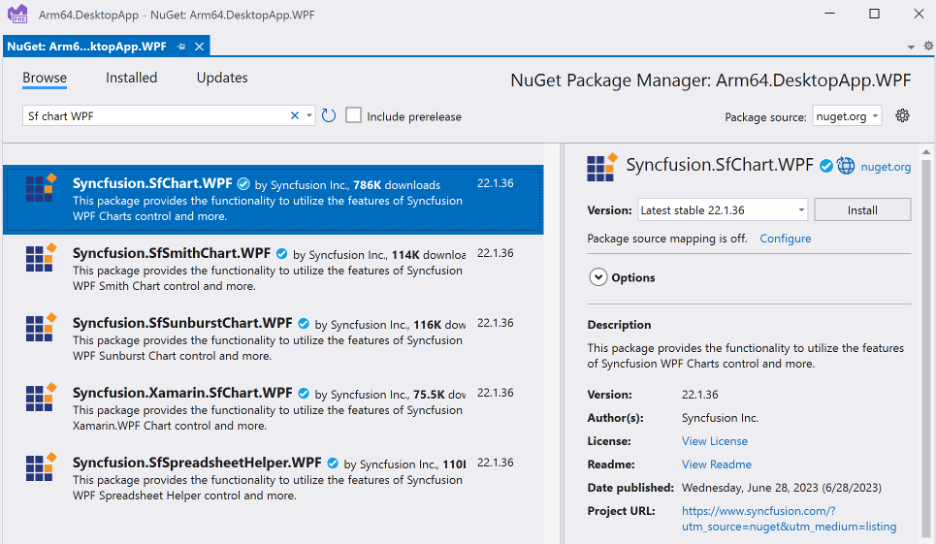
In the Preview Changes window, click OK to accept the changes made to the solution.
Design the UI
The XAML declarative markup language helps quickly design the WPF application’s UI and makes it easy to transfer the UI to multiple environments.
Create the UI by manually putting controls in the window in design mode. First, open MainWindow.xaml by double-clicking MainWindow.xaml in Solution Explorer. The XAML code will be at the bottom of the window (it should look like the code below). The top part of the window renders the XAML statements to generate the preview (shown later in this section).
Next, modify the MainWindow.xaml file by adding the statements bolded in the following code:
<Window x:Class="Arm64.DesktopApp.WPF.MainWindow"
        xmlns="http://schemas.microsoft.com/winfx/2006/xaml/presentation"
        xmlns:x="http://schemas.microsoft.com/winfx/2006/xaml"
        xmlns:d="http://schemas.microsoft.com/expression/blend/2008"
        xmlns:mc="http://schemas.openxmlformats.org/markup-compatibility/2006"
        xmlns:local="clr-namespace:Arm64.DesktopApp.WPF"
        xmlns:syncfusion="http://schemas.syncfusion.com/wpf"
        mc:Ignorable="d"
        Title="Arm"
        Height="450"
        Width="500">

    <Grid>
    </Grid>
</Window>
These declarations update the window’s title and dimensions. Additionally, they import the XAML namespace for the Syncfusion controls.
Now, define the anonymous styles by putting the following declarations before the <Grid> tag.
<Window.Resources>
    <Style TargetType="Button">
        <Setter Property="Margin"
                Value="2,2,2,0" />
        <Setter Property="FontWeight"
                Value="Bold" />
    </Style>

    <Style TargetType="Label">
        <Setter Property="FontWeight"
                Value="Bold" />
    </Style>

    <Style TargetType="syncfusion:SfChart">
        <Setter Property="Margin"
                Value="10" />
    </Style>
</Window.Resources>
These declarations create three styles, all anonymous. In the current window, the application applies them to all buttons, labels, and Syncfusion Charts. You will use the styles to configure margins and font weights.
Next, configure the grid’s layout to contain two rows and two columns. The height of the first row automatically sizes to fit all the controls while the second row occupies the window’s remaining area. The columns are of equal widths. Effectively, the configuration creates a two-column by two-row table layout:
<Grid>
    <Grid.RowDefinitions>
        <RowDefinition Height="Auto" />
        <RowDefinition Height="*" />
    </Grid.RowDefinitions>
    <Grid.ColumnDefinitions>
        <ColumnDefinition Width="*" />
        <ColumnDefinition Width="*" />
    </Grid.ColumnDefinitions>
</Grid>
Use this layout to add two buttons, a label, and a chart by adding the following statements before the closing </Grid> tag:
<StackPanel Grid.Row="0"
Grid.Column="0"
Orientation="Vertical">
<Button Content="Run calculations"/>
<Button Content="Plot results" />
</StackPanel>
<Label Grid.Row="0"
Grid.Column="1"
Content="" />
<syncfusion:SfChart Grid.Row="1"
Grid.ColumnSpan="2">
<syncfusion:SfChart.PrimaryAxis>
<syncfusion:NumericalAxis Header="Trial number"
FontSize="14" />
</syncfusion:SfChart.PrimaryAxis>
<syncfusion:SfChart.SecondaryAxis>
<syncfusion:NumericalAxis Header="Computation time [ms]"
FontSize="14"
Maximum="3000"
Minimum="0">
</syncfusion:NumericalAxis>
</syncfusion:SfChart.SecondaryAxis>
<syncfusion:LineSeries EnableAnimation="True"
Label="Computation time">
</syncfusion:LineSeries>
</syncfusion:SfChart>
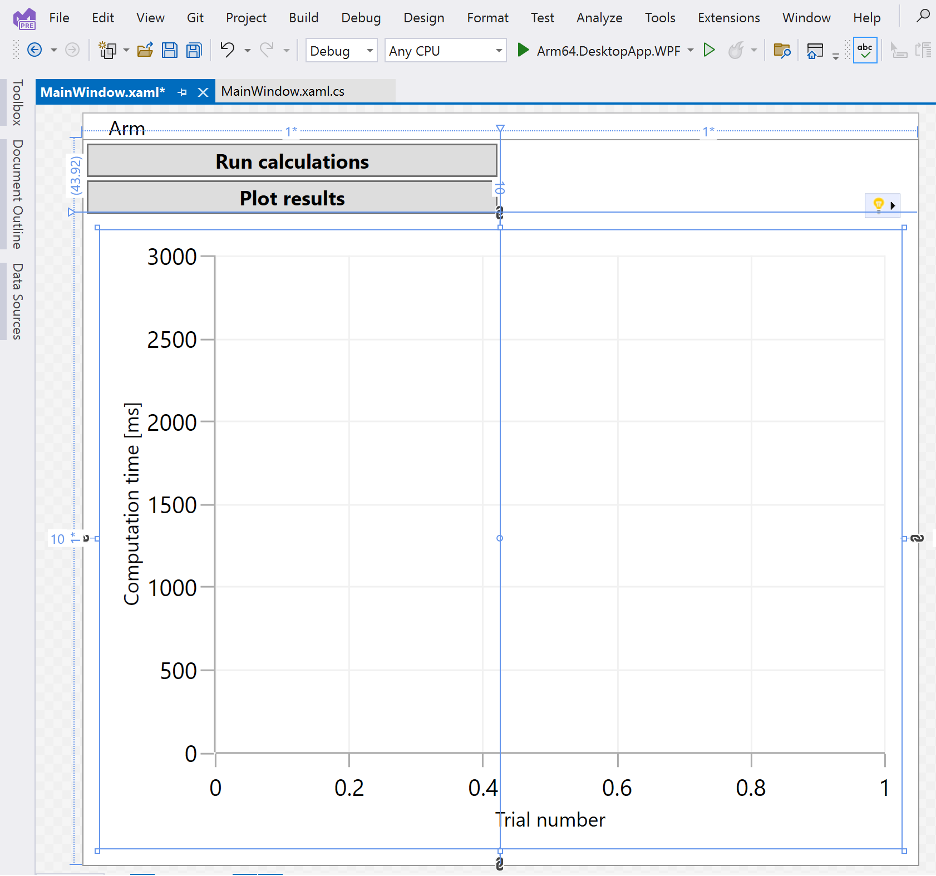
This declaration puts two buttons in the left cell of the first row and the label in the second cell of the first row. It adds the chart, which spans two cells, to the second row.
It also configures the chart to include two numerical axes. The horizontal (primary) axis displays the trial number, and the vertical (secondary) axis shows the calculation time for that trial. You can generate a graph of the calculation time for successive trials by running the calculation several times.
The complete XAML declaration renders the following view in the design area, with buttons to run calculations and plot results and a graph to show computation time for each trial.
Implement the Logic
You can now implement the logic. Follow best practices for WPF app development and use the MVVM architectural pattern.
We will start by defining a model class representing points in the chart. Then, we will implement the helper classes for intense computation work, then the view model containing the actual logic. Finally, we will attach the view model to the view using data binding.
Before adding the implementation files, create the following folders in the Arm64.DesktopApp.WPF project:
- Models
- Helpers
- ViewModels
Use Solution Explorer to create folders. First, right-click the Arm64.DesktopApp.WPF project. Then, from the context menu, select Add > New Folder and type the folder name.
Model
Add a new file in the Models folder to implement the model. Right-click that folder in the Solution Explorer. Next, select Add > Class, and in the window that appears, type “DataPoint2d.cs” and press Enter.
Modify the new file as follows:
public class DataPoint2d
{
    public double X { get; set; }

    public double Y { get; set; }
}
The above class represents the chart’s XY coordinates on the plot.
Helpers
Next, create another file in the Helpers folder, MatrixHelper.cs. This file contains a definition of the MatrixHelper class, which implements square matrix multiplication. The algorithm is as the first article of this series describes. The most important element for the following discussion is the static method MatrixHelper.SquareMatrixMultiplication, which runs computationally intensive work.
Now, you need code to measure the computation time. As in the first article, you rely on the System.Diagnostics.Stopwatch class. Create a PerformanceHelper.cs file in the Helpers folder and modify the file accordingly:
using System.Diagnostics;

namespace Arm64.DesktopApp.WPF.Helpers
{
    public static class PerformanceHelper
    {
        private static readonly Stopwatch stopwatch = new();

        public static double MeasurePerformance(Action method, int executionCount)
        {
            stopwatch.Restart();

            for (int i = 0; i < executionCount; i++)
            {
                method();
            }

            stopwatch.Stop();

            return stopwatch.ElapsedMilliseconds;
        }
    }
}
This class contains one public static method, MeasurePerformance. This method needs an action for execution while another parameter — executionCount — specifies how many times to invoke the action. As shown above, PerformanceHelper.MeasurePerformance calls the stopwatch.Restart method to reset the stopwatch to zero. Then, the method calls an action for executionCount times. Afterward, it calls stopwatch.Stop and returns an elapsed time (in milliseconds) since restarting the stopwatch.
View Model
To make your implementation generic, use the best MVVM practices. First, create a new BaseViewModel.cs file in ViewModels and modify the file:
using System.ComponentModel;
using System.Runtime.CompilerServices;

namespace Arm64.DesktopApp.WPF.ViewModels
{
    public class BaseViewModel : INotifyPropertyChanged
    {
        public event PropertyChangedEventHandler? PropertyChanged;

        protected void OnPropertyChanged(string propertyName)
        {
            PropertyChanged?.Invoke(this,
                new PropertyChangedEventArgs(propertyName));
        }

        protected void SetProperty<T>(ref T property,
            T value, [CallerMemberName] string propertyName = "")
        {
            property = value;
            OnPropertyChanged(propertyName);
        }
    }
}
This class implements functionality that you can reuse in other view models. The BaseViewModel uses the INotifyPropertyChanged interface for data binding. This interface notifies the associated views about changes to the underlying properties, allowing views to update the content they display to the user.
To implement the INotifyPropertyChanged interface, the class defines the PropertyChanged event. The views associated with a view model automatically subscribe to this event to update the underlying controls.
Additionally, you have implemented two protected methods (available in the derived classes):
OnPropertyChanged raises the PropertyChanged event to inform the view when the property of the view model changes.SetProperty is a helper method. It updates the property value and invokes the OnPropertyChanged method to propagate property changes to the view.
The next step is to implement commands. Commands are an alternative to event handlers for controls. However, commands are usually framework-independent — you can implement them directly in a view model. Consequently, you can use the same command in WPF, Xamarin, or .NET MAUI apps.
Create a class that implements the System.Windows.Input.ICommand interface. This interface provides three elements:
Execute: a method that a user action (for example, a button click) invokesCanExecute: a method specifying whether you can invoke a command. Usually, you use this method to ensure the application state or input a user provides is valid and enables the command to execute.CanExecuteChanged: an event raised whenever something changes an application’s state to affect the CanExecute method’s result
Use a simple implementation of the ICommand interface, implemented in a new file, SimpleCommand.cs, with the code below. Save it in the ViewModels folder.
using System.Windows.Input;

namespace Arm64.DesktopApp.WPF.ViewModels
{
    public class SimpleCommand : ICommand
    {
        public event EventHandler? CanExecuteChanged;

        private readonly Action<object?> action;

        public SimpleCommand(Action<object?> action)
        {
            this.action = action;
        }

        public bool CanExecute(object? parameter)
        {
            return true;
        }

        public void Execute(object? parameter)
        {
            if (CanExecute(parameter))
            {
                action(parameter);
            }
        }
    }
}
The SimpleCommand class contains the CanExecuteChanged event. It implements the CanExecute and Execute methods in the ICommand interface.
First, the Execute method calls the CanExecute method. If that method returns true, Execute invokes a method that is stored in an action field of the SimpleCommand class. An action field encapsulates the technique that implements the actual command. The SimpleCommand class’s constructor sets an action field.
Now, implement the actual view model by creating a new file in the ViewModels folder called MainViewModel.cs, as follows:
using Arm64.DesktopApp.WPF.Helpers;
using Arm64.DesktopApp.WPF.Models;
using System.Collections.ObjectModel;
namespace Arm64.DesktopApp.WPF.ViewModels
{
public class MainViewModel : BaseViewModel
{
private string computationTime = "";

public string ComputationTime
{
    get => computationTime;
    set => SetProperty(ref computationTime, value);
}
private readonly List<DataPoint2d> computationTimeHistory = new();
public ObservableCollection<DataPoint2d> DataPoints { get; set; } =
new ObservableCollection<DataPoint2d>();
private SimpleCommand? runCalculationsCommand;
public SimpleCommand RunCalculationsCommand
{
get => runCalculationsCommand ??= new SimpleCommand((object? parameter) =>
{
var computationTime = PerformanceHelper.MeasurePerformance(
MatrixHelper.SquareMatrixMultiplication, executionCount: 2);
ComputationTime = string.Format($"Platform: " +
$"{Environment.GetEnvironmentVariable("PROCESSOR_ARCHITECTURE")}\n" +
$"Computation time: {computationTime:f2} ms");
computationTimeHistory.Add(new DataPoint2d
{
X = computationTimeHistory.Count + 1,
Y = computationTime
});
});
}
private SimpleCommand? plotResultsCommand;
public SimpleCommand PlotResultsCommand
{
get => plotResultsCommand ??= new SimpleCommand((object? parameter) =>
{
DataPoints.Clear();
foreach (DataPoint2d point in computationTimeHistory)
{
DataPoints.Add(point);
}
});
}
}
}
The MainViewModel class derives from BaseViewModel. Then, the code creates the private field computationTime and an associated property ComputationTime. Note how SetProperty from the BaseViewModel raises the PropertyChanged event to notify the view about changes in the ComputationTime property, like below:
private string computationTime = "";
public string ComputationTime
{
get => computationTime;
set => SetProperty(ref computationTime, value);
}
With this approach, you do not need to manually rewrite a value from the ComputationTime property to the property of a visual control (for example, Label.Content). Instead, you use a data binding. A view gets an automatic notification about the source of property changes. You set ComputationTime in the view model using the RunCalculationsCommand command. This does not have any explicit references to the view, effectively decoupling the logic from it.
Create RunCalculationsCommand using the constructor of the SimpleCommand class, like below. The constructor defines the action inline using C#’s lambda expression.
private SimpleCommand? runCalculationsCommand;
public SimpleCommand RunCalculationsCommand
{
get => runCalculationsCommand ??= new SimpleCommand((object? parameter) =>
{
var computationTime = PerformanceHelper.MeasurePerformance(
MatrixHelper.SquareMatrixMultiplication, executionCount: 2);
ComputationTime = string.Format($"Platform: " +
$"{Environment.GetEnvironmentVariable("PROCESSOR_ARCHITECTURE")}\n" +
$"Computation time: {computationTime:f2} ms");
computationTimeHistory.Add(new DataPoint2d
{
X = computationTimeHistory.Count + 1,
Y = computationTime
});
});
}
The action first calls PerformanceHelper.MeasurePerformance to measure the execution time of the two invocations of the MatrixHelper.SquareMatrixMultiplication method. Then, it stores the resulting computation time (expressed in milliseconds) in the computationTime local variable. The latter creates a string containing the processor architecture (using the PROCESSOR_ARCHITECTURE environment variable) and the actual computation time supplemented by the ms suffix. The resulting string becomes the ComputationTime property of the MainViewModel.
The RunCalculationsCommand also stores the computation time in the computationTimeHistory field, which is a list of instances of the DataPoint2D class. Because DataPoint2D has two properties — X and Y — you provide X and Y values to add the computation time to the history. X is the integer with its value set to the number of elements in the computationTimeHistory collection plus one. For the Y value, you provide computationTime.
To plot the computation times, use the PlotResultsCommand method, like below:
public ObservableCollection<DataPoint2d> DataPoints { get; set; } =
new ObservableCollection<DataPoint2d>();
public SimpleCommand PlotResultsCommand
{
get => plotResultsCommand ??= new SimpleCommand((object? parameter) =>
{
DataPoints.Clear();
foreach (DataPoint2d point in computationTimeHistory)
{
DataPoints.Add(point);
}
});
}
The code does not invoke any chart-related logic. It only copies each element from computationTimeHistory to the DataPoints property, which is an ObservableCollection type. The latter is a special collection that implements the INotifyPropertyChanged interface and raises it whenever adding, updating, or removing a new item from ObservableCollection. Therefore, you do not need to use the BaseViewModel.SetProperty method here. However, to update the ObservableCollection when an item property changes, you might still need to implement the item’s INotifyPropertyChanged interface.
Attach the ViewModel to the View
Now that you have connected MainViewModel to the MainWindow view, open the MainWindow.xaml file. Add the bolded declarations:
<Window x:Class="Arm64.DesktopApp.WPF.MainWindow"
xmlns="http://schemas.microsoft.com/winfx/2006/xaml/presentation"
xmlns:x="http://schemas.microsoft.com/winfx/2006/xaml"
xmlns:d="http://schemas.microsoft.com/expression/blend/2008"
xmlns:mc="http://schemas.openxmlformats.org/markup-compatibility/2006"
xmlns:local="clr-namespace:Arm64.DesktopApp.WPF"
xmlns:syncfusion="http://schemas.syncfusion.com/wpf"
mc:Ignorable="d"
Title="Arm"
Height="450"
Width="500"
xmlns:viewModels="clr-namespace:Arm64.DesktopApp.WPF.ViewModels">
<Window.DataContext>
    <viewModels:MainViewModel />
</Window.DataContext>
</Window>
The xmlns:viewModels="clr-namespace:Arm64.DesktopApp.WPF.ViewModels" declaration adds the C# namespace to the XAML code, enabling you to use C# types as XAML tags. The second block of declarations creates an instance of the MainViewModel class and stores it in the Window.DataContext property. The view uses the following property for data-binding:
<Window.DataContext>
<viewModels:MainViewModel />
</Window.DataContext>
Next, modify the Buttons section to add bindings to RunCalculationsCommand and PlotResultsCommand:
<StackPanel Grid.Row="0"
Grid.Column="0"
Orientation="Vertical">
<Button Content="Run calculations"
Command="{Binding RunCalculationsCommand}" />
<Button Content="Plot results"
Command="{Binding PlotResultsCommand}" />
</StackPanel>
Afterward, add a binding to the ComputationTime property of MainViewModel:
<Label Grid.Row="0"
Grid.Column="1"
Content="{Binding ComputationTime, Mode=OneWay}" />
Then, modify the chart declarations so the values displayed in the chart come from the DataPoints property of the MainViewModel:
<syncfusion:SfChart Grid.Row="1"
Grid.ColumnSpan="2">
<syncfusion:SfChart.PrimaryAxis>
<syncfusion:NumericalAxis Header="Trial number"
FontSize="14" />
</syncfusion:SfChart.PrimaryAxis>
<syncfusion:SfChart.SecondaryAxis>
<syncfusion:NumericalAxis Header="Computation time [ms]"
FontSize="14"
Maximum="3000"
Minimum="0">
</syncfusion:NumericalAxis>
</syncfusion:SfChart.SecondaryAxis>
<syncfusion:LineSeries EnableAnimation="True"
ItemsSource="{Binding DataPoints, Mode=OneWay}"
Label="Computation time"
XBindingPath="X"
YBindingPath="Y">
</syncfusion:LineSeries>
</syncfusion:SfChart>
Discussion
You can now run the application to experience the performance advantages of Arm64 over x64 architecture. First, configure the application for Arm64 and x64. In Visual Studio, click the platform list, and select Configuration Manager.

Click <new> under the Active solution platform in the Configuration Manager window. In the New Solution Platform dialog box, set the following:
- Type or select the new platform: Arm64.
- Copy settings from Any CPU.
- Select Create new project platforms.
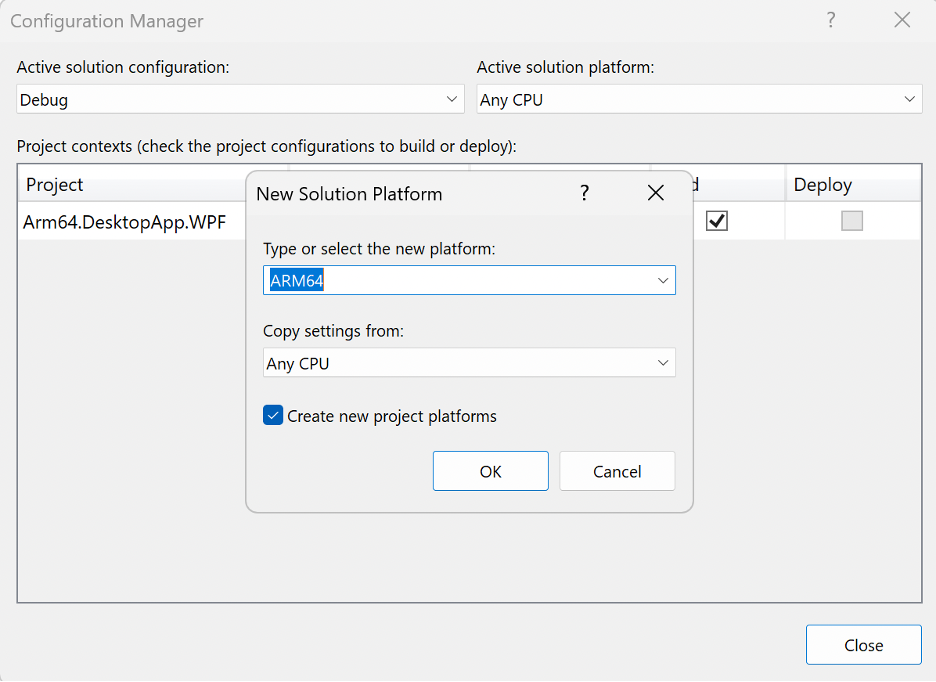
Repeat the same procedure to create the solution platform for x64.
Now, change the mode from Debug to Release and launch the application using the x64 configuration.

The app starts and displays licensing information for the Syncfusion controls. Click Cancel and then Run calculations several times. Finally, click Plot results to generate the line chart. You should get results like the image below, with an average computation time of 2491.00 ms:

Now, launch the application using the Arm64 configuration. After clicking Run calculations several times, click Plot results. You should see output like the following image, with a computation time of 894.00 ms.
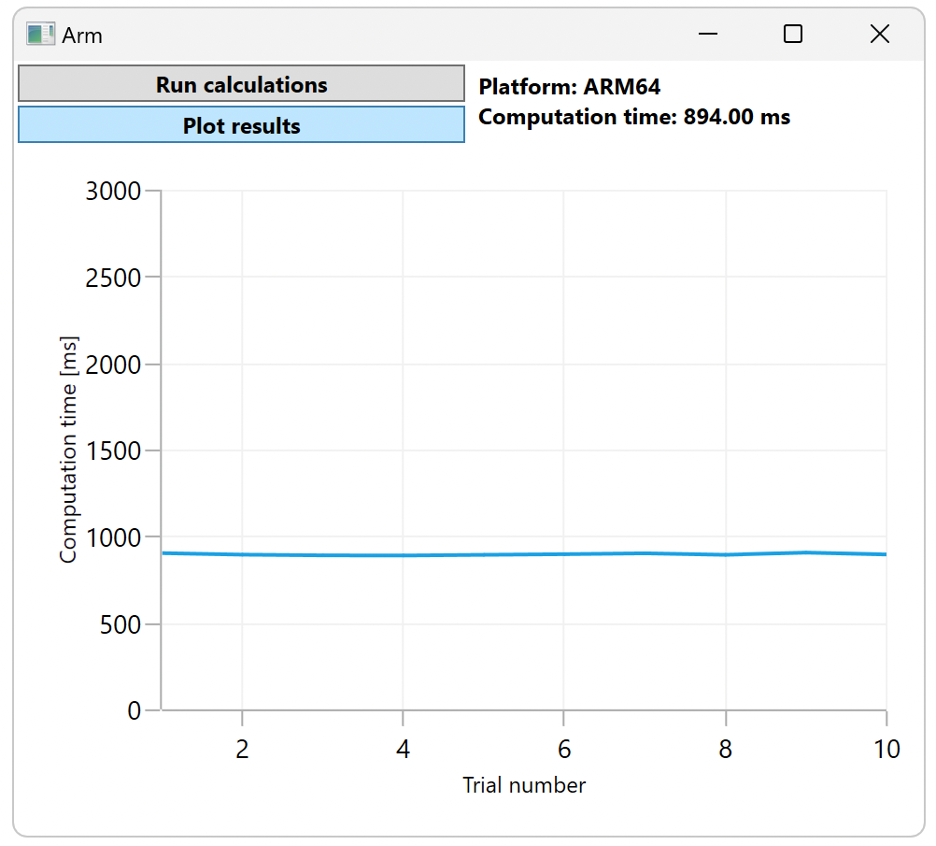
The computation time on Arm64 is close to 900 milliseconds. Conversely, the same code needed about 2,500 milliseconds on x64, almost 2.8 times longer. This result shows the advantage of executing .NET code natively on Arm64.
Conclusion
This tutorial demonstrates the WPF on .NET 8.0 as an alternative to the Qt framework, especially for computation-intense scenarios. Using the MVVM architectural design pattern, you can implement WPF apps and use the Syncfusion NuGet package to render charts.
As in the case of the Qt framework, .NET uses the native power of Arm64. This demo showed a significant performance boost in Arm64 for an application that multiplied relatively large square matrices (500 by 500). Arm64 helped shorten the computation time by nearly a factor of three compared to running the app on x64 architecture, saving precious development time and shortening the time to market.
With these benefits, .NET offers an excellent alternative to Qt and empowers Arm64 developers. Try Windows 11 on Arm64 today to take advantage of your hardware’s full potential and unlock native-level performance.
