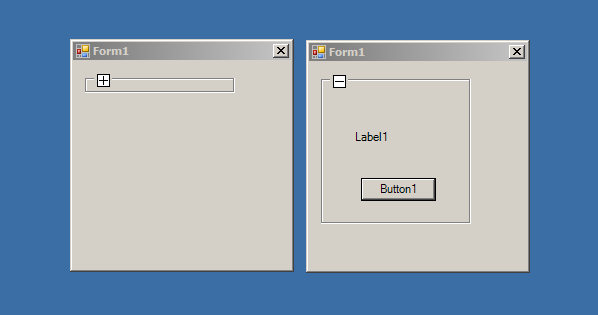
This article discusses the implementation of collapsible panel controls in VB.NET for displaying multiple panels with discrete functionality on a single form, inspired by features in Microsoft Visio and Visual Studio, enhancing usability and organization of the application's interface.
Introduction
I needed to display multiple panels with related but discrete functionality on a single form. Individually, each panel would contain different controls, yet, every panel would relate to the larger scope of the form. Since each panel would take various amounts of space to display, I would be limited to the number of panels I could display on a single form without the form becoming too busy and confusing. That is, unless the panels could collapse to a minimize size and re-expand to their normal size. I needed panel controls that could collapse and expand.
Background

The idea for a collapsing panel came as I worked with Microsoft Visio 2003 and Microsoft Visual Studio 2003. I noticed that Visio contained side panels that collapsed and expanded exactly as I desired, and in a similar fashion, Visual Studio provides an Outlining feature that collapses and expands regions of code. I needed the same functionality only applied to panels.
So, I knew the functionality I desired existed but I didn’t have a clue how to implement it or if a control existed to encapsulate it.
These are all excellent solutions and any of them would have worked but the Collapsible Group Box and Expanding panel from jeffb42 better suited the needs and presentation motif of my application. The only problem was that I needed the code in VB.NET – not C#. So, I had to convert it.
The code contained a Trashcan feature that I didn’t want so as I converted his C# code, I dropped the Trashcan icon and functionality. Great idea and kudos to Jeff for providing the feature but it was extraneous for my purpose. I also renamed the project, file names and some of the methods to match my preferred terminology.
To prove the conversion was successful, I duplicated his test application using my converted VB.NET code.

Additionally, I added a Minimize() method to initially display the panels in a minimized state. Now, I could display multiple panels in a vertical fashion – like a list - on a form.

Each panel scrolls as necessary when it is expanded.

Displaying panels in a vertical fashion that expanded as needed fulfilled my requirement to display many related panels on a single form without compromising the appearance of the form.
Using the Code
Thanks again to jeffb42 for producing excellent documentation in his article. I won’t attempt to improve on his documentation, but I’ll summarize the steps needed to setup and use the code. Since the code is built as a User Control, you’ll need to go through some additional steps to use it.
First, add the CollapsiblePanel controls to your Toolbox in Visual Studio.
- Open a Form
- Select My User Controls from the Toolbox
- Right-click in the Toolbox, and select the Add/Remove Items... menu item
- After the Customize Toolbox dialog displays, select the Browse... button, and navigate to the directory containing CollapsiblePanel.dll.
- Select CollapsiblePanel.dll.
The new controls should be visible in the toolbox.
Note: You may need to close and reopen the solution for the controls to appear.
After the CollapsiblePanel controls have been added to the Toolbox, create a class derived from CollapseGroupBox and add some standard WinForm controls to it. Generally, the standard WinForm controls are added to a CollapseGroupBox which, in turn, is added to a CollapsePanel.
Class Relationships
Standard Winform Control -> CollapseGroupBox -> CollapsePanel
- From the Solution Explorer, right-click on the project, and choose Add->User Control… (or Add Inherited Control…)
- Edit the generated class. Change the base class from
System.Windows.Forms to CollapseGroupBox:
**Public Class** MyUserControl **Inherits** CollapseGroupBox
- Save the new inherited control, then switch to design view.
- Add some standard WinForm controls from the toolbox to the inherited form. Save it.
- Open the project’s main form and drop a
CollapsePanel control from the Toolbox. - Edit the main form's code to add the inherited class (from the steps above) to the
CollapsePanel.
Public Sub New()
MyBase.New()
InitializeComponent()
CollapsePanel1.Add(new MyUserControl ())
End Sub
- Compile and run.
Points of Interest
As previously mentioned, I added a Minimize() method to initially display the panels in a minimized state.
Public Sub Minimize()
To use it, simply call it before displaying the CollapseGroupBox object.
Dim myControl As MyUserControl = New MyUserControl()
myControl.Minimize()
Since, by default, the panels display in the expanded state, all I did to implement the Minimize() functionality was to simulate a click event. See the code for details.
Class Relationships
The following is a simple class diagram that shows the relationship of the classes in the project.

Future Enhancements
Since I converted code, the same or similar issues and enhancements apply to mine. Currently, I don’t have specific plans to enhance the code - only to fix any bugs that exist as they appear in my particular application(s). If the need arises to enhance the application, I will do so, but, right now, the code works satisfactorily in the application(s) for which it was needed.
History
- 15th February, 2024: Initial version
