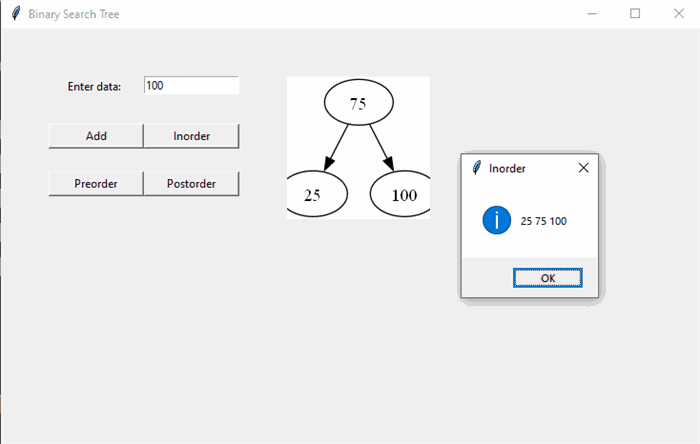
With this article, I wish to demonstrate inserting and traversing nodes in a Binary Search Tree. I also wish to explain the process of visualizing graphically the relationships of nodes in a binary search tree.

Introduction
This article is a demonstration of adding nodes to a Binary Search Tree, traversing nodes and visualizing the tree in a GUI environment using Python with Tkinter.
Background
A tree data structure is a non-linear data structure because it does not store data sequentially. It is called as a hierarchical structure as data is arranged in multiple levels in a tree. In a tree, the topmost node is known as the root node. Each node contains some data which can be of any type and address of other node called children.
Following are some terms related to trees:
- Root: It is the topmost node in a tree. It does not have any parent node.
- Child: It is the descendent of some node.
- Parent: It is a node having a sub node (child node).
- Sibling: They are children of a common (same) parent.
- Leaf Node: It is a node that does not have children. It is the bottom most node. It is also called as external node.
- Internal Node: It is a node which has at least one child node.
- Ancestor Node: It is a predecessor node on a path from the root till the current node.
- Descendant Node: It is the immediate successor of any node.
A Binary Search Tree is a special type of tree in which each node tree can have maximum two child nodes with the restriction that the value of each node in the left subtree must be less than the value of the root node and the value of each node in the right subtree must be more than the value of the root node.
A node in a binary search tree contains three fields:
- Data Field
- Left Child Address Field
- Right Child Address Field
Node Traversal
Nodes in a Binary Search Tree can be traversed in three ways:
(All traversal functions are recursive functions)
inorder - left-root-right
- Traverse the left subtree.
- Visit the root.
- Traverse the right subtree.
preorder - root-left-right
- Visit the root.
- Traverse the left subtree.
- Traverse the right subtree.
postorder - left-right-root
- Traverse the left subtree.
- Traverse the right subtree.
- Visit the root.
Using the Code
The application is a Tkinter based GUI application in which a user can enter data and visualize it in real time.
A node class can be used to describe a node of a Binary Search Tree as follows:
class Node:
    def __init__(self,data):
         self.data = data
         self.left = None
         self.right = None
Insertion and Traversal operations are defined in the Tree class as follows:
class Tree:
    def __init__(self):
        self.root = None
        self.nodes = ""
    def addnode(self,data):
        currnode = Node(data)
        if self.root is None:
            self.root = currnode
        else:
            parent = None
            ptr = self.root
            while ptr is not None:
                parent = ptr
                if int(currnode.data) < int(ptr.data):
                    ptr = ptr.left
                else:
                    ptr = ptr.right
            if int(currnode.data) < int(parent.data):
                parent.left = currnode
            else:
                parent.right = currnode
    def inorder(self,root):
            if root != None:
                self.inorder(root.left)
                self.nodes += root.data + " "
                self.inorder(root.right)
    def preorder(self,root):
            if root != None:
                self.nodes += root.data + " "
                self.preorder(root.left)
                self.preorder(root.right)
    def postorder(self,root):
            if root != None:
                self.postorder(root.left)
                self.postorder(root.right)
                self.nodes += root.data + " "
    def visualizetree(self,root):
        dot = graphviz.Digraph()
        dot.node(str(root.data))
        self.addedge(root,dot)
        dot.render("tree",format="png")
    def addedge(self,node,dot):
        if node.left:
            dot.node(str(node.left.data))
            dot.edge(str(node.data),str(node.left.data))
            self.addedge(node.left,dot)
        if node.right:
            dot.node(str(node.right.data))
            dot.edge(str(node.data),str(node.right.data))
            self.addedge(node.right,dot)
In the above code, the addnode() function adds a node to the tree at the appropriate position based on its value. The inorder(), preorder() and postorder() recursive functions perform the respective traversals and store the traversed node values in the nodes variable. The visualizetree() method performs visualization using graphviz. The addedge() function recursively draws edges from a node to its children nodes. The tree is rendered and stored as a "png" image in the current folder.
The following code provides the GUI environment for the application:
def add():
    tree.addnode(txtvalue.get())
    tree.visualizetree(tree.root)
    img = ImageTk.PhotoImage(Image.open("tree.png"))
    lblimage.configure(image=img)
    lblimage.image = img

def inorder():
    tree.inorder(tree.root)
    messagebox.showinfo("Inorder",tree.nodes)
    tree.nodes = ""

def preorder():
    tree.preorder(tree.root)
    messagebox.showinfo("Preorder",tree.nodes)
    tree.nodes = ""

def postorder():
    tree.postorder(tree.root)
    messagebox.showinfo("Postorder",tree.nodes)
    tree.nodes = ""

def showimage(event):
    os.system("tree.png") if os.path.exists("tree.png") else None

if __name__ == "__main__":

    tree = Tree()
    root = Tk()
    root.title("Binary Search Tree")
    root.geometry("500x300")

    lblvalue = Label(root,text="Enter data: ")
    lblvalue.place(x=50,y=50,width=100)

    txtvalue = Entry(root)
    txtvalue.place(x=150,y=50,width=100)

    btnadd = Button(root,text="Add",command=add)
    btnadd.place(x=50,y=100,width=100)

    btninorder = Button(root,text="Inorder",command=inorder)
    btninorder.place(x=150,y=100,width=100)

    btnpreorder = Button(root,text="Preorder",command=preorder)
    btnpreorder.place(x=50,y=150,width=100)

    btnpostorder = Button(root,text="Postorder",command=postorder)
    btnpostorder.place(x=150,y=150,width=100)

    lblimage = Label(root)
    lblimage.bind("<Button-1>",showimage)
    lblimage.place(x=300,y=50,width=150,height=150)
    root.mainloop()

    if os.path.exists("tree.png"):
       os.remove("tree.png")
       os.remove("tree")
The above code can be used to add nodes and visualize the tree interactively. The rendered tree is displayed in a label, clicking on which opens the tree image in the default image viewer app.
Points of Interest
I hope readers find this article and its concept useful.
History
- 21st February, 2024: Initial version
