OpenCV is a powerful library that supports algorithms related to Computer Vision and Machine Learning. It supports many programming languages like C++, Python, Java, etc., and is available on different platforms including Windows, Linux, OS X, Android, and iOS. Through this article, I wish to demonstrate the ease of use of OpenCV to work with frames in Videos.

Introduction
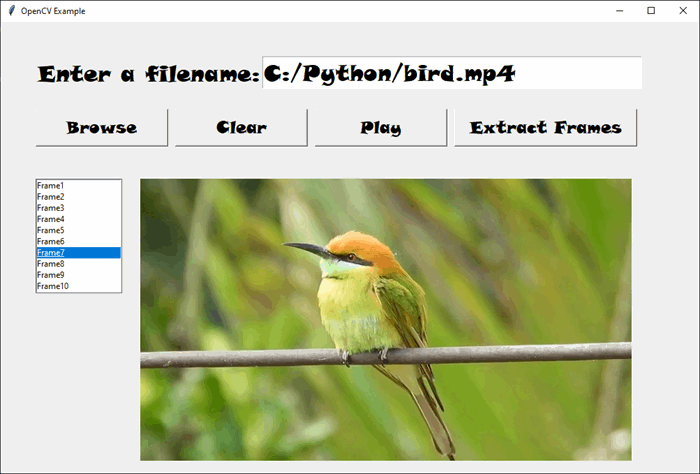
In this article I have embedded OpenCV functionality in a Graphical application using Tkinter. The user of the application has to specify the video file whose frames can be extracted. Each frame of the video can be displayed a as an image in a label.
Background
The basic idea of the article is extremely simple, just extract the frames and process them whichever way you like. The extracted frames are stored as ".jpg" images in a temporary subfolder within the current folder. These images can be accessed and displayed in an image label. The video file can also be played directly without extracting the frames, if so desired.
A video file can be opened using VideoCapture(filename). The isOpened() function returns true if the file is successfully opened. The namedWindow() method creates a window with a specified name and size, which can be resized to the required size using the resizeWindow() method. The video file can be read using the read() method, which returns a boolean value and the frame read from the file. The frame can be displayed using the imshow() method. The waitKey() method displays the frame for the specified number of milliseconds. The video file can be closed using the release() method. The destroyAllWindows() method destroys all open windows.
The application consists of an entry field to accept a video file name. A file name can be chosen using the open file dialog invoked by clicking the Browse button. The video file can be played directly by clicking the Play button. Frames in the video can be extracted and inserted in a list box with sequential names as well as added to a list object, by clicking the Extract Frames button. A frame name can be click in the list box to display that frame.
Using the code
Begin by creating a virtual environment and installing the packages at the OS prompt as follows:
C:\Python>python -m venv cv
C:\Python>cv\scripts\activate
(cv) C:\Python>pip install opencv-python
(cv) C:\Python>pip install pillow
The following is the playfile() function called by clicking the Play button:
def playfile():
     filename = entfilename.get()
     if len(filename.strip()) == 0:
         lblerror.configure(text="No video file specified.")
     else:
         video = cv2.VideoCapture(filename)
         if not video.isOpened():
             lblerror.configure(text="Cannot play file " + filename + ".")
         else:
             cv2.namedWindow("Frame", cv2.WINDOW_NORMAL)
             cv2.resizeWindow("Frame", (640, 480))
             while video.isOpened():
                 ret,frame = video.read()
                 if ret:
                     cv2.imshow("Frame",frame)
                     key = cv2.waitKey(20)
                     if key == ord('q'):
                         break
                 else:
                     break
             video.release()
             cv2.destroyAllWindows()
The following is the extractframes() function called by clicking the Extract Frames button:
def extractframes():
     lstframes.delete(0,"end")
     frames.clear()
     lblerror.configure(text="")
     lblimg.configure(image=None)
     lblimg.image = None
     filename = entfilename.get()
     if len(filename.strip()) == 0:
         lblerror.configure(text="No video file specified.")
     else:
         video = cv2.VideoCapture(filename)
         if not video.isOpened():
             lblerror.configure(text="Cannot open file " + filename + ".")
         else:
             i = 1
             while video.isOpened():
                 ret,frame = video.read()
                 if ret:
                     lstframes.insert("end","Frame"+str(i))
                     frames.append(frame)
                     i += 1
                 else:
                     break
             video.release()
             cv2.destroyAllWindows()
The following is the showframe() function called by choosing a frame from the list box:
def showframe(event):
    if not os.path.exists("temp"):
        os.mkdir("temp")
    lst = event.widget.curselection()
    if lst:
        index = lst[0]
        cv2.imwrite("temp/Frame"+str(index+1)+".jpg",frames[index])
        img = ImageTk.PhotoImage(Image.open("temp/Frame"+str(index+1)+".jpg"))
        lblimg.configure(image=img)
        lblimg.image = img
The following is the openfile() function called by clicking the Browse button:
def openfile():
     f = fd.askopenfilename()
     entfilename.delete(0,"end")
     entfilename.insert(0,f)
The following is the clearfile() function called by clicking the Clear button:
def clearfile():
     entfilename.delete(0,"end")
     lstframes.delete(0,"end")
     frames.clear()
     lblerror.configure(text="")
     lblimg.configure(image=None)
     lblimg.image = None
Points of Interest
Readers can download the attached source file for the full source code of the program. This article is an attempt to highlight one small capability of the OpenCV library. I hope it would lead readers to explore more features.
