WPF: Writing a simple string to a screen should be basic. Most people use TextBox to do that, which generates a big overhead and is difficult to position precisely. Much faster is writing a string in the OnRender method using glyphs, which is complicated, badly documented and leads to ugly code. This article shows how string writing can be done using clean looking and fast executing code.
Introduction
Fair warning: this article is a technical deep dive into WPF, which can be boring for the average reader. However, if you like to improve your WPF code and its efficiency, then this article is for you.
Displaying some string to the user is easiest done in WPF by using TextBox. However, TextBox comes with the overhead which every FrameworkElement has: participating in the visual tree, support of mouse, tons of properties and events, templating support and much more, but sometimes we just want to write something without all this overhead. Especially when you know the pixel position within a FrameworkElement, you can just write the string to the DrawingContext of that FrameworkElement. It is kind of difficult to write to a precise location using a TextBox.
Note: This code works for anything inheriting from UIElement, except Window. It seems Window paints its Background over everything that gets written in OnRender().
Writing a string in the overridden OnRender() method using its DrawingContext is much more efficient. There are 2 ways writing strings to the DrawingContext
DrawingContext.DrawText(FormattedText, Point)
This requires a FormattedText, which is complex and has lots of properties. The implementation is complicated, because it has to cater for all kinds of complicated formatting. It translates the FormattedText into a GlyphRun and calls DrawingContext.DrawGlyphRun() internally.
DrawingContext.DrawGlyphRun(Brush, GlyphRun)
A glyph defines the shape of a character, also width and height, which depends on font attributes like:
- FontFamily
- FontStyle
- FontWeight
- FontStretch
- PixelsPerDip
Note: FontSize is not part of these properties. The calculation for the actual distance from this to the next glyph is: GlyphWidth * FontSize
A GlyphRun contains the font attributes listed above. They are used to paint every glyph, which are also stored in the GlyphRun plus the distance between this glyph and the next glyph (=AdvanceWidth). We could spread characters, since we specify the width each glyph uses.
Creating your own GlyphRun is a bit of a headache. For example, how do you know the distance between 2 glyphs ?
For that, you need to construct a GlyphTypeface. You construct it like this:
var typeface = new Typeface(fontFamily, fontStyle, fontWeight, fontStretch);
if (!typeface.TryGetGlyphTypeface(out glyphTypeface))
throw new InvalidOperationException("No GlyphTypeface found")
var glyphIndex = glyphTypeface.CharacterToGlyphMap[(int)'?'];
var distanceToNextGlyph = glyphTypeface.AdvanceWidths[glyphIndex] * FontSize;
DrawingContext.DrawText() is doing all this and much more. So why not using just DrawingContext.DrawText() ? Because it is inefficient and leads to ugly code. Writing just 2 strings looks like this:
FormattedText formattedText = new FormattedText("some string",
  CultureInfo.GetCultureInfo("en-us"), FlowDirection.LeftToRight,
  new Typeface("Verdana"), 32, Brushes.Black);
DrawingContext.DrawText(formattedText, new Point(10, 10));

FormattedText formattedText = new FormattedText("another string",
  CultureInfo.GetCultureInfo("en-us"), FlowDirection.LeftToRight,
  new Typeface("Verdana"), 36, Brushes.Gray);
DrawingContext.DrawText(formattedText, new Point(10, 50));
If you write several strings all using the same font attributes, you have to repeat that code for every string, and worst of all, DrawText() creates the same GlyphTypeface again and again, which is a big object holding the calculations for thousands of glyphs.
Wouldn't it be nicer you could write code like this and not causing the inefficiency of DrawText():
var glyphDrawer = new GlyphDrawer(FontFamily, FontStyle, FontWeight,
  FontStretch, VisualTreeHelper.GetDpi(this).PixelsPerDip);
glyphDrawer.Write(drawingContext, new Point(10, 10), "some string", 32, Brushes.Black);
glyphDrawer.Write(drawingContext, new Point(10, 50), "another string", 36, Brushes.Gray);
GlyphDrawer stores the GlyphTypeface and reuses it for every write. This article explains how you can use my GlyphDrawer to paint a string quickly and efficiently to the GUI.
How to use the GlyphDrawer
As shown above, creating a GlyphDrawer is easy. You can use FontFamily, FontStyle, FontWeight, FontStretch, which are properties of the the Control you write your string into. Or you can use other values like FontWeights.Bold.
GlyphDrawer glyphDrawer= new GlyphDrawer(FontFamily, FontStyle, FontWeights.Bold,
  FontStretch, VisualTreeHelper.GetDpi(this).PixelsPerDip);

protected override void OnRender(DrawingContext drawingContext) {
  glyphDrawer.Write(drawingContext, new Point(10, 10), "some string", 32, Brushes.Black);
  glyphDrawer.Write(drawingContext, new Point(10, 50), "another string", 36, Brushes.Gray);
}
GlyphDrawer.Write() looks actually like this:
public void Write(
DrawingContext drawingContext,
Point origin,
string text,
double size,
Brush brush,
bool isRightAligned = false,
bool isSideways = false,
double angle = 0)
Some of the parameter's meanings are obvious, others are easier to understand when seen how the result looks like.
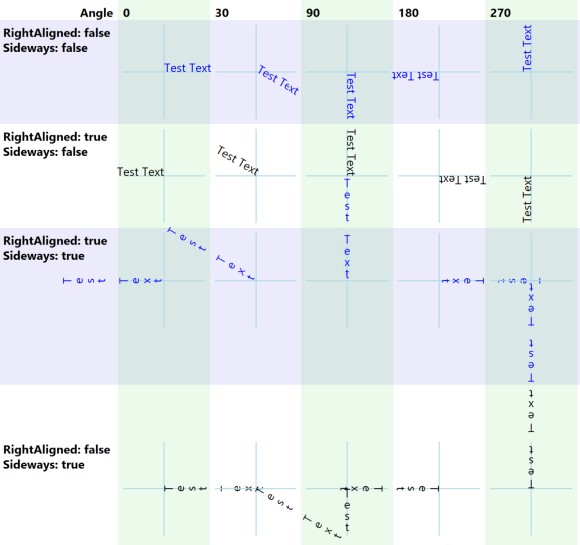
Using the same GlyphDrawer, you can write strings with different font sizes, colours, left & right alignments, sideways or not (see above) and rotation angles. However, if you want to write some text normal and some in bold, you need to use 2 GlyphDrawer instances, one created with FontWeight.Normal and the other with FontWeight.Bold. The same applies if you need different FontFamilies, FontStyles (italic) or FontStretches.
Your code executes faster if you create the GlyphDrawer in the Control's constructor instead recreating it every time OnRender() gets called.
Once you have created the GlyphDrawer, you can use it to write strings with GlyphDrawer.Write(). The origin parameters indicate where the text should be written. origin.X points at the leftmost position where the string should start if the string is left aligned. For right aligned strings (numbers) origin.X points at the rightmost position. origin.Y points at where the lowest glyph pixel gets written (baseline). Note that some characters like 'g' paint some pixels under the baseline.
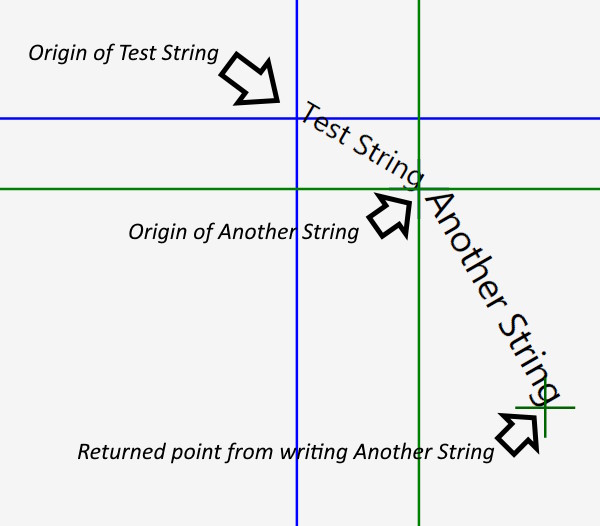
GlyphDrawer.Write() returns a point, which can be used to write the next string. This is especially convenient, when the text is rotated and the x and y calculation is complicated.
var nextPoint = glyphDrawer.Write(drawingContext, new Point(x, y), "Test String", 12,
  Foreground, angle: 30);
nextPoint = glyphDrawer.Write(drawingContext, nextPoint," Another String", 15,
  Foreground, angle: 60);
It would be extremely difficult to do this with TextBoxes and also doing this with DrawingContext.DrawText() is not trivial. Furthermore, using GlyphDrawer.Write() executes about 5 times faster than DrawingContext.DrawText(), i.e 0.04 milliseconds versus 0.2 ms.
Few limitations of GlyphDrawer
Painting Unicode can be very complex, like mixing left to right (English) and right to left (Arabic) in the same string. There is support for this in the .Net framework, but it is not included in GlyphDrawer, because all the text I work with is in english. There might also be some other exotic features in Unicode which I have not encountered.
Getting the code
Here is the code just for the GlyphDrawer:
Download GlyphDrawer.zip - 2.6 KB
You can also get it as part of the CustomControlBaseLib from Github, which includes extensive testing of the GlyphDrawer class plus some great functionality for writing your own WPF control:
https://github.com/PeterHuberSg/CustomControlBaseLib
Recommended Reading
Congratulations if you have read this far. I wrote some more WPF articles which got top ratings. I highly recommend you read my article (CodeProject Best Article of February 2022, Second Prize) for a better understanding of how layouting works in WPF, :
If you write your own WPF controls, you must read the following article, which makes it very easy for you to test visually if your Control displays properly when placed in different containers (Grid, ScrollViewer, Canvas, ...) with different settings of alignment, sizing, margin, border, padding, fonts and much more.
Some other top rated WPF articles I wrote on CodeProject:
After all this hard work, how about playing a WPF game ? I wrote it 10+ years ago and play it every day for up to an hour. It's fun because it is completely different every time you play it. Your opponents are simulated players (=Robot), which gives interesting challenges. Best of all, you can program your own robot:
My Github projects which might be interesting for you:
- CustomControlBaseLib: Facilitates writing your own WPF control with out of the box support for resizing, margin, padding, different fonts, etc. GlyphDrawer is part of it.
- WpfWindowsLib: WPF Controls for data entry, detecting if required data is missing or data has been changed
- TracerLib: Part of it used in
WpfControlTestbench. Fast tracing of exceptions, errors and infos in memory, some entries can be written by a background thread to a file. Great to document what happened just before an exception occurred. - StorageLib: C# only library providing fast object oriented data storage in RAM and long term storage on local hard disk for single user applications. No database required.
- MasterGrab: MasterGrab is a WPF game where a human player plays against several computer players (=Robots). You can program your own Robot in C#. Since 6 years, I play it every day. It takes just about 10 minutes. Perfect for warming up my brain before starting to program.


 General
  News
News  Suggestion
  Question
  Bug
Bug  Answer
  Joke
Joke  Praise
  Rant
Rant  Admin
Admin 


