Introduction
The main structures and data access parts of the data service Web API are based on my previous article with updates of the ASP.NET Core version, breaking changes in code, and new or extended features. Most topics, such as general configurations, multi-layer data access related processes, publishing website projects, etc., won’t be repeated in this article. Please see my previous article for topics described there. The downloadable source code files here also include all previous and up-to-date changes.
The article contains these topics:
The data service Web API application and source code are designed only for the Microsoft Windows system for now. The settings of published source code files are in the basic mode, i.e., disabled HTTPS and Basic Authentication, to facilitate application setup and running on any local environment at the beginning. Features and configurations will be added or enabled with the stepwise instructions later in the article.
These are prerequisites for setting up projects on the local machine:
- Microsoft Windows 10 or 11
- Visual Studio 2022 with the ASP.NET and web development workload
- Internet Information Services (IIS) installed from Programs and Features > Turn Windows features on or off
Please also read this document from Microsoft to understand settings for multiple environment related topics in ASP.NET Core.
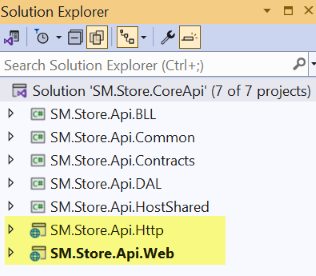
When opening the application solution, SM.Store.CoreApi.sln, with the Visual Studio, and go to the Solution Explorer, two website projects are shown as highlighted in below screenshot, SW.Store.Api.Web that targets to the traditional IIS or IIS Express webserver, and SM.Store.Api.Http that targets to the HTTP.sys webserver. For the HTTP.sys, see the section Website Project with HTTP.sys for details.
Running the application with IIS, IIS Express, or HTTP.sys is easily switchable by selecting the combinations from Startup Project and Debug Target dropdowns on the Visual Studio toolbar. There is no additional setup step required for running the application with the IIS Express or HTTP.sys after rebuilding the solution. Configuring and launching the application with local IIS with custom domain name will be described later in this article.
1. IIS Express
- Selections on the Visual Studio toolbar are shown on this screenshot:

- To run the project, click the IIS Express button or press F5.
2. HTTP.sys
- Selections on the Visual Studio toolbar are shown on this screenshot:
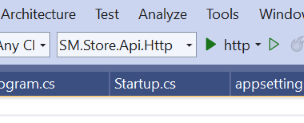
- To run the project, click the http button or press F5.
As per original settings, the in-memory SQL Server database is used to provide the data for demo purposes. Thus, setting up any physical database is not required to obtain data results from Web API calls during the initial set-up phase. The topic of using SQL Server LocalDB as the data source will be detailed later in this article.
There is startup.html built-in to the application which calls an API method for lookup data and loads the page by default. After running the application, the startup page should be shown on the browser as below.

If replacing the startup.html with swagger in the browser address bar and press Enter, the API document Swagger page will be shown. More on the topic for the Swagger will be in the later section, Documentation with Swagger. From the downloaded source, the TestCasesForDataServices_8.0.txt file contains the input parameter samples that can be used to test the API call requests and responses. The Postman is also a good tool for making API calls (see screenshot examples across several sections later in this article).
Friendly Notes: please clear the browser cache before starting any new running session, especially if any discrepancies or unexpected results are shown on the page after making code changes.
Probably most noticeable new feature for startup processes in ASP.NET Core 6.0+ is the minimal hosting model. Whether viewing this as a breaking change or not, it may be just workflow style and sequence changes as illustrated below.
In Traditional Hosting Model:
Callback (create configuration service collections > configure) > build host > run app
In Minimal Hosting Model:
Create configuration service collections > build host > configure > run app
Although the Traditional Hosting Model is still supported in newer versions, this application adopts the Minimal Hosting Model for the benefits of code clarity and extendibility. Wrapping the startup processes in a single Program.cs file or across multiple files are not important and should depend on the workflow needs. I still use the Startup class in the Startup.cs file since the application needs shared configuration routines for multiple different launch hosts. The Startup.cs file is placed in the SM.Store.Api.HostShared project that can be referenced by both IIS/IIS Express and HTTP.sys website projects.
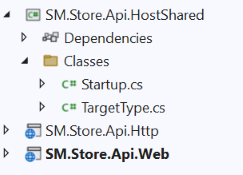
Comparing to the old Startup class in ASP.NET Core 5.0 sample application, all actively-used existing items in the legacy application are replicated to the new Startup class with some minor changes, such as passing the enum TargetType value to the Startup class constructor as a flag for multiple website projects.
public Startup(IWebHostEnvironment env, TargetType type)
{
    WebHostEnvironment = env;
    TargetType = type;
    - - -
}
Two hosting target types are defined in the enum:
public enum TargetType
{
    IIS_IISExpress = 0,
    HTTP_Sys = 1
}
As a full-featured data service application now, configurations for those new or extended features are added into the shared Startup class. See corresponding sections later in this article for details of these features and settings.
The HTTP.sys is not something new, but the template app of ASP.NET Core Web API project in Visual Studio 2022 sets the HTTP.sys as default application launch host. It seems that Microsoft is trying to recommend using the HTTP.sys for any new development. As per Microsoft, the HTTP.sys is useful for deployments where:
- There's a need to expose the server directly to the Internet without using IIS.
- An internal deployment requires a feature not available in Kestrel.
The settings for the SM.Store.Api.Http project with the launch host targeting to HTTP.sys are depicted below. For understanding of HTTP.sys for ASP.NET Core, please read documents and blogs by searching "HTTP.sys" across the Internet.
1. In the SM.Store.Api.Http.csproj file, these lines are set to HTTP.sys specific:
<PropertyGroup>
    <TargetFramework>net8.0-windows</TargetFramework>
    <PlatformName>windows</PlatformName>
</PropertyGroup>
2. In the Program class of the Program.cs file (initial settings without authentication):
builder.WebHost.UseHttpSys(options =>
{
    options.AllowSynchronousIO = false;
    options.Authentication.Schemes = AuthenticationSchemes.None;
    options.Authentication.AllowAnonymous = true;
    options.MaxConnections = null;
    options.MaxRequestBodySize = 30_000_000;
});
3. In the Properties/LaunchSettings.json file (initial settings without HTTPS):
"profiles": {
  "http": {
    "commandName": "Project",
    "dotnetRunMessages": true,
    "launchBrowser": true,
    "launchUrl": "startup.html",
    "applicationUrl": "http://localhost:5024",
    "environmentVariables": {
      "ASPNETCORE_ENVIRONMENT": "LOCAL"
    }
  }
}
These are all necessary for configuring and running the HTTP.sys website project. Other settings in the Startup class are virtually the same as those for the IIS or IIS Express website project.
For more options and controls on the website project, and also closer to production scenarios, hosting the application with local IIS is the best choice for the local code development work. The data service Web API source code downloaded from this article includes the use of In-process local IIS with a custom domain name. It, however, only works after these steps have been completed on the local machine.
1. Open the hosts file in the C:\Windows\System32\drivers\etc folder in Notepad with local admin or elevated permission, and then enter this line into the file:
127.0.0.1 StoreDataServiceApi
2. On the IIS Manager (inetmgr), right-click Application Pool > Add Application Pool…, and then make the entries or selections like those shown below. Note that the No Managed Code must be selected from the .NET CLR version dropdown for the ASP.NET Core web application.
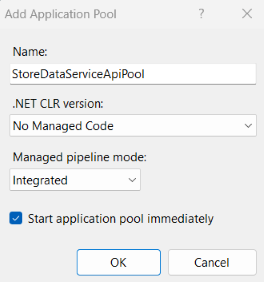
3. Continue to right-click Sites > Add Website…, and then make the entries or selections like those shown below.
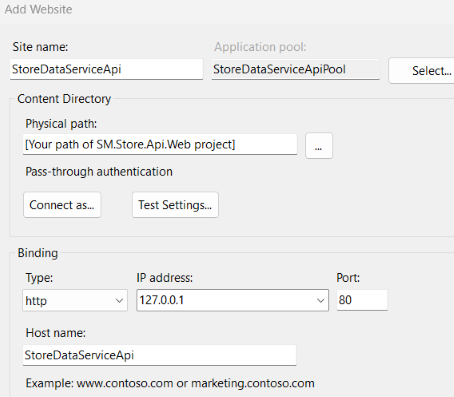
4. Open the SM.Store.Api.Web/Properties/LaunchSettings.json file from Visual Studio Solution Explorer. These lines are there used for launching the application with the IIS web server. No change is needed in this file for now.
"profiles": {
  - - -
  "SM.Store.Api.Web": {
    "commandName": "IIS",
    "launchBrowser": true,
    "launchUrl": "startup.html",
    "environmentVariables": {
      "ASPNETCORE_ENVIRONMENT": "LOCAL"
    }
  }
},
"iisSettings": {
  - - -
  "iis": {
    "applicationUrl": "http://StoreDataServiceApi",
    "sslPort": 0
  }
}
5. Install the latest version of ASP.NET Core Hosting Bundle by downloading and running the hosting bundle installer for Windows on the local machine.
6. To run the application in debugging mode targeting to local IIS, conduct these steps using the Visual Studio:
- Selections on the Visual Studio toolbar are those shown on blow screenshot:
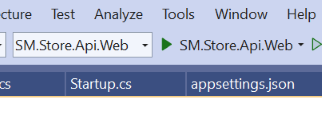
- Click the SW.Store.Api.Web button or press F5
If a user-based Windows Certificate MMC snap-in has not been created, conduct these steps:
-
In Command Prompt or Start Menu > Run panel, enter mmc to open the general MMC console.
-
Press Ctrl + M to open the Add or Remove Snap-ins screen.
-
Select Certificate from Available snap-ins list and add it to Selected snap-ins list.
-
Select Computer account on the Certificate snap-in popup and click Finish.
-
Again, select Certificate from Available snap-ins list and add it to Selected snap-ins list.
-
Select My user account on the Certificate snap-in popup and click Finish.
-
Click File > Save as to save the user-based certificate MMC snap-in. The <file-name>.msc file will be in the path C:\Users\<current-user>\AppData\Roaming\Microsoft\Windows\Start Menu\Programs\Administrative Tools. A shortcut can be created onto desktop for easy access.
The easiest way to complete this task is to run PowerShell scripts for a self-signed certificate and then use the IIS Manager to do the site binding.
1. Open the PowerShell console and run the below scripts, which creates and trusts the self-signed certificate all at once. The local admin or elevated rights may be required for this operation.
$cert = New-SelfSignedCertificate -CertStoreLocation "Cert:\LocalMachine\My" -DnsName   "StoreDataServiceApi" -FriendlyName "StoreDataService" -NotAfter "01/01/2034" -Verbose
$DestStore = new-object System.Security.Cryptography.X509Certificates.X509Store([System.Security.Cryptography.X509Certificates.StoreName]::Root,"localmachine")
$DestStore.Open([System.Security.Cryptography.X509Certificates.OpenFlags]::ReadWrite)
$DestStore.Add($cert)
$DestStore.Close()
Notes for the script:
-
The -DnsName parameter supports multiple domain names separated by comma like "name-A", "name-B".
-
If setting the local IIS with the domain name other than that shown above, replace the existing values of -DnsName and -FriendlyName parameters with the changed names.
-
if the site is configured with the default localhost:<port-number>, not the custom domain name, then enter the "localhost" for the -DnsName.
2. Open the certificate MMC snap-in console to check the newly created certificate in both Certificates (Local Computer) > Personal and Trusted Root Certification Authorities > Certificates.
3. Double-clicking the StoreDataServiceApi in the Issue to list from the MMC snap-in and then selecting the Certificate Path tab to confirm the new certificate name which is the value of -FriendlyName parameter in the PowerShell script.
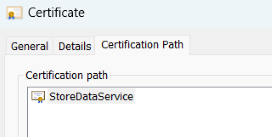
4. Open the IIS Manager > Sites > StoreDataServiceApi > Actions > Bindings…, selections or entries should be those on the below screenshot.
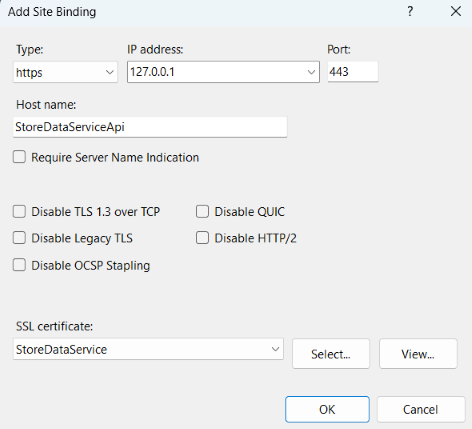
5. Change the lines in the SW.Store.Api.Web/Properties/launchSettings.json for IIS to use HTTPS URL and port number.
"iisSettings": {
  - - -
  "iis": {
    "applicationUrl": "https://StoreDataServiceApi",
    "sslPort": 443
  }
}
6. Run the application by selecting the SM.Store.Api.Web as startup project and SM.Store.Api.Web as launch host. The startup page will be shown with HTTPS.
7. Switch from HTTP to HTTPS URLs to make calls from service clients, such as Postman or Swagger. This will further confirm correct self-signed certificate and settings for the HTTPS.
As per prerequisites, it's required to run the application in Visual Studio 2022 with the ASP.NET and web development workload. Thus, the IIS 10.0 Express accompanied with the Visual Studio should already be installed on the local computer. The "IIS Express Development Certificate" should also automatically be installed. if checking with the certificate MMC snap-in, it's shown in the Certificates (Local Computer) > Personal > Certificates and Issued To "localhost". However, this certificate is not trusted by default as there is no "localhost" in the Trusted Root Certification Authorities > Certificates section this time.
Follow below steps to proceed with necessary settings:
1. Change the lines in the SW.Store.Api.Web/Properties/launchSettings.json for IIS Express to use HTTPS URL and port number.
"iisSettings": {
  - - -
  "iisExpress": {
    "applicationUrl": "https://localhost: 44330",
    "sslPort": 44330
  }
}
2. In Visual Studio, select SM.Store.Api.Web as startup project and IIS Express as launch host. Click the IIS Express button or press F5.
3. If this is the first website project running with HTTPS and IIS Express, it usually prompts for trusting the certificate. Clicking "Yes" on the popup will add the IIS Express Development Certificate into the local machine trusted certificate store. If any other website project with HTTPS and IIS Express has already successfully run on the local computer, the SM.Store.Api.Web project should already be working fine without this step.
4. If this is the first time to set up a local development website with HTTPS and IIS Express, and the SM.Store.Api.Web project runs without the auto trusting certificate prompt, it would better execute these script lines with the PowerShell to add the certificate into the local trusted store:
$cert = Get-ChildItem -Path Cert:\LocalMachine\My | Where-Object {$_.Subject -eq "CN=localhost"}
$DestStore = new-object System.Security.Cryptography.X509Certificates.X509Store([System.Security.Cryptography.X509Certificates.StoreName]::Root,"localmachine")
$DestStore.Open([System.Security.Cryptography.X509Certificates.OpenFlags]::ReadWrite)
$DestStore.Add($cert)
$DestStore.Close()
5. Run the application by selecting the SM.Store.Api.Web as startup project and IIS Express as launch host. The startup page will be shown with HTTPS.
6. If encountering some serious issues or expiration for the IIS Express Development Certificate, the certificate can be reset using these steps:
-
Delete the "localhost" certificate from both Local Computer > Personal and Local Computer > Trusted Root Certification Authorities stores.
-
Run repair of IIS 10.0 Express on the Control Panel > Programs and Features screen. This will automatically re-install the IIS Express Development Certificate.
-
Repeat the above instruction steps from #1 to #4.
Conduct these steps to set up and run the SM.Store.Api.Http website project with HTTPS:
1. Open the Command Prompt and run the line below.
dotnet dev-certs https --trust
This will add the certificate that issues to "localhost" into both Personal > Certificates and Trusted Root Certification Authorities stores of the Current User. Check and confirm that the certificate has been created in the Certificates - Current User section from the Certificate MMC snap-in. The name in the certification path is "ASP.NET Core HTTPS Development certificate".
2. Open the launchSettings.json file under the SM.Store.Api.Http/Properties folder and change the value of applicationUrl to use the HTTPS,
from:
"applicationUrl": "http://localhost:5024",
to:
"applicationUrl": "https://localhost:44360",
3. Start the application by selecting the SM.Store.Api.Http as startup project and http as launch host. The startup page will be shown with HTTPS.
The advanced custom error log and report system is implemented for the ASP.NET Core Data Service Web API. There are two patterns of error handling processes, global error handler with breaking current code execution and local error handler with continuing current code execution.
The global error handler processes are initiated from the configureExceptionHandler custom midware method in the Startup class:
public void Configure(IApplicationBuilder app)
{
app.ConfigureExceptionHandler();
- - -
}
This method calls the built-in UseExceptionHandler midware in the SM.Store.Api.Common/ErrorLogging/ExceptionHandlerFactory.cs:
public static void ConfigureExceptionHandler(this IApplicationBuilder app)
{
app.Use((context, next) =>
{
context.Request.EnableBuffering();
return next();
});
app.UseExceptionHandler(appError =>
{
appError.Run(async context =>
{
context.Response.StatusCode = (int)HttpStatusCode.InternalServerError;
context.Response.ContentType = "application/json";
var errorFeature = context.Features.Get<IExceptionHandlerFeature>();
if (errorFeature != null)
{
await ProcessError.LogAndReport(context, errorFeature.Error);
}
});
});
}
This midware routine further calls the custom LogAndReport method in the ProcessError class. The method, in turn, performs the below operations:
-
Build error messages in text format including error categories, descriptions, status code, and stack traces.
-
Write generated lines of text to both current and history log files. The locations of the files can be configured in the appsettings.json for different environments. The current log file is refreshed when new error occurs. The history log file can auto be archived based on the configurable maximum file size setting.
-
Send the email via SMTP services. All service and email parameters can be configured in the appsettings.json.
To test the global error hander and report, follow these steps:
1. Download the smtp4dev tool with the preferred version. Since we just need to confirm sending and receiving error report emails and are not interested in fancy email UI, I suggest simply downloading the standalone-executable Windows only GUI version that doesn't need the installation task. Directly run the extracted executable, smtp4dev.exe, and leave it under the background.
2. Open the startup.html under the SM.Store.Api.Web/wwwroot folder using the Visual Studio Solution Explorer or Notepad. Find this line:
request.open('Get', 'api/lookupcategories', true);
and then change the called method name to lookupcategorieserror. This API method is intentionally designed to throw a dummy error with the test error message.
request.open('Get', 'api/lookupcategorieserror', true);
3. Save the file and press F5 to run the application.
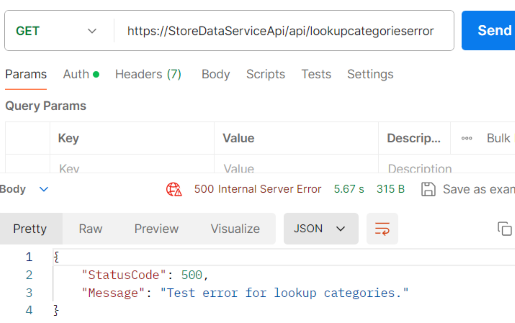
4. Clearing the browser cache and refreshing the browser session may be needed. The startup page will show the generic message "An error occurred during your request: 500" because the startup.html does not get the detailed pass-through error message. If calling the same method using the Postman, it shows the exact test error message:
5. Open the StoreDataService.Log file from the …\SM.Store.Api.Web\bin\Debug\net8.0\Logs physical location. The constructed text lines for error details should be shown in the file. From my side, the file content looks like this:

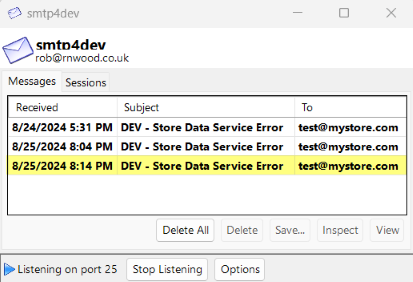
6. Open the smtp4dev tool from the background. The email item for reporting the error should be there. Highlight the email and click the Inspect button, or the View button if preferring to load the email to an outside email provider app. The content of the email should be virtually the same as shown in the current error log file.
In some situations, when an error occurs in any code structure, such as a class constructor, method, or property, we need to log or/and report the error but don’t want to stop the current code execution. The type of local error handler and report is designed to achieve this purpose.
The local error hander is initiated from the error catch block of any routine that needs to report the error but continue the remaining processes. A demo case is placed in the ProductController.Post_GetPagedProductListSp method. The in-memory database doesn't support stored procedures so that calling a stored procedure would render the error with the message "Query root of type 'FromSqlQueryRootExpression' wasn't handled by provider code" which is a generic message for any error whenever calling the FromSql or FromSqlRaw method. When this error occurs, if we would not like to bother the global error handler for this particular case, and also need more clear error message to be reported with empty data items in the response body, we can implement below code logic:
try
{
- - -
}
catch (Exception ex)
{
if (StaticConfigs.GetConfig("UseInMemoryDatabase").ToLower() == "true")
{
var errMsg = "Stored procedure is not supported by using InMemory database.";
var dataInfo = "Stored Procedure Name: dbo.GetPagedProductList.";
var asynTask = new Task(async () =>
{
await ProcessError.LocalErrorAndContinue(HttpContext, ex, errMsg, dataInfo);
});
asynTask.RunSynchronously();
}
else
{
throw;
}
}
return resp;
For the local error hander, steps of building error messages, saving details to error log files, and sending out error report emails all share the same code base as for the global error handler in the ProcessError class.
To test the local error handler and report, we can use the Postman to call the getpagedproductlistbysp API method with the POST parameters in the included TestCasesForDataServices_8.0.txt file. Make sure that the "UseInMemoryDatabase" is set to "true" in the appSettings.json. The empty data will be obtained without any error in the response which is correct for the continuing process pattern. The error details should be logged into log files and reported by an email. Check the log files and email using the same approaches as for global error handler and report.
The application uses the role-based Basic Authentication approach. The advantage of this approach is that we can set multiple policies and roles for different allowed operations in the data services. The different users or service accounts passed from the request header could be in different groups, thus, have different permissions if needed.
In this section, I just describe the implementation-related topics and test cases for a single "Basic Auth Role" group that is used for this application.
1. Create Windows local group, Basic Auth Role, and local user, BasicAuthAccount with password indicated in the Startup.html. Add the user into the group. Note that this is just the case for local development environment. For a deployed service application on either test or production server boxes in any company having active directory (AD) system, AD groups and service accounts would be used instead.
2. Setting schemes in webservers (not apply to HTTP.sys).
-
For IIS, enable the Basic Authentication from IIS Manager > Sites > StoreDataServiceApi > Authentication, in addition to the enabled Anonymous Authentication.
Note that a warning message may be shown if setting the Basic Authentication for the site with HTTP only since it passes the credentials in plain text, which causes security vulnerabilities. Always use HTTPS for Basic Authentication in production.
-
For IIS Express, open the applicationhost.config file under the <solution-root-folder>\ .vs\SM.Store.CoreApi\config using the Notepad. Search location path="SM.Store.Api.Web". Add the basicAuthentication line into the Authentication node but under the anonymousAuthentication line:
<anonymousAuthentication enabled="true" />
<basicAuthentication enabled="true" />
3. Settings schemes in startup code.
-
For IIS and IIS Express, add the linked authentication scheme into the builder service collections in Startup.cs:
if (TargetType == TargetType.IIS_IISExpress)
{
services.AddAuthentication(IISServerDefaults.AuthenticationScheme);
}
-
For Http.sys, change the options setting in the SM.Store.Api.Http/Program.cs:
builder.WebHost.UseHttpSys(options =>
{
options.AllowSynchronousIO = false;
options.Authentication.Schemes = AuthenticationSchemes.Basic;
options.Authentication.AllowAnonymous = true;
options.MaxConnections = null;
options.MaxRequestBodySize = 30_000_000;
});
4. Add a policy with the name "RoleBasedBasicAuth" into the service collection from the startup code. This policy sets the configurable "AuthRoleGroup" as a required role, which means that the user identity from the request header must be in that group of Windows security or AD system to pass the authorization check. This code piece is working for any IIS, IIS Express or Http.sys website project.
var authRoleGroup = StaticConfigs.GetConfig("AuthRoleGroup") ?? "Basic Auth Role";
services.AddAuthorization(options =>
{
    options.AddPolicy("RoleBasedBasicAuth", policy =>
      policy.RequireRole(authRoleGroup));
});
5. Add the CustomerAuthorizeAttribute.cs into the application. In the downloaded source code, this file is in the SM.Store.Api.Common/Classes/BasicAuth folder. Only the constructor we need to be concerned about. This attribute class accepts an optional argument for the policy name which is compatible with the multiple policy scenario.
[AttributeUsageAttribute(AttributeTargets.Class | AttributeTargets.Method, Inherited = true, AllowMultiple = true)]
public class CustomAuthorizeAttribute : AuthorizeAttribute
{
    public CustomAuthorizeAttribute(string policy = "RoleBasedBasicAuth")
    {
        this.Policy = policy;
    }
}
6. In the API controllers or methods that need authorized access, add the [CustomAuthorize] attribute with or without (for using the default) parameter for the policy name.
namespace SM.Store.Api.Web
{
    [CustomAuthorize]
    [ApiController]
    [Route("api")]
    public class LookupController : ControllerBase
    {
        - - -
    }
}
7. Add the custom claims identity with generated token into the claims principal using the IClaimsTrasformation. In this application, the additional class ClaimsTransformer in Startup.cs is created to accomplish this task.
public class ClaimsTransformer : IClaimsTransformation
{
public Task<ClaimsPrincipal> TransformAsync(ClaimsPrincipal principal)
{
((ClaimsIdentity)principal.Identity).AddClaim(new Claim("now", DateTime.Now.ToString()));
return Task.FromResult(principal);
}
}
8. The claims transformation service needs to be added into the service collection in the Startup class:
services.AddTransient<IClaimsTransformation, ClaimsTransformer>();
It’s annoying when the Basic Authentication is always enforced during local code work and test cycles. To bypass the authorization checker in local environment, one temporary resolution is to comment out the [CustomAuthorize] attribute on the top of API controllers or methods. It, however, is an unwise or last-resort behavior. We need to update the code logic in the implementation step #3 with conditionally calling the policy.RequireAssertion method to set the pass-through policy for the local code work environment.
var authRoleGroup = StaticConfigs.GetConfig("AuthRoleGroup") ?? "Basic Auth Role";
if (!WebHostEnvironment.IsEnvironment("LOCAL"))
{
services.AddAuthorization(options =>
{
options.AddPolicy("RoleBasedBasicAuth", policy =>
policy.RequireRole(authRoleGroup));
});
}
else
{
services.AddAuthorization(options =>
{
options.AddPolicy("RoleBasedBasicAuth", policy =>
policy.RequireAssertion(ahc => true));
});
}
1. With any launch host and value of the "ASPNETCORE_ENVIRONMENT" set to "LOCAL" in launchSettings.json, calling API methods, no matter loading Startup page or using the Postman, should go smoothly as expected since the Basic Authentication process is bypassed for the local environment.
2. Change the "ASPNETCORE_ENVIRONMENT" set to "DEV" or "PROD" in launchSettings.json for any launch host and then run the application with or without inputs of account info.
-
Startup page no auth: the request line with username and password is commented out in the original Startup.html file. The page would be loaded with prompts for credentials.

If clicking the Cancel button, it will render the 401 error (unauthorized).
-
Startup page with auth: in the startup.html, comment out the existing request line and enable the line with the username and password:
request.open('Get', 'api/lookupcategories', true, "BasicAuthAccount", "Hb87j#G34asYm&f%Op");
Save the file, clear the browser cache, and refresh the browse screen. The page should be rendered normally.
-
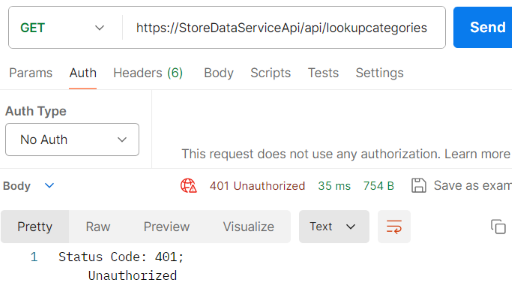
Postman without auth: select No Auth from the request Auth tab. Clicking Send button would get the "401 unauthorized" error message.
-
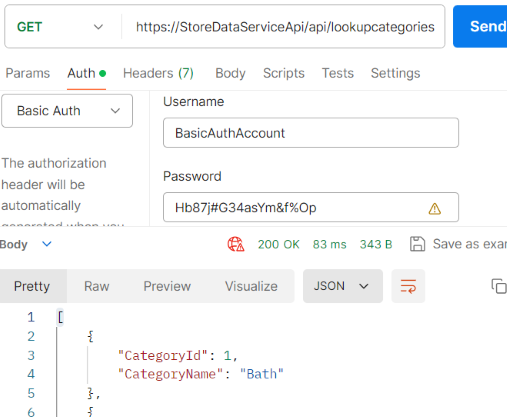
Postman with auth: select Basic Auth from the request Auth tab. Enter the username and password as the same as in startup.html. Click the Send button. The call would be successful and data items loaded normally.
The Swagger UI can be used not only as a documentation tool to expose API specifications but also as a test client to call API methods during code development work. The template of ASP.NET Core Web API project in Visual Studio 2022 includes the Swagger UI so that developers can use it easily for any new projects and applications.
The code for using the Swagger UI is simple and straightforward. In the Visual Studio template app, these four lines of code in the Program.cs function as the basic model of the Swagger UI:
builder.Services.AddEndpointsApiExplorer();
builder.Services.AddSwaggerGen();
- - -
app.UseSwagger();
app.UseSwaggerUI();
In the downloaded source code, two sets of additional code pieces are added into the Startup class to extend the Swagger UI functionalities.
1. Custom Swagger page title and description text display
services.AddSwaggerGen(options =>
{
    options.SwaggerDoc("v1", new Microsoft.OpenApi.Models.OpenApiInfo
    {
        Title = "Store Data Service API",
        Version = "v1",
        Description = "ASP.NET Core data service application",
    });
    - - -
});
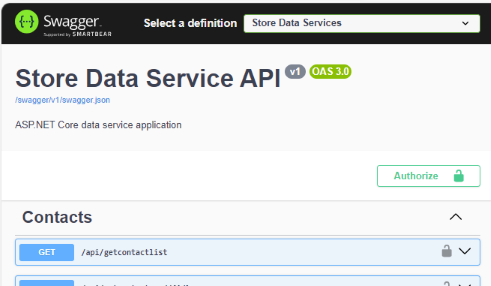
See the screenshot next section for the custom title and description text.
2. Basic Authentication settings and Authorize button
Using below code, the Swagger UI can handle the requests with Basic Authentication security checker. It also enables the Authorize button and related workflow in the Swagger page.
services.AddSwaggerGen(options =>
{
    - - -
    options.AddSecurityDefinition("basic", new OpenApiSecurityScheme
    {
        Name = "Authorization",
        Type = SecuritySchemeType.Http,
        Scheme = "basic",
        In = ParameterLocation.Header,
        Description = "Basic Authorization header using the Bearer scheme."
    });

    options.AddSecurityRequirement(new OpenApiSecurityRequirement
    {
        {
            new OpenApiSecurityScheme
            {
                Reference = new OpenApiReference
                {
                    Type = ReferenceType.SecurityScheme,
                    Id = "basic"
                }
            },
            new string[] {}
        }
    });
});
The Authorize button is shown on the right of the Swagger page:
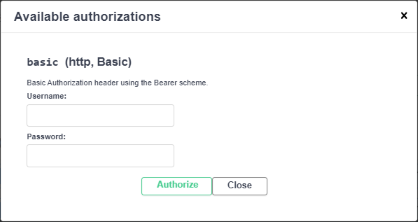
Before selecting any API method to be called, we can preset the user or service account by clicking the Authorize button and save the account info for calling multiple API methods in the entire session.
The SQL Server LocalDB (officially named as SQL Server Express LocalDB, and also briefed as LocalDB in this article) is designed especially for the local development environment. It’s installed by Visual Studio as part of data storage and processing workload, or by a standalone SqlLocalDB.msi file extracted from the installation package of SQL Server Express edition. The LocalDB has major differences from other editions in the SQL Server family:
-
It’s running as an API-like desktop program, not the Windows Service like any other SQL Server edition.
-
Instances are created and run in current user context/account without involving admin or elevated permissions except for commands of sharing and un-sharing an instance for multiple users on that local machine.
-
The on-demand management turns on the instance automatically when needed and turned off when not in use for the timeout period.
-
The database tool is private and local-only, not related to any network resources or operations, and not possible for any remote connections from the network.
Those features of the LocalDB make it ideal to replace the SQL Server Developer or Express editions for development work that requires test databases locally but with restrictions of possible network-oriented tool running on any local machine.
1. The localDB installation could be effortless. Install the LocalDB if haven’t done so, or use the version installed by the Visual Studio. See this document for instructions.
2. Open the Command Prompt and check the automatic instance of the LocalDB by executing below line. The instance name should be shown as MSSQLLocalDB.
sqllocaldb info
3. Start the LocalDB instance by running this command.
sqllocaldb start MSSQLLocalDB
This step is optional since when any application pointing to the LocalDB instance starts to run by current user, the instance will automatically be started if it’s in stopped status.
4. Install the SQL Server Management Studio (SSMS) if haven’t done so.
5. Open the SSMS with the LocalDB instance (localdb)\MSSQLLocalDB. If this is a new instance, it should have no customer database.
6. Open the data service Web API solution with the Visual Studio, go to the appSettings.json:
-
Change the value of "UseInMemoryDatabase" to "false".
-
If database mdf and ldf files need to be created in a user-defined location, add this name=value pair into the ConnectionStrings.StoreDbConnection JSON item (this line can be removed after the database is created). Otherwise, the database files will be created in C:\Users\<user>\Documents folder by default.
AttachDBFilename=<drive>:\\<parent-directory-path>\\MSSQLLocalDB\\StoreCF8.mdf;
7. Select IIS Express or HTTP.sys as the launch host and run the application. If no error is rendered, the StoreCF8 database should automatically be created by the action of built-in database initializer usually only for the non-production environment. The application is now using the LocalDB database as the data provider.
8. When running the website project with Local IIS and LocalDB, errors may occur due to issues of some environment or user-account settings. See the topic of Local IIS Related Errors for details and resolutions.
The error message we would mostly see may be the “A network-related or instance-specific error occurred while establishing a connection to SQL Server. The server was not found or was not accessible. . .”. Other pieces of descriptions may also be present, such as “Cannot create an automatic instance” or “SQL Server process failed to start”.
It’s possible that someone else, such as domain admin instead of real machine owner, install the LocalDB. The automatic instance would then be created in that installer's context. The user owns the machine cannot access the instance that is not created by this user unless the instance is shared in the computer. In this case, try to creating the current user own instance by running the command:
sqllocaldb create MSSQLLocalDB
If getting the “Instance already exists” message, then run these two command lines below before running the creating instance command again.
sqllocaldb stop MSSQLLocalDB
sqllocaldb delete MSSQLLocalDB
Sharing the instance is not recommended for this case since in the current user mode, it’s difficult for the user to manage the instance shared from other physical user accounts.
Deleting and recreating the automatic instance is also the last resort for any corrupted instance if issues still persist after repeated tries for fixes. As usual, developers may often backup the database or archive the database mdf and ldf files for restoring the database in case of re-creating a new instance.
If the “A network-related or instance-specific error occurred. . . “ is rendered when using the IIS with the LocaDB, try to understand and fix errors following below listed instructions.
1. When using the default ApplicationPoolIdentity for the application pool, it needs to enable the full user profile from the IIS settings.
-
Use the Notepad with local admin or elevated rights, open the file, applicationHost.config, from the path C:\Windows\System32\inetsrv\config.
-
Search and find the node having attribute "setProfileEnvironment".
-
Change the value of "setProfileEnvironment" from "false" to "true".
-
The updated XML nodes in the file should look like this:
<applicationPoolDefaults managedRuntimeVersion="v4.0">
    <processModel identityType="ApplicationPoolIdentity" loadUserProfile="true" setProfileEnvironment="true" />
</applicationPoolDefaults>
2. Using the default ApplicationPoolIdentity results in accessing the LocalDB from a different user account, thus, may render the instance error since a single LocalDB instance can only be accessed by the current user. This issue may not appear with newer versions of ASP.NET Core and Entity Framework Core for data access. But occurring, try to create a shared instance using this command:
sqllocaldb share MSSqlLocalDB SharedLocalDb
NOTE: for the sqllocaldb command line utilities, only share and unshare commands need local admin or elevated rights.
The shared instance name can then be used for the LocalDB connection:
(localdb)\.\ SharedLocalDB
3. If getting “Login failed for user <app-pool-user>” within the error message text, especially with older versions of ASP.NET Core or Entity Framework Core, then the app pool account needs to be added into the LocalDB for the login authentication and database access authorization.
To add the IIS APPPOOL\<app-pool-name> into the LocalDB, follow the steps in the section Using IIS Express and Local IIS > Mapping the application pool account, from my previous article.
Alternatively, executing the below SQL script in the SSMS can programmatically map the user account to the LocalDB instance and database for this Web API application:
USE [master]
GO
IF NOT EXISTS (SELECT name FROM master.sys.server_principals WHERE name = 'IIS APPPOOL\StoreDataServiceApiPool')
BEGIN
    CREATE LOGIN [IIS APPPOOL\StoreDataServiceApiPool] FROM WINDOWS WITH DEFAULT_DATABASE=[StoreCF8],
    DEFAULT_LANGUAGE=[us_english]
END
GO
USE StoreCF8
GO
IF NOT EXISTS (SELECT * FROM sys.database_principals WHERE name = N'IIS APPPOOL\StoreDataServiceApiPool')
BEGIN
    CREATE USER [IIS APPPOOL\StoreDataServiceApiPool] FOR LOGIN [IIS APPPOOL\StoreDataServiceApiPool]
        WITH DEFAULT_SCHEMA=[dbo]
    EXEC sp_addrolemember N'db_datareader', N'IIS APPPOOL\StoreDataServiceApiPool'
        EXEC sp_addrolemember N'db_datawriter', N'IIS APPPOOL\StoreDataServiceApiPool'END;
GO
GRANT EXECUTE TO [IIS APPPOOL\StoreDataServiceApiPool];
GO
As mentioned earlier, the LocalDB instance can be turned on and off with an on-demand behavior. In some situations when calls come from client applications, the instance could not automatically be turned on after the timeout period, causing the same "instance fails to start" error. The default timeout period is only 5 minutes for any LocalDB instance.
The timeout case may rarely be seen in applications with newer versions of the Entity Framework Core that handles client calls. But if coming across such issue, running below script using the SSMS can extend the timeout period for LocalDB instances. The maximum value is 65535 minutes which is about 45 days, hence, almost no timeout in respect to the local machine.
USE [master]
GO
EXEC sp_configure 'show advanced options', 1;
RECONFIGURE;
GO
--maximum value: 65535 min
EXEC sp_configure 'user instance timeout', 65535;
RECONFIGURE;
GO
Summary
This article and accompanied source code present many major topics for the ASP.NET Core data service Web API application that were not described in my previous article with older ASP.NET Core versions. The development model of the application also covers multiple launch hosts within the same Visual Studio solution, but each type of website project can be built and published separately. Many sections provide detailed step-by-step tutorials, test cases, and issue resolutions which would benefit developers during related code works. Audiences may also be interested in implementations of many features demonstrated here. Happy coding!
History
