When developing distributed applications, it's important to be familiar with the underlying technology. This article discusses the OpenSSL library, which enables developers to connect to remote systems using the Secure Sockets Layer (SSL).
1. Introduction
As distributed computing becomes more common, it becomes more important for programmers to understand the mechanisms that make distributed computing possible. Many developers know about source files, header files, and makefiles, but relatively few are familiar with digital certificates, public/private key files, and certificate signing requests.
Today, the dominant methodology for secure distributed computing is SSL/TLS (Secure Sockets Layer/Transfer Layer Security). The most popular open-source toolset that implements SSL/TLS is OpenSSL. The goal of this article is to explain what OpenSSL accomplishes and show how to access its capabilities in code.
2. Brief History of SSL and TLS
Way back in 1994, the Internet was in its infancy and Netscape was the world's most popular browser. Despite its amazing features, Netscape had two major security issues:
- lack of confidentiality - messages between clients and servers weren't encrypted, so eavesdroppers could read what was being transmitted
- lack of authentication - during client/server communication, clients couldn't be certain of a server's identity and servers couldn't be certain of a client's identity
These issues made online transactions risky. To remedy these concerns, Netscape created the Secure Sockets Layer (SSL), which encrypts messages sent between browsers and servers. Versions SSL 1.0 and SSL 2.0 were found to be insecure, but SSL 3.0 was used until 2014.
In 1999, engineers at Certicom improved the cryptography of SSL 3.0 and called their new protocol Transport Layer Security, or TLS. TLS versions 1.0 and 1.1 have been deprecated, but versions 1.2 (released in 2008) and version 1.3 (released in 2018) are widely used. TLS 1.3 is more secure, but TLS 1.2 is more popular because TLS 1.3 has many changes that break existing systems.
Modern secure communication relies almost exclusively on TLS. Despite this, people usually refer to the mechanism as SSL/TLS or just SSL. In keeping with common usage, this article refers to the protocol as SSL.
3. Overview of Public Key Infrastructure (PKI)
Confidentiality and authentication are two vital components of secure communication. To ensure their availability, the Internet relies on public key infrastructure (PKI). In essence, the goal of the OpenSSL library is to enable developers to interact with the PKI. Therefore, before I introduce the library, I'd like to provide a high-level overview of what PKI is and how it works.
3.1. Confidentiality Through Encryption
To prevent eavesdropping, a sender must be able to transform a message in such a way that the recipient, and only the recipient, can un-transform it. For digital messages, this transformation (called encryption) involves mathematical operations. These operations accept two inputs (the message and a number called a key), and produce a transformed version of the message (ciphertext).
An important question arises: how can a recipient recover (or decrypt) the original message from the ciphertext? Decryption must be made as easy as possible for the recipient and as difficult as possible for eavesdroppers. If the sender and recipient both know the key in advance, they can use symmetric-key encryption methods like the Advanced Encryption Standard (AES).
But what if the recipient doesn't have the sender's key? How can he or she decrypt the message? This has puzzled researchers since the dawn of computing, and the best solution we have involves using two keys: a public key for encryption and a private key for decryption. If the recipient has a public key and a private key, a sender can securely transfer a message using a three-step process:
- The recipient makes his or her public key available to everyone.
- The sender encrypts a message using the recipient's public key and sends it to the recipient.
- The recipient decrypts the message using his or her private key.
For this to work, the encryption operation must be easy to perform in one way, and difficult to perform in the reverse. This ensures that the ciphertext can only be decrypted with the private key, and never with the public key. The low-level details are beyond the scope of this article, but TLS 1.2 relies on the Elliptic Curve Diffie-Hellman Ephemeral (ECDHE) method, which exploits properties of elliptic curves.
3.2. Authentication with Certificates
In the twentieth century, phone books had white pages for individual listings and yellow pages for business listings. When buying a listing in the yellow pages, a company had to verify its identity. Therefore, when the phone book printed a company's phone number, you could be reasonably certain that calling the number would connect you to the right company.
Instead of phone book listings, SSL authenticates entities using certificates. The most popular certificate format was established by the X.509 standard from the International Telecommunication Union (ITU), and every X.509 certificate provides the following information:
- subject - includes the entity's name, country, and DNS name
- public key - value used to encrypt messages intended for the entity
- public key algorithm - the algorithm to use when encrypting messages
In addition, every X.509 certificate must have a signature, which consists of the certificate's data encrypted by an entity's private key. The process of encrypting a certificate with a private key is called signing the certificate, and in many cases, an entity's certificate is signed by another entity. But if an entity signs its own certificate, the certificate is called a self-signed certificate.
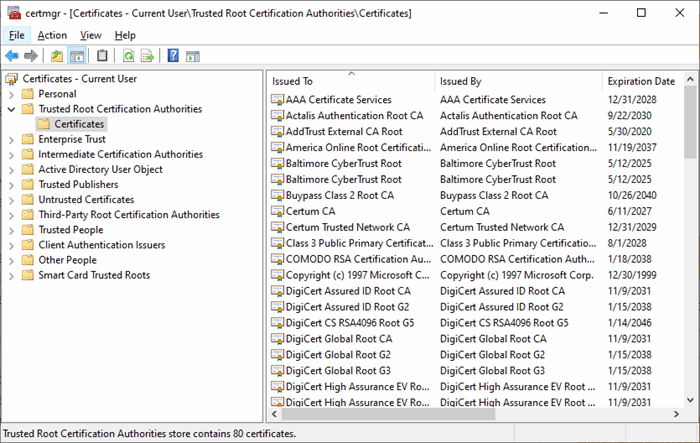
The more reliable the signer, the more you can trust the entity. Every operating system keeps a list of entities it considers reliable, and these are called root certificate authorities, or root CAs. On Windows, you can see the list of root CAs by running the Certificate Manager (certmgr.exe). The following image shows what this looks like.
On Linux, each root CA has a corresponding file in the /etc/ssl/certs folder. The process of installing a new CA requires three steps:
- Obtain a certificate file for the CA. Its suffix will usually be *.crt or *.pem.
- Move the file into the /usr/local/share/ca-certificates directory.
- Execute the command
sudo update-ca-certificates to update the certificate store.
If a certificate has been signed by an entity that isn't in the list of trusted CAs, it can be still be considered trustworthy if the entity's certificate has been signed by a reputable CA. In this manner, certificates can form a chain that leads to a trusted certificate self-signed by a root CA.
3.3. Privacy-Enhanced Mail (PEM) Files
In almost all cases, OpenSSL stores public keys, private keys, and certificates in text files structured according to the Privacy-Enhanced Mail, or PEM format. A PEM file may contain multiple keys and/or certificates, and each element of the list will have three parts:
- header - contains
BEGIN <LABEL> surrounded by dashes, where possible values of <LABEL> are PRIVATE KEY, PUBLIC KEY, and CERTIFICATE - data - binary data formatted in Base64, where every six bits are expressed as a character in the set A-Z, a-z, 0-9, +, and -.
- footer - contains
END <LABEL> surrounded by dashes, where <LABEL> has the same value as in the header
For example, if you generate a private key and store it to a PEM file, the file's content might take the following form:
-----BEGIN PRIVATE KEY-----
BgkqhkiG9w0BAQEF...
-----END PRIVATE KEY-----
There is no official suffix for PEM files, and in some cases, *.pem is used for all types of files. However, many applications employ the following convention:
- *.key - contain private keys
- *.pem - contain public keys
- *.crt/*.cert - contain signed certificates
- *.csr - certificate signing request
The last type of file asks a CA to generate and sign a certificate. For example, if you want DigiCert to provide a signed certificate, you'd send a CSR containing your certificate data (organization name, public key, DNS name, and so on).
4. OpenSSL from the Command Line
Before you start programming, it's a good idea to become familiar with the OpenSSL utility, which is installed by default on many Linux and macOS computers. For Windows users, it can be accessed by installing Git Bash and executing openssl on the Git Bash command line.
The general format of an OpenSSL command is as follows:
<code>openssl <command> <options> <arguments></code>
For example, you can display the version of OpenSSL by executing the command openssl version. Many options start with a dash, and you can get the list of encryption algorithms with the command openssl list -public-key-algorithms.
The OpenSSL utility provides a vast number of commands. Table 1 lists ten of them and provides a description of each.
Table 1: OpenSSL Commands (Abridged) | Command | Description |
req | Generate certificates and certificate requests |
x509 | Sign or display X.509 certificates |
verify | Verify certificate chains |
genrsa | Generate an RSA private key |
rsa | Generate an RSA public key from the private key |
enc | Symmetric-key encryption and decryption |
dgst | Perform digest operations |
rand | Generate pseudo-random numbers |
prime | Generate prime numbers |
passwd | Compute password hashes |
It would take a book to explore all the capabilities provided by the OpenSSL utility. Therefore, this section presents only the first two entries in the table: openssl req and openssl x509.
4.1. The openssl req Command
The openssl req command can create certificates based on requests or can create certificates with new keys. This accepts a wide range of options including the following:
- -in filename - Identifies the file containing the input request
- -out filename - Identifies the file to contain the command's output
- -x509 - Generates a certificate instead of a certificate request
- -days num - Number of days that the certificate should be valid
- -new - Creates a new certificate request
- -newkey - Generates a new private key
- -noenc - The new private key shouldn't be encrypted
- -keyout filename - Identifies the file to store the new private key
To demonstrate how this is used, the following command generates a certificate signing request (CSR) in request.csr from the private key in input.pem:
openssl req -out request.csr -key input.pem -new
The following command creates an unencrypted private key in newkey.pem and uses it to create a self-signed certificate that's valid for one year. The result is stored in newcert.crt.
openssl req -x509 -sha256 -noenc -days 365 -newkey rsa:4096 -keyout newkey.pem -out newcert.crt
In this command, -newkey is followed by rsa:4096. This tells OpenSSL that the generated private key should be based on the RSA-4096 encryption algorithm.
4.2. The openssl x509 Command
The openssl x509 command makes it possible to perform multiple operations involving X.509 certificates, including signing and displaying. It accepts a private key file (with the -in option) and produces various forms of output.
The -x509toreq option tells the command to create a certificate request. The following command creates a request (request.csr) from an existing certificate (input.crt):
openssl x509 -x509toreq -in input.crt -out request.csr -key sign.pem
If you just want to display information about a certificate, the -noout option prevents generation of output files. The following code prints the content of a certificate named input.crt in text form:
openssl x509 -in input.crt -noout -text
In this command, the -text option specifies that all of the certificate's information should be printed. If you're only interested in specific fields of the certificate, -serial prints the serial number, -subject prints subject information, and -dates prints the start and end dates of the certificate's validity.
5. Programming with OpenSSL
Now that you understand what OpenSSL is all about, you're ready to start coding. The OpenSSL library is written in C, so there are no classes or objects. Instead, the API consists of functions that perform operations like creating data structures, verifying certificates, and establishing communication with servers.
Most function names start with one of two identifiers:
BIO_ - the function performs basic input/output (BIO) communicationSSL_ - the function secures communication with SSL
This discussion looks at the BIO_ functions and their associated data structures, and then explores the SSL_ functions and their data structures. This section ends by presenting an application that sends an HTTPS connection request to www.google.com and prints the response.
5.1 Basic Input/Output (BIO) Functions
The first set of functions discussed in this article make it possible to set up basic connections. Their names start with BIO_ and Table 2 lists twenty-three of them.
Table 2: Basic I/O (BIO) Functions of the OpenSSL Library (Abridged) | Function | Description |
BIO_new_connect(const char *name) | Creates a new BIO structure |
BIO_new_ssl_connect(SSL_CTX *ctx) | Creates a new BIO structure with SSL |
BIO_new_socket(int sock, int flag) | Creates a new BIO structure with sockets |
BIO_get_ssl(BIO *b, SSL **sslp) | Returns the SSL structure |
BIO_set_ssl(BIO *b, SSL *ssl, long c) | Sets the SSL structure |
BIO_get_conn_hostname(BIO *b) | Returns the hostname |
BIO_set_conn_hostname(BIO *b, char *host) | Sets the hostname |
BIO_get_conn_address(BIO *b) | Returns the address |
BIO_set_conn_address(BIO *b, BIO_ADDR* addr) | Sets the address |
BIO_get_conn_port(BIO *b) | Returns the communications port |
BIO_set_conn_port(BIO *b, char *port) | Sets the communications port |
BIO_do_connect(BIO *b) | Establish the connection |
BIO_do_connect_retry(BIO *bio, int t, int ms) | Attempts to establish a connection |
BIO_do_handshake(BIO *b) | Attempts to establish handshaking |
BIO_do_accept(BIO *b) | Accept incoming socket communication |
BIO_read(BIO *b, void *buff, int len) | Read len bytes, store in buff |
BIO_gets(BIO *b, char *buff, int len) | Reads null-terminated string |
BIO_get_line(BIO *b, char *buff, int len) | Read line of text, store in buff |
BIO_write(BIO *b, const void *buff, int len) | Write len bytes from buff |
BIO_puts(BIO *b, const char *buff) | Writes null-terminated string |
BIO_flush(BIO *b) | Writes remaining buffered data |
BIO_free(BIO *b) | Frees a single BIO structure |
BIO_free_all(BIO *b) | Frees all BIO structures |
The central data structure in this functions is the BIO structure, which stores information related to a connection. The first three functions return a new BIO, and the BIO_new_ssl_connect function is particularly important because it returns a BIO that represents a connection secured with SSL. This function accepts an SSL_CTX structure, which represents an SSL context. I'll discuss this context later in the article.
When a BIO structure is created with an SSL context, it will have an SSL structure that stores SSL configuration information. This can be accessed with BIO_get_ssl and set with BIO_set_ssl. Applications frequently access this structure to set the security mode by calling SSL_set_mode, which will be discussed shortly.
Before a BIO can be used to connect to a remote system, it needs information about the system. The system's IP address can be given with BIO_set_conn_address and the communication port can be given with BIO_set_conn_port. Applications frequently call BIO_set_conn_hostname, which accepts a DNS name for the system and the port. For example, the following code specifies that the remote system is www.google.com and that the desired port is 443:
BIO_set_conn_hostname(bio, "www.google.com:443");
Once the remote system is identified, the BIO_do_connect function will attempt to establish a connection. This returns 1 if the attempt succeeds and a value less than or equal to 0 if the attempt fails. For repeated attempts, BIO_do_connect_retry accepts a timeout period and the number of milliseconds that should separate attempts.
After the connection is established, BIO_read can be used to read data from the remote system and BIO_write can be used to write data. For null-terminated strings, BIO_gets and BIO_puts can be used instead. BIO_read returns the amount of data that can be read, and if this is less than or equal to 0, there's no more data available.
The last two functions in the table are used to deallocate resources. BIO_free deallocates a single BIO structure and BIO_free_all deallocates a chain of BIO structures.
5.2 Secure Socket Layer (SSL) Functions
The OpenSSL library provides several functions that enforce SSL security on connections created with the BIO functions discussed earlier. Table 3 lists ten of them.
Table 3: SSL Functions of the OpenSSL Library (Abridged) | Function | Description |
SSL_library_init() | Initialize operation of the SSL library |
SSL_load_error_strings() | Load text to display errors |
SSL_CTX_new(const SSL_METHOD *method) | Create a new context for SSL processing |
SSL_set_mode(SSL *ssl, long mode) | Set the SSL processing mode |
SSL_clear_mode(SSL *ssl, long mode) | Clear the SSL processing mode |
SSL_CTX_load_verify_file(SSL_CTX *ctx,
const char *file) | Sets the file containing CA certificates
used for verification |
SSL_CTX_load_verify_dir(SSL_CTX *ctx,
const char *path) | Sets the directory containing CA certificates
used for verification |
SSL_CTX_load_verify_locations(SSL_CTX *ctx,
const char *file, const char *path) | Sets the file and directory containing CA
certificates used for verification |
SSL_get_verify_result(const SSL *ssl) | Get the certificate verification result |
SSL_CTX_free(SSL_CTX *ctx) | Deallocate the SSL context |
The first two functions make it possible to initialize the processing environment. SSL_library_init loads algorithms used for SSL processing and SSL_load_error_strings loads text to be displayed when errors occur. These two functions are commonly called before any other OpenSSL functions.
An SSL context provides the OpenSSL processing environment, and in code, it's represented by an SSL_CTX structure. To create this structure, applications call SSL_CTX_new with an argument that identifies the communication protocol. If the argument is set to the return value of TLS_client_method, the protocol will be determined when communication is established.
Earlier, I mentioned that the BIO structure contains an SSL structure that stores configuration data. The SSL_set_mode function can be called with the SSL structure to configure SSL's behavior. This accepts one of multiple values or an OR'ed combination of them. Five of the values are:
SSL_MODE_ENABLE_PARTIAL_WRITE - enables writing data in chunksSSL_MODE_ACCEPT_MOVING_WRITE_BUFFER - makes it possible to change buffer location when writing dataSSL_MODE_AUTO_RETRY - read/write operations continue attempts despite initial failuresSSL_MODE_RELEASE_BUFFERS - frees memory when a read/write buffer is no longer usedSSL_MODE_ASYNC - enables asynchronous processing
The next set of functions make it possible to verify the certificate of the connected entity. The first step is to identify the root CAs on the local system, and this can be done by calling SSL_load_verify_file, SSL_load_verify_dir, or SSL_load_verify_locations. Afterward, an application can check the verification result by calling SSL_get_verify_result.
5.3 Example Application - Connecting to Google
The example code for this article consists of a source file named client.c. This sends an HTTPS request to google.com and prints its response. If you look through the code, you'll see that it performs eight steps:
- Initializes the SSL library and loads error strings.
- Creates the SSL context (
SSL_CTX). - Creates the
BIO structure using the SSL context. - Sets the SSL mode to
SSL_MODE_AUTO_RETRY. - Sets the host name and port, and attempts to establish a connection.
- Submits a GET request to google.com.
- Reads and prints the response.
- Frees resources.
The following listing presents the code that performs these eight steps:
int main() {
SSL_library_init();
SSL_load_error_strings();
SSL_CTX* ctx = SSL_CTX_new(TLS_client_method());
if (!ctx) {
perror("Error creating SSL_CTX");
ERR_print_errors_fp(stderr);
exit(-1);
}
BIO* bio = BIO_new_ssl_connect(ctx);
if (!bio) {
perror("Error creating BIO");
ERR_print_errors_fp(stderr);
exit(-1);
}
SSL* ssl = NULL;
BIO_get_ssl(bio, &ssl);
SSL_set_mode(ssl, SSL_MODE_AUTO_RETRY);
BIO_set_conn_hostname(bio, "www.google.com:443");
if (BIO_do_connect(bio) <= 0) {
perror("Error connecting to server");
ERR_print_errors_fp(stderr);
SSL_CTX_free(ctx);
BIO_free_all(bio);
exit(-1);
}
BIO_puts(bio, "GET / HTTP/1.1\r\nHost: www.google.com \r\nConnection: close\r\n\r\n");
char response[1024];
while(1) {
memset(response, '\0', 1024);
if (BIO_read(bio, response, 1024) <= 0)
break;
puts(response);
}
SSL_CTX_free(ctx);
BIO_free_all(bio);
return 0;
}
If an error condition arises, the application calls ERR_print_errors_fp to standard error. This provides low-level information about the SSL state that produced the error.
To receive and print Google's response, the application executes an infinite loop. Each iteration clears the response buffer and calls BIO_read. If the value returned by BIO_read is greater than zero, the received text be printed to standard output. If the value is less than or equal to zero, the loop terminates and the application frees resources by calling SSL_CTX_free and BIO_free_all.
If gcc is available on your development system, you can compile the code with the following command:
gcc -o client client.c -lssl -lcrypto
As shown, the development system needs to have the OpenSSL library and OpenSSL crypto library installed.
History
This article was initially submitted on 9/15/2024.

