Introduction
The objective of this article series is to give a quick overview of Behaviors, Triggers and Actions in Silverlight and WPF. Together, they enable a great deal of design time interactivity for your UI. They also make possible re-use and re-distribution of interaction logic.
Note: In this post, we'll be playing around with Microsoft Expression Blend 4.0 beta a bit, to help us understand the concepts further. So, if you don't have Blend 4.0 beta,
Behaviors
Behaviors – Scratching the Surface
A behavior is something you attach to an element, modifying the way in which the element should present itself, or how the element should respond to user interactions. First, Let us add an existing behavior to an object to see how behaviors work. Later we'll create a custom behavior and may use the same from Blend.
Step 1. Let us start with a simple Silverlight application. Fire up Expression Blend 4.0 beta, and click File->New to select a Silverlight 4.0 application, and click OK.

Step 2. Once you have the project created, just add a rectangle to your MainPage.xaml canvas, and give it a nice background color using the color picker (I gave blue:)). Also, at this point, click View->Active Document View->Split View – So that you can view the XAML along with the designer. You may also press F5 and run the project if you want, and make sure you can't drag the rectangle around as of now ;).

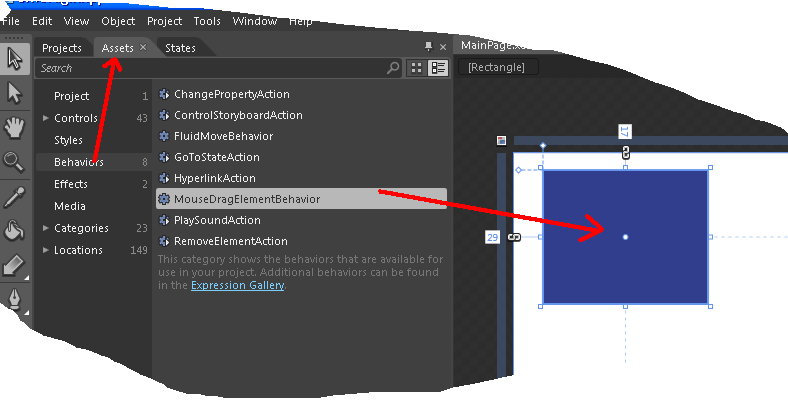
Step 3. Now, our objective is to attach a dragging behavior to our rectangle, so that it can be dragged around by the user in the screen. For this, we'll attach the MouseDragElementBehaviour to our rectangle. To do this, go to the Assets tab in Blend (See the arrow below), and Click the Behaviors label. Now, from the right pane of the Assets tab, drag and drop MouseDragElementBehaviour to your rectangle. Press F5 and run the project, and you see that you'll be able to drag your element anywhere.

Step 4. Let us take a step back here, and have a look at the XAML. You'll see the MouseDragElementBehaviour added to the Behaviors attached property of our dumb little rectangle.

Behind the Scenes
The System.Windows.Interactivity infrastructure (initially introduced in Blend 3) simplifies the creation of Behaviors, triggers and actions.
xmlns:i="clr-namespace:System.Windows.Interactivity;
	assembly=System.Windows.Interactivity"
xmlns:il="clr-namespace:Microsoft.Expression.Interactivity.Layout;
	assembly=Microsoft.Expression.Interactions"
The System.Windows.Interactivity namespace has multiple classes to inherit from and to create your own Behaviours, triggers and actions. The WPF and Silverlight versions are present at C:\Program Files\Microsoft SDKs\Expression\YourBlendVersion\Interactivity\Libraries. In the same folder, you'll also find theMicrosoft.ExpressionBlend.Interactions.dll which hosts various concrete behaviours and triggers, like the MouseDragElementBehaviour we just applied.
If you have a look at the MouseDragElementBehavior using Reflector, you'll find that MouseDragElementBehaviour is inherited from the Behaviour<T> abstract class in System.Windows.Interactivity.

Creating your own Behaviors
So, let us create a custom behavior.
Step 1 – Create a Behavior. In Blend, right click your project in the Projects pane, and click ‘Add New Item’, to bring up the New Item dialog box. Select Behavior from there, give a nice name and click OK.

Step 2 – See what is inside. Have a look at the new behavior class that got added to your project. You'll find that our Behavior class is inherited from Behavior<T> in System.Windows.Interactivity as discussed earlier. Also, have a look at the override methods, OnAttached and OnDetaching (and the comments below them).

Step 3 – Add some meat. And what should we do in the Behavior? Let us tilt the object a bit, when the mouse moves over an object with this Behavior applied. Just modify OnAttached to have the following code. The AssociatedObject property of the Behavior will provide the current object context, to which this behavior is applied. Let us hook the MouseEnter and MouseLeave events, so that we'll apply a simple projection to the object when the mouse moves over, and reset the project when the mouse leaves the object.

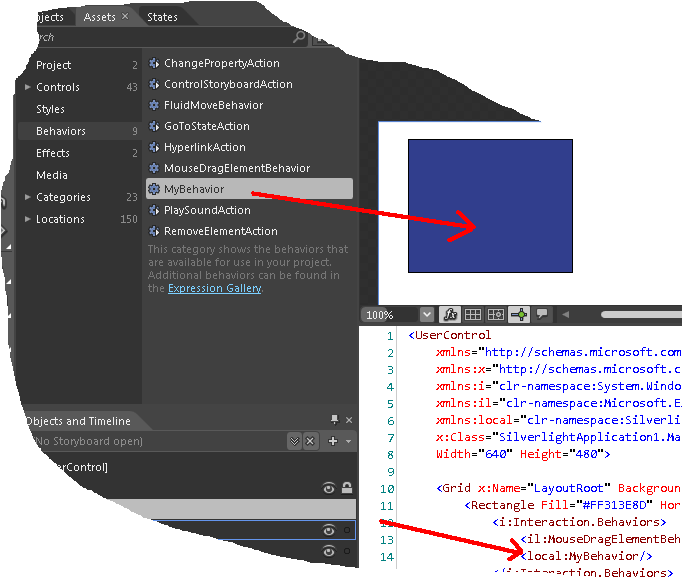
Step 4 – Rebuild. Now, click Project->Build Project in Expression Blend menu. And go to the Assets window again and click Behaviors to view MyBehavior there. Just drag and drop the behavior to your object. See that the new behavior is added to our Rectangle in XAML as well.

Step 5 – Run. You are done. Press F5 and run your project, and see that when you move your mouse over the rectangle to start the dragging, the rectangle is getting a bit tilted.
Triggers and Actions – Scratching the Surface
A Trigger can invoke a set of Actions, when it is fired. For example, you can nest few actions (like PropertyChangeAction to change a property of an element) in an EventTrigger, so that those actions will get executed when a specific Event occurs. You can attach more than one trigger to an element.
If you have some WPF background, you may quickly remember the DataTriggers, MultiDataTriggers, etc.
There are various Triggers and Actions that comes ‘out of the box’, residing in System.Windows.Interactivityand Microsoft.Expression.Interactions
- Triggers – EventTrigger, TimerTrigger, StoryBoardCompletedTrigger, KeyTrigger etc.
- Actions - ChangePropertyAction, ControlStoryBoardAction, PlaySoundAction etc.
Let us start playing with some of the existing triggers and actions.
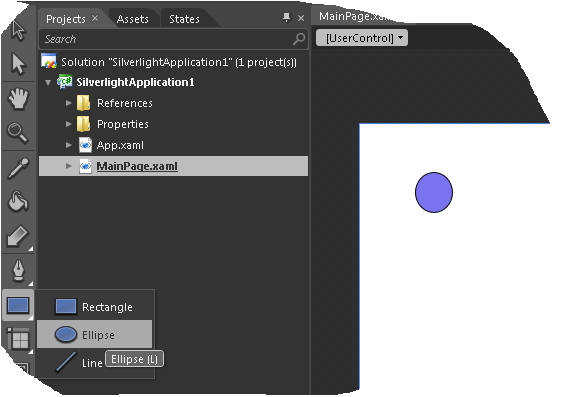
1. Set The Stage - Create a new Silverlight Application Project in Blend as explained above. You'll see the design surface of MainPage.xaml by default. This time, select the Ellipse tool from Blend toolbar, to draw a ball to the design surface. Give some nice color as well :)

Also, at this point, click View->Active Document View->Split View – So that you can view the XAML along with the designer.
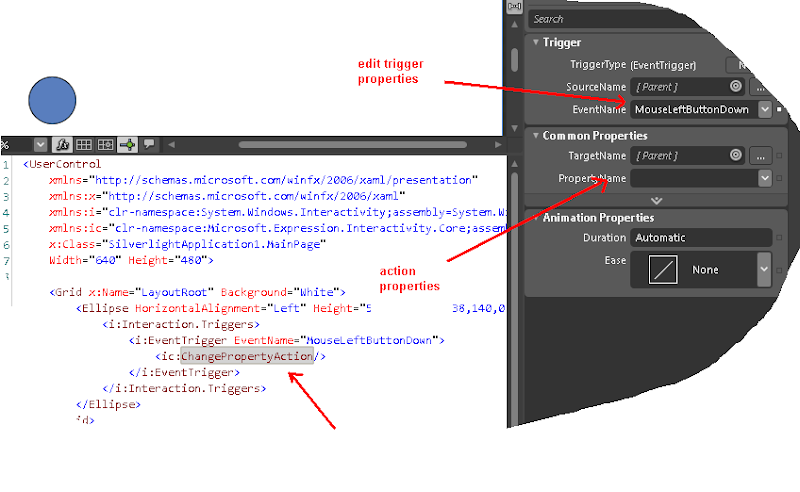
2. Attach a Trigger and Action to an object – Go to the Assets pane in Blend, and click the Behaviors link. Drag the ChangePropertyAction to the ellipse you added, and have a look at the XAML. You'll find that Blend automatically added an EventTrigger for you with MouseLeftButtonDown as the default event, and sandwiched your ChangePropertyAction inside the same.

Select the ChangePropertyAction in the XAML Editor or in the Object and Timelines window. Have a look at the properties Window in blend, to see the properties of your Trigger and Action (See the image below). By default, the trigger will be fired for the MouseLeftButtonDown event of our ball. Also, you may note that presently we haven't specified any parameters for the ChangePropertyAction.

3. Modifying ChangePropertyAction

Now let us squeeze our ellipse a bit by changing the Width property of our Ellipse - when the MouseLeftButtonDown happens. For this, go to the properties window, and
- Change ‘
PropertyName’ parameter of our ChangePropertyAction to ‘Width’.
- Set the value to
200 so that Width will increase to 200 when the Action is invoked.
- In the Animation Properties of
ChangePropertyAction, set the duration to 4 seconds, and change the Ease property to Elastic Out.
We are done. Run the application, by pressing F5 and move click over the Ellipse. And you'll see a bit of fun.
Play around with this a bit, to understand how the Triggers and Actions work together. And once you are back, scroll down to read further – about creating our very own Triggers and Actions.
Creating a Custom Trigger
Time to go under the skin. Then, we'll replace the ‘EventTrigger’ we used in our above example with the custom trigger we are creating, to stretch the ball!!.
First, let us create a minimal custom trigger – named KeyDownTrigger, that'll be fired each time when a key is pressed. Let us continue from where we left our above project.
Step 1 – Create a Trigger: In Blend, right click your project in the Projects pane, and click ‘Add New Item’, to bring up the New Item dialog box. Select ‘Trigger’ from there, give the name ‘KeyDownTrigger’ and click OK.

Step 2 – Add some meat. Have a look at the new trigger class that got added to your project. You'll find that our Trigger class is inherited from TriggerBase<T> in System.Windows.Interactivity. Also, have a look at the override methods, OnAttached and OnDetaching (and the comments below them). Let us add some meat to the code you already see there. Modify the code to this.
Tip: If you have Visual Studio 2010 Beta installed, you can right click on a file in Blend 4.0 project explorer, and click ‘Edit in Visual Studio’ at any point of time, if you prefer writing code in VS rather than in Blend.
public class KeyDownTrigger : TriggerBase<FrameworkElement>
{
protected override void OnAttached()
{
base.OnAttached();
this.AssociatedObject.Loaded += (sender, args) =>
{
Application.Current.RootVisual.KeyDown +=
new KeyEventHandler(Visual_KeyDown);
};
}
protected override void OnDetaching()
{
base.OnDetaching();
Application.Current.RootVisual.KeyDown -=
new KeyEventHandler(Visual_KeyDown);
}
public string Keys { get; set; }
void Visual_KeyDown(object sender, KeyEventArgs args)
{
var key = Enum.GetName(typeof(Key), args.Key);
if (Keys.Split(',').Contains(key))
InvokeActions(key);
}
}
The code is self explanatory, but here is basically what we are doing there. When the Associated object is loaded, we hook up to the KeyDown event of the Root visual element. And when KeyDown is fired, we Invoke the Actions inside this trigger, if the key is entered by the user.
Step 3 – Associate the KeyDownTrigger to our Ball
In Blend, click Project->Build Project menu. Now, go back to our MainPage.xaml where you have your ball. As we did earlier, Select the ChangePropertyAction in the XAML Editor or in the Object and Timelines window, to bring up the Properties Window - as we did earlier. In the Properties window, Click the ‘New’ button against the TriggerType, in the Trigger Pane (see the image). In the resultant dialog box, select the ‘KeyDownTrigger’ we recently added, and click OK.

Now, you'll see that the ‘EventTrigger’ we had there earlier, got replaced with the ‘KeyDownTrigger’. Note that the ‘Keys’ property we added to our Trigger class is visible in the Blend UI - so that some one who may use our trigger can enter the values there to specify what all keys should invoke the actions inside the trigger. Just enter few key names without spaces (let us say A,B,C) to the Keys field.

Step 4 – Salvation
Cool, we are done. Press F5 and run your project. Click on the surface to bring focus, and press A,B or C to see the ball getting stretched. Woot!! We just created and implemented a minimal trigger.
Now, with these insights, I suggest you to have a look at the triggers and actions in my WPF Experimental Hacks and Silverlight Experimental Hacks. Read...
And hey, do stay in touch. I do Tweet, @amazedsaint Or Subscribe to my blog
Happy coding!!
History
- 9th February, 2010: Initial post
