This series of CodeProject articles is based on a series of posts I've first published on my blog.
Today I'll show you how to use the following ribbon features inside a Winforms application:
- Menu Group
- Split Button in an Application Menu
- Drop Down Button in an Application Menu
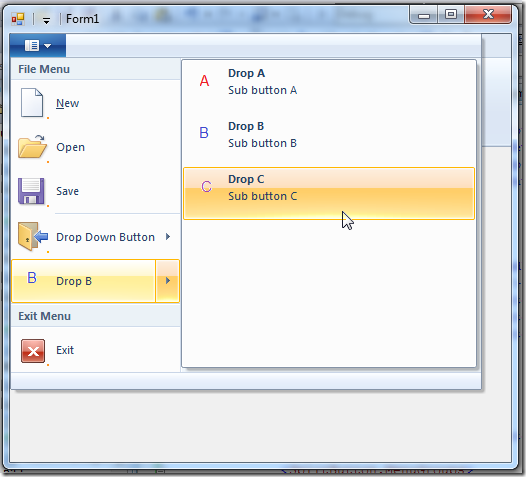
The result of this post looks like this:

SplitButton VS DropDownButton
What is actually the difference between those two?
DropDownButton is NOT a button, meaning clicking it does nothing. Hovering over it will open a list of buttons.
On the other hand, SplitButton is itself a button, which you can respond to. Hovering over it will also open a list of buttons.
The common use for a DropDownButton is when you want to expose a set of items which doesn't have an obvious default option. Think of “Rotate” feature in Paint. you have Rotate90, Rotate180 and Rotate270 but none of them is an obvious default.
The common use for a SplitButton is when you want to expose a set of items which has an obvious default option. Think of “Save As” button, where there is a default save format.
Using SplitButton and DropDownButton in Ribbon Application Menu
The commands markup is the same as before, just define some command to be listed later in the views markup. For example:
<Command Name="cmdButtonDropA"
    Id="1008"
    LabelTitle="Drop A"
    LabelDescription="Sub button A"
    TooltipTitle="Drop A">
  <Command.LargeImages>
    <Image>Res/DropA32.bmp</Image>
  </Command.LargeImages>
</Command>

<Command Name="cmdButtonDropB"
    Id="1009"
    LabelTitle="Drop B"
    LabelDescription="Sub button B"
    TooltipTitle="Drop B">
  <Command.LargeImages>
    <Image>Res/DropB32.bmp</Image>
  </Command.LargeImages>
</Command>
The relevant views markup is defined as follows:
<DropDownButton CommandName='cmdDropDownButton'>
  <MenuGroup Class='MajorItems'>
    <Button CommandName='cmdButtonDropA' />
    <Button CommandName='cmdButtonDropB' />
    <Button CommandName='cmdButtonDropC' />
  </MenuGroup>
</DropDownButton>

<SplitButton>
  <SplitButton.ButtonItem>
    <Button CommandName='cmdButtonDropB' />
  </SplitButton.ButtonItem>
  <SplitButton.MenuGroups>
    <MenuGroup Class='MajorItems'>
      <Button CommandName='cmdButtonDropA' />
      <Button CommandName='cmdButtonDropB' />
      <Button CommandName='cmdButtonDropC' />
    </MenuGroup>
  </SplitButton.MenuGroups>
</SplitButton>
The code behind section is also the same as in the previous post, just handle IUICommandHandler.Execute with the corresponding ID.
Update (18.11.2009): Just register to the OnExecute event of the corresponding button.
MenuGroup
A menu group is a collection of menu items inside the application menu. The most useful feature it provides is giving a title to a group of items, like “File Menu” in the last image.
If you just want a simple separator between menu items, you use a MenuGroup that is not attached to any command.
<MenuGroup>
  …
</MenuGroup>
As always, the most updated version of “Windows Ribbon for WinForms” along with sample applications can be found here.
That’s it for now,
Arik Poznanski.
