Introduction
In this article I am describing how easy it is to develop mobile web pages without using Visual Studio. Since Express Editions of Visual Studio do not support ASP.NET mobile development, the alternative is to create mobile web pages using a stand-alone web server like Cassini and stand-alone emulator images. To demonstrate this concept, I have created a mobile web application which displays EmployeeID, LoginID and Title from the HumanResources.Employee table of the Adventureworks database. This application is developed using the Cassini Webserver. Device emulation is provided by the Microsoft Device Emulator.
The following steps can be used to install the Device Emulator:
Note: You must run the Windows Mobile 6 Professional Images installer twice. When running the installer second time, select the option to repair the installation and ignore errors, if any.
Now you can start the emulator from the following menu command:
Start -> All Programs -> Windows Mobile 6 SDK -> Stand Alone Emulator Images -> USB English -> Professional
This will display the following emulator screen:

Background
A Mobile Web page is derived from the System.Web.UI.MobileControls.MobilePage class. Mobile controls are present in the
System.Web.Mobile namespace. Some Mobile controls are as follows:
mobile:Form - A form acts as a container for all other mobile web controls.mobile:Label - This control can be used to display a constant text on the device screen.mobile:Image - An image control can be used to display a graphical image, for e.g. a logo, on the device screen.mobile:Command - This control can be used to initiate an action by clicking on it.mobile:ObjectList - This control can be used to display data in the form of rows and columns. Typically it is used to display data from a database table on a device.
A mobile web page may consist of one or more mobile forms. A form can be navigated to by setting the
ActiveForm property of the page.
Using the code
The following code creates a mobile page by inheriting from the MobilePage class.
<%@ Page Inherits="System.Web.UI.MobileControls.MobilePage" %>
The following two lines are used to import namespaces to get data from SQL Server database.
<%@ Import Namespace="System.Data" %>
<%@ Import Namespace="System.Data.SqlClient" %>
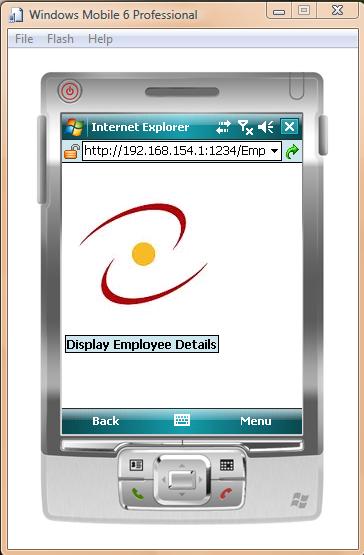
The following code creates two mobile web forms. The first form contains an image representing a logo. The Display command button is used to navigate to the second form.
An ObjectList control is created on the second form to display the employee details. The Home command button is used to navigate to the first form.
The OnLoad event of the second form specifies the event handler function to display the employee details.
<body>

<mobile:Form id="Form1" runat="server">
<mobile:Image id="image1" runat="server" ImageURL="employee.jpg"/>
<mobile:Command id="cmdDisplay" runat="server" OnClick="Display">
Display Employee Details
</mobile:Command>
</mobile:Form>

<mobile:Form id="Form2" runat="server" OnLoad="ShowDetails">
<mobile:Command id="cmdBack" runat="server" OnClick="ShowHome">Home</mobile:Command>
<mobile:Label id="lblHeading" runat="server">Employee Details</mobile:Label>
<mobile:ObjectList id="obj1" runat="server"/>
</mobile:Form>

</body>
The following is the script for the page.
<script language="C#" runat="server">
void Display(object sender,EventArgs e)
{
   this.ActiveForm=Form2;
}
void ShowDetails(object sender,EventArgs e)
{
   if(!Page.IsPostBack)
   {
      SqlConnection con=new SqlConnection();
      con.ConnectionString=@"Integrated Security=true;Initial Catalog=AdventureWorks;Data Source=AZ\SQLEXPRESS";
      SqlCommand cmd=new SqlCommand();
      cmd.Connection=con;
      cmd.CommandType=CommandType.Text;
      cmd.CommandText="select EmployeeID,LoginID,Title from HumanResources.Employee";
      SqlDataAdapter da=new SqlDataAdapter();
      da.SelectCommand=cmd;
      DataSet ds=new DataSet();
      con.Open();
      da.Fill(ds,"Employee");
      con.Close();
      obj1.DataSource=ds;
      obj1.DataMember="Employee";
      obj1.DataBind();
   }
}
void ShowHome(object sender,EventArgs e)
{
   this.ActiveForm=Form1;
}
</script>
In the above code, the Display function navigates to the second form and the
ShowHome function navigates to the first form. The ShowDetails function
displays employee details using an ObjectList control.
Following is the complete code of the mobile web page:
<%@ Page Inherits="System.Web.UI.MobileControls.MobilePage" %>
<%@ Import Namespace="System.Data" %>
<%@ Import Namespace="System.Data.SqlClient" %>
<html>
<head>
<script language="C#" runat="server">
void Display(object sender,EventArgs e)
{
   this.ActiveForm=Form2;
}
void ShowDetails(object sender,EventArgs e)
{
   if(!Page.IsPostBack)
   {
      SqlConnection con=new SqlConnection();
      con.ConnectionString=@"Integrated Security=true;Initial Catalog=AdventureWorks;Data Source=AZ\SQLEXPRESS";
      SqlCommand cmd=new SqlCommand();
      cmd.Connection=con;
      cmd.CommandType=CommandType.Text;
      cmd.CommandText="select EmployeeID,LoginID,Title from HumanResources.Employee";
      SqlDataAdapter da=new SqlDataAdapter();
      da.SelectCommand=cmd;
      DataSet ds=new DataSet();
      con.Open();
      da.Fill(ds,"Employee");
      con.Close();
      obj1.DataSource=ds;
      obj1.DataMember="Employee";
      obj1.DataBind();
   }
}
void ShowHome(object sender,EventArgs e)
{
   this.ActiveForm=Form1;
}
</script>
</head>
<body>
<mobile:Form id="Form1" runat="server">
<mobile:Image id="image1" runat="server" ImageURL="employee.jpg"/>
<mobile:Command id="cmdDisplay" runat="server" OnClick="Display">
Display Employee Details
</mobile:Command>
</mobile:Form>
<mobile:Form id="Form2" runat="server" OnLoad="ShowDetails">
<mobile:Command id="cmdBack" runat="server" OnClick="ShowHome">Home</mobile:Command>
<mobile:Label id="lblHeading" runat="server">Employee Details</mobile:Label>
<mobile:ObjectList id="obj1" runat="server"/>
</mobile:Form>
</body>
</html>
You can create the above code in any text editor and save it in a folder. Start
Cassini web server and configure it as shown in the following figure:

Start the emulator from the following menu command:
Start -> All Programs -> Windows Mobile 6 SDK -> Stand Alone Emulator Images -> USB English -> Professional
The following emulator screen appears:

Now start the Windows Mobile Device Center from the following menu command:
Start -> All Programs -> Windows Mobile Device Center
The following screen will be displayed:

Click on Connection settings and choose DMA from the drop down list box below the "Allow connections to one of the following:" checkbox and
click on the OK button, as follows:

Now start the Device Emulator Manager from the following menu command:
Start -> All Programs -> Windows Mobile 6 SDK -> Tools -> Device Emulator Manager
The Device Emulator Manager screen will appear as follows:

Select the emulator and choose Cradle option from the Actions menu as follows:

Now start Internet Explorer on the emulator and type the URL to the web page in the following format:
http://ipaddress:port/pagename.aspx
For example: http://192.168.154.1:1234/EmployeeDetails.aspx
The following output will be displayed:

Clicking on the "Display Employee Details" button shows the following output:

Clicking on the EmployeeID 7 displays the following output:

Points of Interest
I hope the above discussion will be helpful to readers who wish to do ASP.NET Mobile Web Page development without Visual Studio.
