Introduction
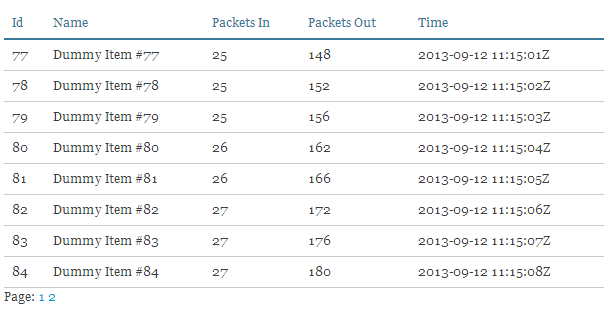
This article presents a custom control that allows to easily create a data-bound an HTML Table to a remote, server-side ObservableCollection:
- An
ObservableCollection is used on the server in order to notify remote clients of updates. - It uses knockout.js library for client-side databinding.
- It uses websockets internally, but abstracted by Spike-Engine, will fallback to flash sockets for older browsers.
- It is cross-platform and with a minimized packet payload and message compression.
- The application server is a self-hosted executable and the client is just a plain HTML file.

Background
Few weeks before writing this article I had an interesting idea, I wanted to abstract client-server networking and create a nice API that would maintain an HTML Table automatically populated by being data-bound remotely on an ObservableCollection. Essentially, allowing data-bound views be updated in real-time whenever a change occurs and a new item is added or removed from the collection. This would allow people to build seamlessly and easily very dynamic and great looking websites, providing users with a great user experience. This article presents an approach I designed that uses:
- Knockout.js for client side databinding
- Spike-Engine for client-server communication
In order to accomplish this, I created the abstraction of a synchronized list, called SyncList<T> that inherits from ObservableCollection on the server, and a SyncView, a JavaScript object that represents the bound view to our SyncList<T>, as shown on the image below:

Using the code
I wanted the API to be very easy and intuitive to use. After all, complex modern websites contain many collections and the setup time should be minimal and simple.
First, on the server we need to create a SyncList collection. This collection should be smart enough to propagate the changes itself.
var list = new SyncList<TestItem>("MyList");
On our HTML page, we need to first create a placeholder <div> element which would contain our table.
<div data-bind='syncList: list1.gridViewModel'></div>
And then, we need to bind our <div> element to the remote collection, and specify the columns, titles, and various layout properties:
var endpoint = new spike.ServerChannel("127.0.0.1:8002");
var list1 = new SyncView({
    server: endpoint,
    name: "MyList",
    columns: [
        { headerText: "Id", rowText: "Id" },
        { headerText: "Name", rowText: "Name" },
        { headerText: "Packets In", rowText: "Incoming" },
        { headerText: "Packets Out", rowText: "Outgoing" },
        { headerText: "Time", rowText: "Time" },
    ],
    pageSize: 8
});

ko.applyBindings(list1);
And this is really it, the collections are bound by name and this library will propagate automatically every change to the collection on the server to our clients. For some reason, feels almost magical.
Server-Side SyncList
For the sake of space, I won't show complete server-side implementation in the article, but feel free to explore the code. However, the central class is SyncList<T> which essentially inherits from ObservableCollection and forwards the events to the remote clients via a PubHub.
public class SyncList<T> : ObservableCollection<T>, IDisposable
{
private readonly PubHub Hub;
private readonly string Name;
public SyncList(string name)
{
if (String.IsNullOrEmpty(name))
throw new ArgumentNullException("name");
this.Name = name;
this.Hub = Service.Hubs.GetOrCreatePubHub(this.Name);
this.CollectionChanged += OnCollectionChanged;
this.Hub.ClientSubscribe += OnClientSubscribe;
}
private void OnClientSubscribe(IHub sender, IClient client)
{
this.Hub.PublishTo(new SyncListEvent(this.Items as IList), client);
}
private void OnCollectionChanged(object sender, NotifyCollectionChangedEventArgs e)
{
this.Hub.Publish(new SyncListEvent(e));
}
(...)
}
In addition, there's some more code implementing IDisposable pattern to ensure that everything is cleaned-up when the collection is no longer needed.
Client-Side Code
On the client we use a ko.observableArray ( http://knockoutjs.com/documentation/observableArrays.html ) and we handle the events of ObservableCollection accordingly.
this._server.on('connect', function () {
self._server.hubSubscribe(self._name, null);
});
if (this._server.hubEventInform == null) {
this._server.hubEventInform = function (p) {
$.event.trigger({
type: "hubEvent",
hubName: p.hubName,
message: JSON.parse(p.message),
time: new Date()
});
};
}
$(document).on("hubEvent", function (event) {
if (self._name != event.hubName)
return;
var value = event.message;
if (value.Action == "Reset") {
self.clear();
}
if (value.Action == "Remove") {
self.removeAt(value.OldIndex);
}
if (value.Action == "Replace") {
self.replace(value.NewIndex, value.NewItems[0]);
}
if (value.Action == "Move") {
self.move(value.OldIndex, value.NewIndex);
}
if (value.Action == "Add" || value.Action == "Reset") {
if (value.NewItems != null) {
value.NewItems.forEach(function (item) {
self.add(item);
});
}
}
});
I've also created a custom control on the client-side that is inspired by the paged grid sample on the knockoutjs website. All the implementation is attached in the zip file to this article, check it out!
History
- 23/06/2015 - Source code & article updated to Spike v3.0
- 12/03/2014 - Source code updated to Spike v2.3
- 14/09/2013 - Initial Article
