Do you have the time when you are deploying your application, first you compile, copy the files to the server, change the web.config on the server. Next time, you want to deploy again, compare the server’s configuration to the development one to figure out which ones should be changed?
If you experienced the situation above, this post may help to make your life easier. The target of this post is to do the ASP.NET web application deployment by a single click.
All the source code is on Github (here), you may clone the repository, and deploy immediately.
The Basic Web Application
I will start with a basic MVC 4 web application, almost empty, then add stuff to make the development and deployment easier. The basic web application will look like this:

The basic web application uses SQL Server Compact 4.0 as database provider.
Elmah Configuration
Elmah is an application wide error logging module which can significantly improve trouble shooting experience.
- Install Elmah from official NuGet gallery.
- Since I use the SQL Server Compact Edition, I configure the errorLog node for Elmah in Web.Config as (you may find the full configuration in the source code):
<errorLog type="Elmah.SqlServerCompactErrorLog, Elmah" connectionStringName="ElmahDB"
applicationName="Baseline.Web[Dev]"/>
- Since the default path of Elmah is elmah.axd, it is better to change it to errorlog.axd or other path you like to reduce the risk since some hacks scan the elmah.axd.
- After configuration, you can use Elmah like this:

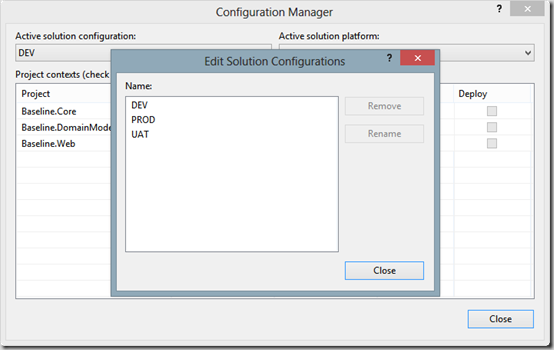
Create Solution Configurations
Assume we have three environments, Development, UAT, Production, now let’s create each solution configuration in Visual Studio:

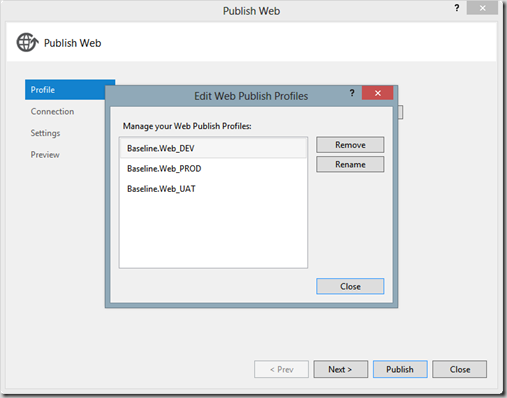
Create Publish Profile
Like the solution configuration, let’s create three publish profiles respectively:

Add Web.config Transformation
Right click the Web.config file, click Add Config Transformation, the transformation file will be generated for each solution configuration.
For example, we want to display the error message on the development environment while we would like to hide those message on UAT, we can configure like this:
- In Web.DEV.config, add:
  <system.web>
    <customErrors xdt:Transform="Replace" mode="Off"></customErrors>
  </system.web>
- In Web.UAT.config, add:
  <system.web>
    <customErrors xdt:Transform="Replace" mode="RemoteOnly"></customErrors>
  </system.web>
- You may preview the transformation by click Preview Transform on the context menu:

- You can transform other configuration elements according to your situation.
Add Publish Script
You don’t have to open Visual Studio to do the deployment, and you can develop for several environments at one time by creating a batch script:
%SystemRoot%\Microsoft.NET\Framework\v4.0.30319\msbuild Baseline.Web.csproj
/p:Configuration=DEV /p:DeployOnBuild=true;PublishProfile=Baseline.Web_DEV.pubxml;VisualStudioVersion=11.0

%SystemRoot%\Microsoft.NET\Framework\v4.0.30319\msbuild Baseline.Web.csproj
/p:Configuration=UAT /p:DeployOnBuild=true;PublishProfile=Baseline.Web_UAT.pubxml;VisualStudioVersion=11.0

%SystemRoot%\Microsoft.NET\Framework\v4.0.30319\msbuild Baseline.Web.csproj
/p:Configuration=PROD /p:DeployOnBuild=true;PublishProfile=Baseline.Web_PROD.pubxml;VisualStudioVersion=11.0
You may find the file publish.cmd in the root of repository.
Server Configuration
I use one server for all the environments, if you use a different server, you may change the publish setting of each environment.
- Create sites for each environment and bind with custom domains:

- Configure your host file to those domains:

- Use different application pools for each site:

- After publishing, you may view each site like this:

Configuration Information Protection
Because some production configuration settings are sensitive, for example, SQL connection user name/password, active directive user name/password. It’s not good to commit these information to source control. But we need to deploy automatically, so how can we do that?
We can use the aspnet_regiis utility to protect the configuration information using the application’s machine key. As you can see in the encrypt_web_config_PROD.bat file:
cd "C:\Windows\Microsoft.NET\Framework\v4.0.30319"
aspnet_regiis -site "Baseline.Web" -app "/" -pe "connectionStrings"
After running the encrypt_web_config_PROD.bat on the server, the Web.config for production site will look like:

Copy it to Web.PROD.config, replace the connectionStrings section, remember to add xdt:Transform="Replace":
<connectionStrings xdt:Transform="Replace"
configProtectionProvider="RsaProtectedConfigurationProvider">
It’s now safe to commit to source control because without the machine key, this information cannot be decrypted.
Windows Azure Publishing
I also add a solution configuration & configuration transformation for Windows Azure Website but I didn’t add the publish profile because it contains the publish key, etc. You can create a publish profile and the publish to Windows Azure Webiste like:

Be Social
There are other good practices for ASP.NET. You may take a look at my repository (here) and add them in. Thanks! 
CodeProject
