Introduction
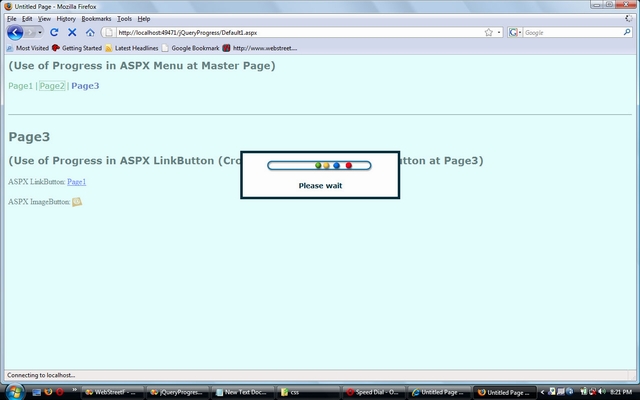
This article is about showing load progress using jQuery. Often we perform high bandwidth operations like file upload, etc. To give a bit of relief to the website user, we need to show that something is happening. The best way is to show a progress message using jQuery with overlay fade effect in the client area of browser.
Using the Code
To show progress using jQuery, I'm using two .JS files. The first .JS file is the latest version of jQuery file downloaded from jQuery website, another file works for progress overlay and message box content.
Next is the .CSS part which is used for styling overlay fade effect and progress message box style. A GIF image is used to make the progress box more effective.
Overlay progress using jQuery can be attached with server side ASPX controls as well as HTML controls. For example, ASPX LinkButton, HyperLink, Menu, Button, DropDownList, ListBox, etc. and HTML Anchor, Select, Input, etc.
The important parts which must be discussed about ‘progress.js’ file (included in demo):
$("BODY").append('<div id="processing_overlay"></div>');
$("BODY").append(
'<div id="processing_container">' +
'<div id="processing_content">' +
'<img style="width: 215px; height: 25px;"
src="img/googleballs.gif" />' +
'<br><br>Please wait' +
'</div>' +
'</div>');
The first division with id processing_ovelay is the container for complete progress context including faded color. If you need to change the color of overlay, go to .css file --> check out the style for this division --> change the value of CSS property background-color. To make the overlay more transparent or more opaque, you need to change CSS properties filter (for Internet Explorer) and opacity (for Mozilla and Opera). Pass the opacity value 1-100 in filter Alpha (for Internet Explorer) and put opacity value from 0.1-1 (for Mozilla and Opera). A change in these three properties will make the overly a match with your website theme.
The second division with id processing_container is the container for message box. That will be shown at the middle of client area vertically and centered horizontally. You can set the .css properties like border, width, height, background-color, you can put rounded, etc.
The third and the commented division with id processing_title is used to put a title for progress message box, if needed. But I suggest not to uncomment this portion if you are putting only one function to show progress (like $.showprogress() in my case), I am using it throughout my solution. So there is no specification of progress message box, though you can use it by writing more functions with different title and use it at different places in your solution.
The fourth division is the container of any message you want to show or image you want to put. Here I put an HTML image, sourced from a folder ‘img’ in root directory and named ‘googleballs.gif’. Don’t forget to specify the exact width and height of image to show the box more rigid and effective. Here, you can also write some message like ‘Loading…’, ‘Please wait’, etc. and set CSS properties like text-align, vertical-align, padding, font, etc.
setTimeout(function(){$('#' + msgEle).fadeOut('normal')},10000);
Here, the value 10000 means 10000 milliseconds. It is the minimum timeout value for progress effect. You can decrease or increase this value as needed.
Points of Interest
Practical stuff is attached as demo. You will easily understand when you download it. The selection of events for various controls is important … some examples are given below:
- ASPX Menu:
onclick - ASPX Button:
OnClientClick - ASPX DropDownList:
onchange - ASPX HyperLink:
onclick - ASPX LinkButton:
OnClientClick - HTML Button:
onclick - HTML Select:
onchange - HTML Anchor:
onclick
Most of the time, you will be using jQuery function $.showprogress() and sometimes $.hideprogress() later when working with client side scripting where page does not post back to the server. In the latter case, autohide doesn’t work. That’s why you need to hide the progress manually using function $.hideprogress().
Final Words
I hope you’ll find the stuff helpful. Thanks for reading. Good luck.
