Yesterday, we migrated SharePoint’s SQL Server to a new instance. Today, we will be migrating Team Foundation Server (TFS) SQL database to new SQL instance.
In this example, we are migrating it to a new version of SQL Server which is from SQL 2008 R2 to SQL 2012, this will also work on the same SQL version.
What we had done here is very simple step by step instructions and this is what I’ve done with our live environment. I only migrated the Project Collection and Configuration Database so if you have the same scenario, you can follow this with care of course. So let’s start.
Moving TFS Project Collections
1. Detach Project Collection

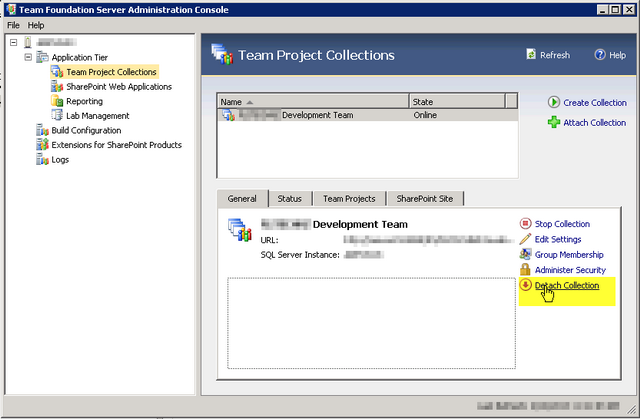
Go to Team Foundation Server Administration Console -> Application Tier -> Team Project Collections, then choose the collection you want to migrate. Once chosen, choose detach, then click next on each following step to confirm.
Once finished, you will see a Window similar to this, click Complete, then close.

2. Detach Your TFS_Configuration Database in SQL Server

3. Copy the Database Related Files
Copy all database related files (.mdf, .ldf) to the New SQL Server.

4. Attach the Database in the new SQL Server

5. Attach Project Collection
Go to Team Foundation Server Administration Console -> Application Tier -> Team Project Collections, then choose Attach Collection.


Once finished, you will see a Window similar to this, click Complete, then close.

At this stage, try doing a check in and check out to see if everything worked, compare file history as well to double check.
Moving TFS Configuration Database
1. Stop IIS on TFS Server
Using the Admin context to execute “iisreset /stop” at the command prompt.
If you can’t stop IIS, there is another alternative. Just stop the TFS related sites and application pool in the Server.
Stop TFS Website on Server.

Stop Application Pools, those two highlighted in the screenshot below:

2. Stop TFS Job Agent Service
You can stop this via services.msc or execute “net stop TfsJobAgent” at the command prompt.

3. Detach the Tfs_Configuration Database
Do it similarly with the step 2 on migrating the project collection.
4. Attach the Tfs_Configuration to the New SQL Server Instance
5. Prepare New SQL for TFS Instance
Using Admin context, open again Command Prompt if you had closed it, then navigate to “C:\Program Files\Microsoft Team Foundation Server 2010\Tools”.
Execute “TfsConfig prepSql /sqlInstance:{your_new_server_name_here}”.

6. Register New SQL for TFS Instance
In the same command prompt instance, execute “TfsConfig registerDb /sqlInstance:{your_new_server_name_here} /databaseName:Tfs_Configuration”.

7. Reapply Service Account
Go to Team Foundation Server Administration Console -> Application Tier, then click on Reapply Account.
Select the account you use, then click OK.

If successful, you will see something like this:

8. Start the TFS Job Agent Service
Start the TFS Job Agent service via services.msc or execute “net start TfsJobAgent” at the command prompt.
9. Start IIS on TFS Server
Using the Admin context, execute “iisreset /start” at the command prompt.
If earlier you just stopped the TFS related sites and application pool, just run it all back again.
You have now successfully migrated your database.
