Introduction
You can consume your backend OData Visual Studio LightSwitch services in AngularJs. Coding your business layer in LightSwitch will save you a lot of development time and reduce the code you will be required to write.

This example uses JayData, a unified data access library for JavaScript that will be used to allow AngularJs to read and write to the LightSwitch OData layer.
The Application

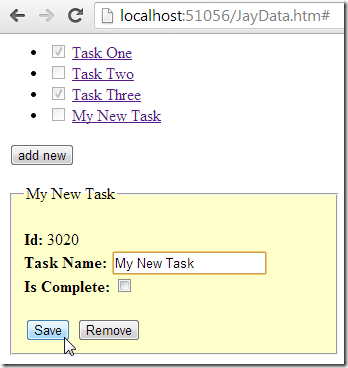
Tasks are displayed in a list.

Clicking the Add new button will display the form to allow a new task to be created.

The task can be entered and saved.

New tasks will appear immediately.

Clicking on an existing task will open it in a form so that it can be edited.
Clicking the remove button deletes a task.

Business rules created in the LightSwitch business layer are enforced.
Creating the LightSwitch Application

Use Visual Studio 2013 (or higher), create a New Project.

Create a new LightSwitch application.

Right-click on the Data Sources folder and select Add Table.

Create a table called ToDo and save it.

The table will be pluralized to ToDoes.

Select Write Code, then ToDoes Validate.
Use the following code for the method:
partial void ToDoes_Validate(ToDo entity,
EntitySetValidationResultsBuilder results)
{
if (entity.TaskName == "[New Task]")
{
results.AddEntityError(
"Task cannot be named [New Task]"
);
}
if (entity.IsComplete == false)
{
int intCountOfIncomplete =
this.DataWorkspace.ApplicationData.ToDoes
.Where(x => x.IsComplete == false).Count();
if (intCountOfIncomplete > 0)
{
results.AddEntityError(
"Cannot have more than 1 incomplete Task"
);
}
}
}

We can create LightSwitch HTML Client screens to allow us to enter sample data.
(See: Visual Studio LightSwitch 2013–Hello World! for directions on creating LightSwitch screens.)

We also see that the LightSwitch business rules are enforced.
Create the Entity Context
JayData tracks the changes of the entities using an entity context. Adding, updating, deleting entities happen through the context, which holds the reference to the added, updated and deleted objects and dispatches the operations (HTTP requests) to the OData endpoint after calling context.saveChanges(). Entity contexts can be defined manually or generated the JaySvcUtil.exe. You can download the latest version from JaySvcUtil CodePlex page.

When we run the application, we note the URL.

If we change the path to ApplicationData.svc, we see the OData service.

We use the JayScvUtil tool to create the entity context using the format:
JaySvcUtil.exe -m http://{domain}:{port}/ApplicationData.svc/$metadata -o ApplicationData.js

We add the resulting file to the project.
Creating the AngularJs View Page

We will first make a simple page that displays data.
Right-click on the Server project and Add a new HTML page.

Name the page JayDataView.
Use the following code for the page:
<html>
<head>
<title>JayData.org Sample</title>
<script src="http://code.jquery.com/jquery-2.0.3.min.js"></script>
<script src="http://code.angularjs.org/1.2.0-rc.3/angular.js"></script>
<script src="http://include.jaydata.org/datajs-1.0.3.js"></script>
<script src="http://include.jaydata.org/jaydata.js"></script>
<script src="http://include.jaydata.org/jaydatamodules/angular.js"></script>
<script src="JayDataView.js"></script>
<script src="ApplicationData.js"></script>
</head>

<body data-ng-app="app">
<div ng-controller="ToDoesController">
	<ul>
		<li ng-repeat="ToDo in ToDoes">
			<input id="checkSlave" type="checkbox" ng-model="ToDo.IsComplete">
			{{ToDo.TaskName}}
		</li>
	</ul>
</div>
</body>
</html>
Create a JavaScript file called JayDataView.js and use the following code:
var app = angular.module('app', ['jaydata']);
function ToDoesController($scope, $data) {
$scope.ToDoes = [];
var ApplicationData = new LightSwitchApplication.ApplicationData({
name: 'oData',
oDataServiceHost: '/ApplicationData.svc'
});
ApplicationData.onReady(function () {
$scope.ToDoes = ApplicationData.ToDoes.toLiveArray();
});
}

Run the application.

Navigate to the JayDataView page in the root of the website and the tasks will show.
Create the AngularJs CRUD Page
Create a new page called JayData.html and use the following code:
<html>
<script src="http://code.jquery.com/jquery-2.0.3.min.js"></script>
<script src="http://code.angularjs.org/1.2.0-rc.3/angular.js"></script>
<script src="http://include.jaydata.org/datajs-1.0.3.js"></script>
<script src="http://include.jaydata.org/jaydata.js"></script>
<script src="http://include.jaydata.org/jaydatamodules/angular.js"></script>
<script src="JayData.js"></script>
<script src="ApplicationData.js"></script>

<body>
	<div data-ng-app="app" ng-controller="ToDoEditorController">
	<ul>
	<li ng-repeat="ToDo in colToDoes">
	<input id="checkbox" type="checkbox"

	ng-model="ToDo.IsComplete" disabled="disabled">
	<a href="#" ng-click="$parent.selectedToDo = ToDo">{{ToDo.TaskName}}</a>
	</li>
	</ul>
	<button ng-click="newToDo()">add new</button>
	<p>
	<form ng-if="selectedToDo">
	<fieldset style="width: 300px; background-color: #FFFFCC;">
	<legend>{{selectedToDo.TaskName}}</legend>
	<br />
	<label>
	<span><strong>Id:</strong></span>
	<span>{{selectedToDo.Id}}</span>
	<span>
	<br />
	<strong>Task Name:</strong>
	</span>
	<input ng-model="selectedToDo.TaskName" size="20" />
	<span>
	<br />
	<strong>Is Complete:</strong>
	</span>
	<input type="checkbox" ng-model="selectedToDo.IsComplete" />
	<br />
	<br />
	</label>
	<button ng-click="save()">Save</button>
	<button ng-click="remove()">Remove</button>
	</fieldset>
	</form>
	</p>
	</div>
</body>
</html>
Use the following code for the JayData.js file:
var app = angular.module('app', ['jaydata']);
function ToDoEditorController($scope, $data) {
$scope.ToDoes = [];
$scope.selectedToDo = null;
var ApplicationData = new LightSwitchApplication.ApplicationData({
name: 'oData',
oDataServiceHost: '/ApplicationData.svc'
});
ApplicationData.onReady(function () {
$scope.ApplicationData = ApplicationData;
$scope.ToDoes = ApplicationData.ToDoes.toLiveArray();
});
Object.defineProperty($scope, "colToDoes", {
get: function () {
return $scope.ApplicationData
.ToDoes
.toLiveArray();
}
});
$scope.save = function () {
if ($scope.selectedToDo.Id) {
$scope.ApplicationData.ToDoes.attach($scope.selectedToDo, true);
$scope.selectedToDo.entityState = $data.EntityState.Modified;
}
else {
$scope.ApplicationData.ToDoes.add($scope.selectedToDo, true);
}
$scope.saveChanges();
};
$scope.saveChanges = function () {
$scope.ApplicationData.saveChanges()
.then(function () {
$scope.selectedToDo = null;
}, function (error) {
var xml = error.message,
xmlDoc = $.parseXML(xml),
$xml = $(xmlDoc),
$ValidationResults = $xml.find("ValidationResults");
angular.forEach($ValidationResults, function (ValidationResult) {
angular.forEach(ValidationResult.childNodes, function (childNode) {
alert(childNode.childNodes[0].textContent);
});
});
$scope.ApplicationData.stateManager.reset();
});
};
$scope.remove = function () {
$scope.ApplicationData.ToDoes.remove($scope.selectedToDo);
$scope.saveChanges();
};
$scope.newToDo = function () {
var ctx = $scope.ApplicationData;
$scope.selectedToDo = new ctx.ToDoes.elementType({
TaskName: "[New Task]"
});
};
}
JayData Links
LightSwitch Help Website Links
