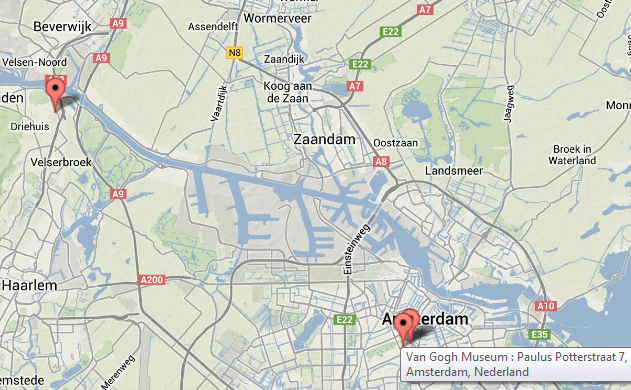
Introduction
This article shows how to create a map image in your browser, showing a number of location markers that are taken from a list of addresses, using a few HTML lines and client side JavaScript. It also demonstrates a simple trick to add labels to the marker pins on that map. The locations are specified as human readable addresses, which are then converted to GPS coordinates using Google's Geocoder. As a bonus, a progress bar shows while doing the location lookups.
Background
It took me a few hours to get all information and put it together to a working demo. So I figured it would be a good idea to publish this working example to save you some time.
Using the Code
The example map is generated by a single HTML file, which has the HTML code and JavaScript combined. Let's go through the code block by block, from top to bottom of the file.

Google API Declaration
The first part of the file contains the HTML header and Google API 'declarations' (please forgive me if I don't use the correct terminology):
<!DOCTYPE html>
<html>
    <head>
        <meta charset="utf-8">
        <meta http-equiv="X-UA-Compatible" content="IE=edge,chrome=1">
        <title>Points of interest</title>
        <script src="http://ajax.googleapis.com/ajax/libs/jquery/1.9.0/jquery.min.js"></script>
        <script src="https://maps.googleapis.com/maps/api/js?v=3.11&sensor=false"
                   type="text/javascript"></script>
List of Locations to Look Up
A a next step, the list of locations is defined as an Array of simple strings. Commas are used to separate the fields within a location string. The first field serves as the name, the rest is the address itself. Also note that the whole Java scripting is started when the document loading is ready():
<script type="text/javascript">
$(document).ready(function() {
(function() {
var locations = new Array();
var i = 0;
locations[i++] = "Rijksmuseum, Museumstraat 1, Amsterdam"
locations[i++] = "Van Gogh Museum, Paulus Potterstraat 7, Amsterdam";
locations[i++] = "Kroller-Muller Museum, Houtkampweg 6, Otterlo";
locations[i++] = "Beeckestijn, Rijksweg 136, Velsen";
var total_locations = i;
i = 0;
The variable total_locations is introduced to calculate the progress (discussed later on).
Creating the Map
Now comes the interesting part. A variable options is created with a number of elements:
zoom: Sets the default zoom level of the mapcenter: Specifies the center of the map, using GPS coordinates (latitude, longitude)mapTypeId: For this example, we use terrainmapTypeControl: Set to 'true' so that controls are added to the map (zoom, navigate)
Then a new instance of the map is created with the options specified. The 'map_canvas' identifier comes from the HTML part. It is the identifier of a <div> element to hold the map image.
console.log('About to look up ' + total_locations + ' locations');
var options = {
zoom: 8,
center: new google.maps.LatLng(52.2313, 4.83565),
mapTypeId: google.maps.MapTypeId.TERRAIN,
mapTypeControl: true
};
console.log('Initialise map...');
var map = new google.maps.Map(document.getElementById('map_canvas'), options);
Looking Up the Locations, Slowly...
When not using a Google API key, the number of Geolocation lookups per second is limited. If we perform too many queries, an error result code is returned by the Google Maps API server. So let's prevent that by limiting the number of location lookups to one per second. For this, the setInterval method is used:
var geocoder = new google.maps.Geocoder();
if (geocoder) {
console.log('Got a new instance of Google Geocoder object');
var myVar = window.setInterval(function(){createNextMarker()}, 1000);
When the 1000 millisecond interval expires, it calls createNextMarker in our JavaScript:
function createNextMarker() {
    if (i < locations.length) {
        var customer = locations[i];
        var parts = customer.split(",");
        var name = parts.splice(0,1);
        var address = parts.join(",");
        console.log('Looking up ' + name + ' at address ' + address);
        geocoder.geocode({ 'address': address }, makeCallback(name));
        i++;
        updateProgressBar(i / total_locations);
    } else {
        console.log('Ready looking up ' + i + ' addresses');
        window.clearInterval(myVar);
    }
}
Here, a little trick is performed. The geocoder.geocode method takes a callback as last argument. This will be called once the reply has been received from the server. That reply contains the GPS coordinates and address details, but not the original name from our list of locations. To have that name value available in the context of the callback, we use the trick as shown in the code fragment above. Note that makeCallback returns the function variable (geocodeCallBack) of the actual callback that will be called by geocoder.geocode. It will then parse the result (results[0]) and place the marker on the map.
function makeCallback(name) {
var geocodeCallBack = function (results, status) {
if (status == google.maps.GeocoderStatus.OK) {
var longitude = results[0].geometry.location.lng();
var latitude = results[0].geometry.location.lat();
console.log('Received result: lat:' + latitude + ' long:' + longitude);
var marker = new google.maps.Marker({
position: new google.maps.LatLng(latitude, longitude),
map: map,
title: name + ' : ' + results[0].formatted_address});
} else {
console.log('No results found: ' + status);
}
}
return geocodeCallBack;
}
}
Progress Bar
Just for fun and to show some animation while looking up the geolocations, a progress bar is shown:
function updateProgressBar(percentage_factor) {
var map_canvas = document.getElementById('map_canvas');
var node = document.getElementById('progress_bar');
var w = map_canvas.style.width.match(/\d+/);
w = w * percentage_factor;
node.style.width = parseInt(w) + 'px';
if (percentage_factor == 1) {
node.style.backgroundColor = 'green';
}
}
})();
});
</script>
HTML Code
</head>
<body>
<div style="border: 1px solid black; width:1024px; height:3px;">
<div id="progress_bar" style="height:3px; width:0px; background-color:red;"/>
</div>
<!--
<div id="map_canvas" style="width: 1024px; height:600px;"></div>
</body>
</html>
Browser Security
When first loading the HTML code, the security settings of your browser may prevent display of the map. Internet Explorer shows a pop-up bar at the bottom of the page. Firefox and Chrome show a shield icon in the address bar. Click it with the mouse and choose the option to disable security for this page.
Points of Interest
The thing that I have learned from the examples that are already published on the net, is the trick of passing a variable value to a callback. The rest of the code is actually pretty straight forward and already available on the net, but not combined into a working example as shown here.
History
- 12th November, 2013: Initial version
- 13th November, 2013: Fixed small typo and added security note
