Creating an ASP.NET Website and Working with LINQ
You can use LINQ to XML for the following purposes:
- For creating an XML file
- For loading an XML file
- For querying XML data
- Manipulating XML data
- Transforming the XML into another shape
In this example, we will load an already created XML file. We will use Contacts.xml file. The content of this file is as shown below:
<contacts>
<contact>
<id> 1 </id>
<name> Name1 </name>
     <department> IT </department>
</contact>
<contact>
<id> 2 </id>
<name> Name2 </name>
     <department> IT </department>
</contact>
   <contact>
     <id> 3 </id>
     <name> Name3 </name>
     <department> CS </department>
   </contact>
   <contact>
     <id> 4 </id>
     <name> Name4 </name>
     <department> CS </department>
   </contact>
</contacts>
Follow the below steps to query through the XML file:
- Open Visual Studio and create an ASP.NET website called
Linq2Xml by using C#. - Add the above created Contacts.xml file to the App_Code directory of your solution.
- Add a new class file called Contact.cs to the solution. This class represents a
contact object and will be used when the XML is turned to a collection of strongly typed objects. The following code shows an example:
namespace Linq2Xml
{
    public class Contact
    {
        public int id { get; set; }
        public string name { get; set; }
        public string department { get; set; }
    }
}
- Add a new class file called ContactServices.cs. This class will expose methods that use LINQ to work with the XML file. Add the following code to this file:
- Add a class level variable to read the class file. Also, add the reference for
namespace System.Xml.Linq.
using System;
using System.Collections.Generic;
using System.Linq;
using System.Web;
using System.Xml.Linq;
namespace Linq2Xml
{
public class ContactServices
{
XElement _conXml = XElement.Load
("c:\\....\\visual studio 2010\\Projects\\Linq2Xml\\Linq2Xml\\App_Data\\Contacts.xml");
. . .
}
}
- Add a method called
GetDepartments to return the distinct departments from the XML file.
public List<string> GetDepartments()
        {
            var deptQuery =
                from con in _conXml.Descendants("contact")
                group con by con.Element("department").Value
                    into conGroup
                    select conGroup.First().Element("department").Value;
            return deptQuery.ToList();
        }
- Add another method called
GetContactsByDept that takes department as a parameter. It will then query the XML file and returns department with a matching name. The query will transform data into a list of Contact object.
public List<Contact> GetContactsByDept(string department)
        {
            IEnumerable<Contact> conQuery =
                from con in _conXml.Descendants("contact")
                where con.Element("department").Value == department
                select new Contact
                {
                    id = Convert.ToInt32(con.Element("id").Value),
                    department = con.Element("department").Value,
                    name = con.Element("name").Value,
                };
            return conQuery.ToList();
        }
- Open the default.aspx page. Add a
label, Dropdownlist, Button, GridView and ObjectDataSource controls to the page. - Configure the
ObjectDataSource to point to ContactServices.GetDepartments method. - Configure the dropdown list to use the
ObjectDataSource. The markup inside the MainContent placeholder should look similar to the following:
<asp:Content ID="BodyContent"
	runat="server" ContentPlaceHolderID="MainContent">
    <asp:Label ID="Label1" runat="server"
    Text="Select a department:"></asp:Label>
    <br />
    <br />
    <asp:DropDownList ID="DropDownListDepts"
    runat="server" DataSourceID="ObjectDataSourceDept">
    </asp:DropDownList>

    <asp:Button ID="Button1" runat="server"
    Text="Update " onclick="Button1_Click" />
    <br />
    <br />
    <asp:GridView ID="GridViewContacts" runat="server">
    </asp:GridView>
    <br />
    <asp:ObjectDataSource ID="ObjectDataSourceDept"
    runat="server" SelectMethod="GetDepartments"
        TypeName="Linq2Xml.ContactServices"></asp:ObjectDataSource>
</asp:Content>
- Add a click event to the button control. Inside the code for the click event, call the
ContactServices. GetContactsByDept method and pass the selected method from the dropdown list. Update the data in the gridView control with the results. The following code shows an example:
protected void Button1_Click(object sender, EventArgs e)
        {
            ContactServices conSrv = new ContactServices();
            GridViewContacts.DataSource =
                conSrv.GetContactsByDept(DropDownListDepts.SelectedItem.Text);
            GridViewContacts.DataBind();
        }
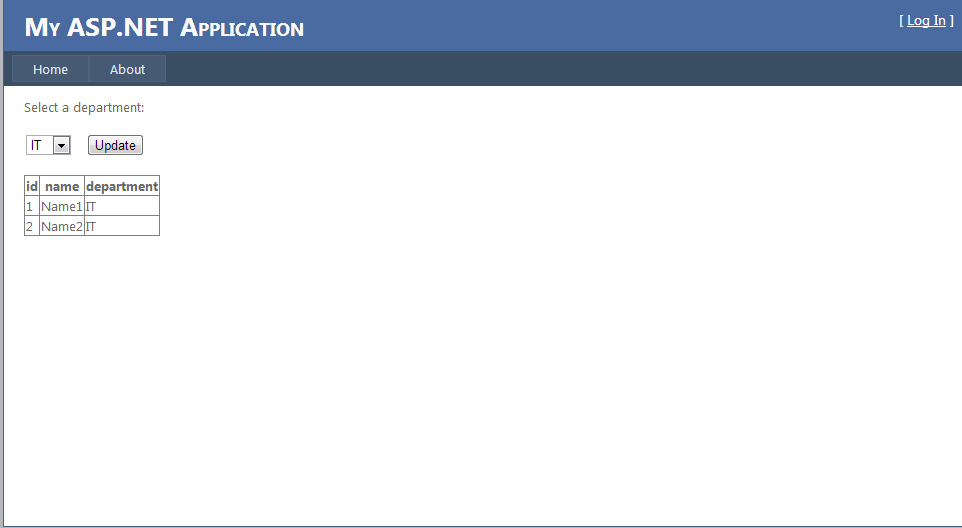
- Run your application. Select a
department and click on Update button. Your result should look similar to the below figure:

