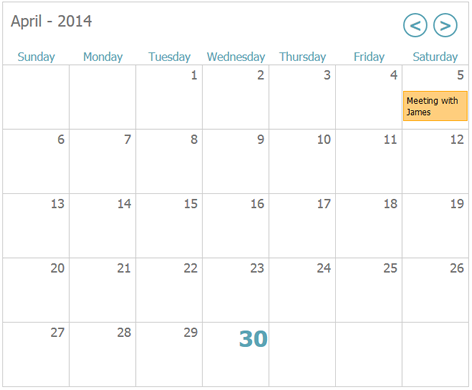
This article explains how to develop a calendar feature where application users can select a date and add an event.

Introduction
While working on a recent project, I had the need to include a calendar feature where users of the application could select a date and add an event. There was nothing fancy about this application. It was one of those internal company applications, your boss gets you to develop, but nobody ever uses.
In this article, I explain how I developed the class with a few usage examples.
The Theory
The theory to develop a calendar control, is quite simple, all you need is a few pieces of information. First, we start with a date where only the month and year is relevant. We then work out how many days there are in that date. For example, let's assume the date in question is the 29/04/2014, using the PHP cal_days_in_month() function, we can work out how many days there are in April of 2014. The final piece is working out what weekday the 1st of the month is on. By weekday, I mean the weekday ordinal, which is between 0-6. PHP provides a getdate() function which can accept a timestamp and returns an array of date related attributes, one of which is the weekday position for the given date.
These two pieces of information is all that is needed to begin rendering a calendar. Unfortunately, this is where it all gets a bit messy. I decided to use an HTML table element to represent the calendar as it seemed the most obvious choice. The approach I took was to calculate how many weeks there were in the month. Because the 1st of the month might start on any weekday (also including the weekend), I needed to account for any blank table cells. This was easily corrected by adding the total days in a month with the weekday ordinal. For example, the weekday ordinal for the 1st of April 2014 is 2 which is a Tuesday considering Sunday is 0. By adding the two values together and dividing by 7, I had the number of rows that the HTML table needed. Now for each row, I could simply iterate for each day of the week. This made it easy to deal with blank cells at the beginning of the month and at the end of the month. Finally, each day in the calendar was given a hyperlink so that the day could be selected.
Using the Code
The sample Calendar class provided in the download, contains a few helper methods that allow you to customize the calendar. In this section, I'll show a few examples of usage. We begin by instantiating a new instance of the Calendar class.
$calendar = new Calendar();
By default, the current date is used to initialize the calendar. This can be changed by using the setDate() method, which accepts three arguments (Day, Month, Year) as shown in the example below:
$calendar->setDate(20,4,2014);
Calendar methods can be chained together because each set* method returns the calendar instance. By default, the calendar weekday names are shown as a 3 character short name. The code below shows how to display the full weekday names.
$calendar->setShortWeekDayNames(false);
Each day cell has an HTML data attribute data-date which contains the date for that cell. This is useful, if you want to use JavaScript to get the selected date. You can change the format of the data-date attribute using the following method:
$calendar->setDateFormat('d/m/Y');
There are three callback methods, that allow you to render different parts of the calendar. Callback functions must return a string. Let's start by looking at the onTitleRender() method. This method accepts a callback function that accepts three arguments, which are all timestamps. The first argument is the current calendar month, the second is the timestamp for the previous month and the third argument is the timestamp for the next month. Using these timestamps, you can render a custom navigation that will allow you to navigate between the previous and next month. The example code demonstrates this better.
$calendar->onTitleRender(function($currentMonth, $prevMonth, $nextMonth){

    return '<div class= "title">' . date('F - Y', $currentMonth) . '</div>'
    . '<div class= "nav"><a href= "?date=' . date('d/m/Y', $prevMonth) . '"><</a>'
    . '<a href= "?date=' . date('d/m/Y', $nextMonth) . '">></a></div>';

});
The onDayRender() method allows you to change the default rendering of each day cell. The example below shows how to add a hyperlink to each day. You can also use this method to add event titles to the cell.
$calendar->onDayRender(function($day, $month, $year){

    return '<a href= "/event.php?date=' . "$day/$month/$year " .'">' . $day . '</a>';

});
Finally, the onCurrentDayRender() method allows you to change the default rendering of the currently selected date. The example below makes the currently selected date bold.
$calendar->onCurrentDayRender(function($day){
    return '<h1>' . $day . '</h1>';
});
This brings me to the end of this article. Please feel free to leave your comments and suggestions.
History
- 29th April, 2014: Initial version
