This is an article demonstrating how web services clients can be built both easily and quickly using XForms, a new, declarative language from the W3C. The forms are illustrated using formsPlayer, an XForms processor plug-in for IE6.
Introduction
Web Services is a technology with great promise. The idea that we should be able to build our own custom applications that interact with everything from Google searches, Amazon book-stores, weather forecasts, diaries, travel plans, and more, is of course an exciting notion for us developers.
But, a big problem is that the most common way that this is achieved is either by aggregating web services on a server and then delivering an HTML user interface to the user, or to use some development application with a SOAP wizard, which generates a static user interface that interacts with the web service.
The problem with both of these solutions is that it sets the bar quite high for playing with web services - you either need a server and all its associated software, or at the very least, you need some expensive development environment. And then there is the bigger problem that any solution you come up with can only be further developed by someone with the same programming environment as you.
XForms
XForms [1] gets us out of this by offering an open standard language that allows us to interact with web services. Using a non-proprietary language allows us to share solutions without requiring that we all run the same development environment.
And more than that, since XForms processors can be built for any platform you can think of, the code produced is incredibly portable.
But the final advantage that I think out-weighs all others, is that XForms is a declarative language - it means that we can build and test sophisticated solutions incredibly quickly. In this tutorial, we will build a program that interacts with a weather service in less than 50 lines of mark-up - and that includes stylesheet rules, and no hidden 'code behind'!
In short, think of the advantages of the Java virtual machine ... but without the headache.
Development Environment
To follow along with this sample, all you really need is a simple text editor, like Notepad, and an XForms processor. I'm using formsPlayer [2] here, since it is a plug-in to Internet Explorer 6, and so makes it very easy to mix ordinary HTML with the form, but you could also try others, such as:
- X-Smiles [3]
- Novell Technology Preview [4]
- Chiba [5]
- DENG [6]
Weather Web Service
In this example, we will access a weather report web service. The service we will use has been mentioned in a few other samples in CodeProject [7, 8] and comes from EJSE [9].
Step 1 - A Simple Form
The first thing we will do is create a simple XForm that loads the weather report for zip code 02852 from the web service into a DOM. The form will also show the name of the location and the current forecast.
The code for the form is made up of a model and a user interface. The model contains a DOM and an instruction to initialize it with the weather forecast, whilst the UI has a couple of output controls wired up to the general weather forecast and the location that corresponds to the zip code.
The first thing we need to do when writing our form is establish all of the namespaces we will need. Obviously, we need one for XForms, but we also need one for XHTML (which is hosting our XForms elements), and one for the weather web service:
="1.0"="utf-8"
<html
xmlns="http://www.w3.org/1999/xhtml"
xmlns:xforms="http://www.w3.org/2002/xforms"
xmlns:wr="http://ejse.com/WeatherService/"
>
Next, we need to load formsPlayer, to process the XForms elements. This step is not required if you are using X-Smiles or the Novell Technology Preview, but since they ignore this tag, it won't hurt - in other words, this form will still be cross-platform:
<head>
    <object id="formsPlayer"
      classid="CLSID:4D0ABA11-C5F0-4478-991A-375C4B648F58">
        formsPlayer has failed to load! Please check your installation.
    </object>
    <?import NAMESPACE="xforms" IMPLEMENTATION="#formsPlayer" ?>
Now, we can establish the data model. In the data model, we simply have an XML document that is initialized to the result of a request to the weather web service for a nine day weather forecast (using the HTTP GET method):
    <xforms:model>
        <xforms:instance
         src="http://ejse.com/WeatherService/Service.asmx/
                       GetExtendedWeatherInfo?zipCode=02852"
        />
    </xforms:model>
</head>
The results from the web service consists of nine elements (one for each day of the weather forecast) preceded by an element that contains information about the location, when the report was last updated, a forecast, and so on:
<ExtendedWeatherInfo
 xmlns="http://ejse.com/WeatherService/">
  <Info>
    <Location>North Kingstown, RI</Location>
    ...
  </Info>
  <Day1>
    ...
  </Day1>
  <Day2>
    ...
  </Day2>
  .
  .
  .
  <Day9>
    ...
  </Day9>
</ExtendedWeatherInfo>
So that we can establish that everything is working fine, we'll build a simple UI that shows some of the information from the Info block:
    <body>
        <xforms:group ref="wr:Info">
            <xforms:label>Current Conditions</xforms:label>


            <xforms:output ref="wr:Location">
                <xforms:label>Location:</xforms:label>
            </xforms:output>

            <xforms:output ref="wr:Forecast">
                <xforms:label>Forecast:</xforms:label>
            </xforms:output>
        </xforms:group>
    </body>
</html>
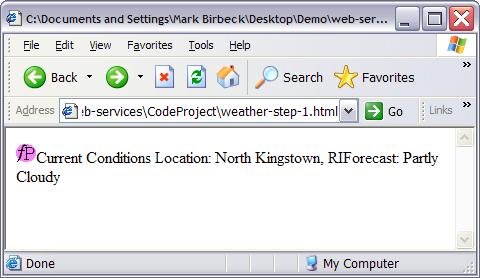
If you have opened the zip files, and installed an XForms processor, then open the document fP-and-weather-ws-step-1.html and you should see something like the following:
If you want to play with this simple form before moving on, here is a typical content for the Info element:
<Info>
  <Location>North Kingstown, RI</Location>
  <IconIndex>-1</IconIndex>
  <Temprature>69°F</Temprature>
  <FeelsLike>69°F</FeelsLike>
  <Forecast>Partly Cloudy</Forecast>
  <Visibility>6.0 miles</Visibility>
  <Pressure>29.95 inches and rising</Pressure>
  <DewPoint>64°F</DewPoint>
  <UVIndex>0 Low</UVIndex>
  <Humidity>84%</Humidity>
  <Wind>From the West at 5 mph</Wind>
  <ReportedAt>Providence, RI</ReportedAt>
  <LastUpdated>Wednesday, July 21, 2004,
     at 6:51 AM Eastern Daylight Time.</LastUpdated>
</Info>
Change any of the @ref values, or add some new outputs, to see what happens.
Step 2 - Styling
Before we add any more information, let's make the form a little easier to read. Since XForms builds on other W3C standards, it will be no surprise to you to learn that we can use CSS to style our output.
The first thing we'll do is get rid of any margins, and set a default font. We insert the following in the head, after the model element:
</xforms:model>

<style>
    html, body
    {
        margin: 0px;
        padding: 0px;
    }
    body
    {
        font-family: "Trebuchet MS", Verdana, Helvetica, sans-serif;
    }
Next, we create a rule for all group elements:
            xforms\:group
            {
                float: left;
                border: 3px silver window-inset;
                padding: 5px;
                background-color: silver;
            }
Finally, we add some rules for the information from the weather forecast:
        .location, .forecast
        {
            display: block;
            font-size: xx-small;
        }
    </style>
</head>
We can then use these style names by altering the UI as follows:
<xforms:output ref="wr:Location" class="location">
    <xforms:label>Location:</xforms:label>
</xforms:output>

<xforms:output ref="wr:Forecast" class="forecast">
    <xforms:label>Forecast:</xforms:label>
</xforms:output>
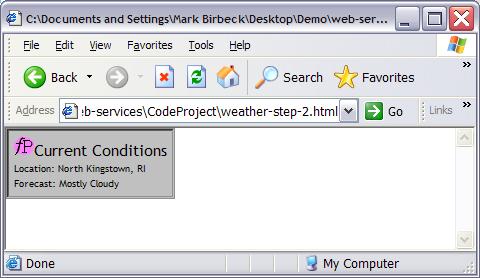
The resulting display will now be:
Step 3 - Repeating Data
Now that we know our form works, and it's starting to look a little better, let's get the data for the nine day forecast. We'll make use of the XForms repeat element which allows us to specify a template that will be used to render each item in a nodeset, no matter how many items there are.
The first thing that we need to specify in our repeat is the list of nodes we want to process. As you saw at the beginning, the elements for the forecast are uniquely named (Day1, Day2, and so on) so we can't use the element name as the selector. However, each forecast has a child element of Day, so we can use that to uniquely identify our nodeset. Add the following after the closing element of the group:
    </xforms:group>

    <xforms:repeat nodeset="*[wr:Day]">
        [template goes here]
    </xforms:repeat>
</body>
We now have a repeat that will iterate over a nodeset that contains all elements with a child of Day. Next, we need to specify the template that will be used for each of these nodes. A typical entry for the forecast for one day is:
<Day1>
  <Day>Thu</Day>
  <Date>Jul 22</Date>
  <IconIndex>30</IconIndex>
  <Forecast>Partly Cloudy</Forecast>
  <High>80°</High>
  <Low>65°</Low>
  <PrecipChance>20 %</PrecipChance>
</Day1>
So to get us going - and ensure that our repeat is working OK - let's just output Day. We'll add a twist though - when the user hovers over the Day value, we'll render a hint that is derived from the Date. The repeat template now looks like this:
<xforms:repeat nodeset="*[wr:Day]">
    <xforms:output class="day" ref="wr:Day">
        <xforms:hint ref="../wr:Date" />
    </xforms:output>
</xforms:repeat>
Note that all XPath statements have a context, and in this example, the context for hint is wr:Day - hence the need for ".." before wr:Date. We also need some style for the class 'day':
    .location, .forecast
    {
        display: block;
        font-size: xx-small;
    }
    .day
    {
        color: blue;
        font-weight: bold;
    }
</STYLE>
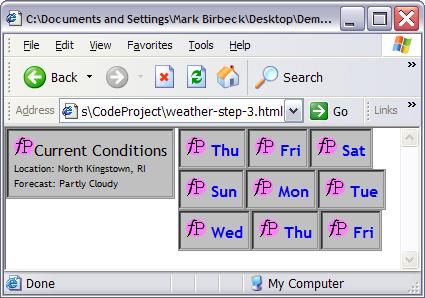
The form should now look something like this:
Now that we are sure everything is working, we can modify the repeat template as much as we like. We're not restricted to just echoing data from the instance document with @ref, though. In the next snippet, we can see how we can use @value on output to call functions, and so concatenate two strings together - the low and high temperature values:
        <xforms:repeat nodeset="*[wr:Day]">
            <xforms:output class="day" ref="wr:Day">
                <xforms:hint ref="../wr:Date" />
            </xforms:output>
            <xforms:output class="tempRange" value="concat(wr:Low, '-',

wr:High)"/>
        </xforms:repeat>
The associated stylesheet changes are:
.day
{
    color: blue;
    font-weight: bold;
    display: block;
}
.tempRange
{
    font-size: smaller;
}
With the temperature range added, the form should look like this:
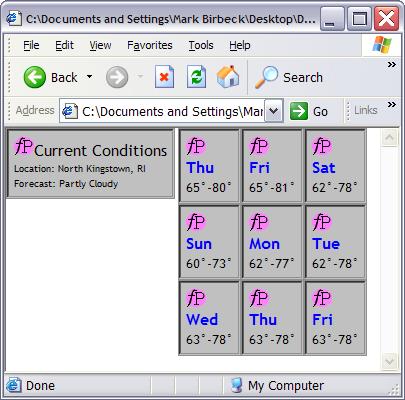
Step 4 - Rendering Images
The final step in this short tutorial is to show an image associated with the forecast. XForms 1 .0 does not support the rendering of images based on instance data, but this will be included in the forthcoming XForms 1.1. However, formsPlayer does provide a mechanism to do this, which is to use nested mark-up. We'll use that feature here, mindful of the fact that we'll need to change this in the future, when a platform-independent way of specifying images becomes available.
As before, the location of the mark-up is in the repeat template. This time, we are going to use the IconIndex element from the web service data, and build up an HTML img element with a URL that refers to an image on the EJSE web service server. Our template should now look like this:
<xforms:repeat nodeset="*[wr:Day]">
    <xforms:output class="day" ref="wr:Day">
        <xforms:hint ref="../wr:Date" />
    </xforms:output>
    <xforms:output
     class="image"
     value="concat(
        '<img src="http://www.ejse.com/WeatherService/images/52/',
        wr:IconIndex,
        '.gif" />'
     )"
    >
        <xforms:hint ref="wr:Forecast" />
    </xforms:output>
    <xforms:output class="tempRange"
           value="concat(wr:Low, '-', wr:High)"/>
</xforms:repeat>
Note that we have also added a hint, so that hovering over the image gives us the forecast.
We need to add a further style rule to make our image a 'block', and whilst we're editing the CSS, let's factor a little:
.day, .location, .forecast, .image
{
    display: block;
}
.location, .forecast
{
    font-size: xx-small;
}
.day
{
    color: blue;
    font-weight: bold;
}
We also need to add a rule to control the style of each item within the repeat. This is addressed in XForms using a pseudo-class called repeat-item, although formsPlayer implements this using ordinary class names - but there is no harm in having both formats in the style rules. We'll also make the group used for 'today' have the same style as repeat-items:
::repeat-item, .repeat-item, xforms\:group
{
    float: left;
    border: 3px silver window-inset;
    padding: 5px;
    width: 80px;
    height: 140px;
    background-color: white;
    text-align: center;
}
Our display should now look like this:

Step 5 - Branding
One additional step is formsPlayer specific, but involves customizing the branding for the forms in your project. This is easily achieved with an extra attribute on model, which points to a configuration file, which in turn contains information about the splash-page and form-control icons that you want to use. The file is encrypted and will only work with specific URLs, and is obtained when licensing formsPlayer [10]. Note that this does not alter the behavior of formsPlayer, and forms such as the one demonstrated in this article will work on formsPlayer with or without a license. This makes it a great platform for developing web service -based applications.
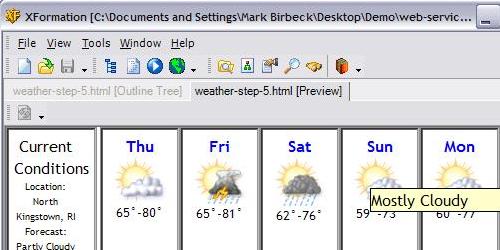
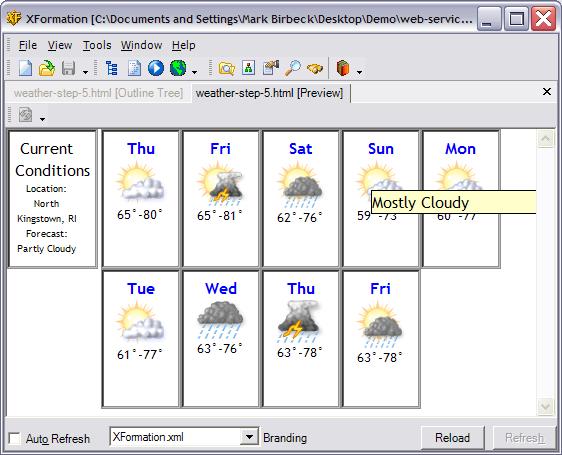
If you do purchase a license, you may find that during testing, you'll want to avoid having to repeatedly deploy your application to a web server. An alternative is to obtain a fully licensed version of XFormation [11], which allows full control over the branding used by formsPlayer. In the following screen-shot, we can see XFormation rendering the form we have just completed, but with no branding:
Conclusion
If an application or form has a strong dependency on XML - such as those using web services - then XForms is the language of choice. Its declarative syntax makes it easy to build, test, and deploy applications, many times faster than traditional techniques. And as more XForms processors are developed for more platforms, any application and form you develop now will be able to run in an ever increasing number of environments.
References
- XForms - The Next Generation of Web Forms - W3C
- formsPlayer - The XForms Toolkit
- X-Smiles. An open XML-browser for exotic devices
- Novell XForms Technology Preview
- Chiba - An Open Source Java Implementation of the W3C XForms standard
- DENG
- Writing a Web Service Consumer using Borland C# Builder
- Consuming a Weather Web Service with MyXaml
- EJSE Inc.
- formsPlayer Licensing
- XFormation
