Asp.net MVC 5 has a host of awesome features that can be leveraged to make a good and maintainable website. One of these features is the templating system. MVC offers two types of templates for views, namely:
- Display Templates: Used for displaying data.
- Editor templates : Used for creating an editor for data
 WPF and Silverlight developers users will find a lot of similarity in the MVC templating system.
The MVC templating system uses DataType as an identifier to select the appropriate template for use. In order to use the templates we have to use the following syntax so that MVC can invoke the template selection.
For Display templates:
@Html.DisplayFor(m=> m.Myproperty)
where m can be the model for the view.
For Editor Templates:
@Html.EditorFor(m=> m.Myproperty)
where m can be the model for the view.
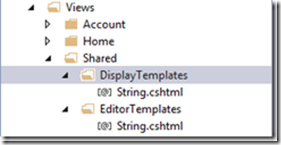
For demo, we will Create/Modify the editor template for data type String. In this demo, I have purposefully added some css to make the Display and Editor look different Display templates and Editor template are saved in Specific folders inside the Views\\Shared\\<folders>.

From the above figure, you can understand that we have created a display as well as an editor template for the data type String. For Display Template, the file “String.cshtml” has
@model String
-->
<div class="panel panel-primary">
<div class="panel-heading">
<h3 class="panel-title">Display Template</h3>
</div>
<div class="panel-body">
@ViewData.TemplateInfo.FormattedModelValue
</div>
</div>
For Editor Template, the file “String.cshtml” has
@model String
-->
<div class="panel panel-success">
<div class="panel-heading">
<h3 class="panel-title">Editor Template</h3>
</div>
<div class="panel-body">
@Html.TextBox("", ViewData.TemplateInfo.FormattedModelValue)
</div>
</div>
The job is almost done, we just have to use these templates in one of the views, I will create a Separate View/Controller (TemplateDemoController) to keep this tutorial simple. I have created a “Person” model with a string property “Name” and passed it as the model for my view.
public class TemplateDemoController : Controller
{
public ActionResult Index()
{
return View(new Person() {Name = "Some Name"});
}
}
And I will use the “Displayfor" and EditorFor” helpers in my view to invoke template selection while view rendering.
@model BootswatchDemo.Models.Person

@{
    ViewBag.Title = "Template Demo";
}

<h2>@ViewBag.Title</h2>

<div>@Html.DisplayFor(m => m.Name)</div>

<div>@Html.EditorFor(m => m.Name)</div>
After this, compile and run the website and navigate to the respective view to see the result.

 Using this feature people will save a lot of time by creating templates for custom classes instead of writing HTML in every View.
I hope this post might have helped you to understand the concept of templates in MVC and will help you in your projects/assignments. If you like the article please share or comment. You suggestions are welcome. Bye for now, will meet post more articles soon with some more interesting stuff as my journey of exploring ASP.NET MVC continues.
