Introduction
ClickOnce deployment allows you to publish Windows-based applications to a Web server or network file share for simplified installation. It is used to deploy .NET Windows application in a server or in www space to make an application online, so the Windows based application will be updated automatically when a new version has been added or some modification has been made in the application. For more details about ClickOnce deployment, click here.
Background
The purpose of this article is to ensure ClickOnce deployment with Visual Studio without installing FrontPage Server Extension on the deployment server. It will prevent the user from facing the below expecting errors message:
So you need to deploy your application by using FTP instead of HTTP address in the Publish Folder Location.
Steps of Deployment
1. FTP Folder
The first thing is you need to create an FTP Folder with full rights (read, write, etc.) in your server. You can create it by using Windows buildin feature or by using third party FTP software. Your Windows application will be deployed here physically along with all files and executables. I created a Folder 'VisionWindows' in D drive 'D:\VisionWindows' and gave it full FTP Access via User Id and Password.
2. Creation of Virtual Directory in IIS
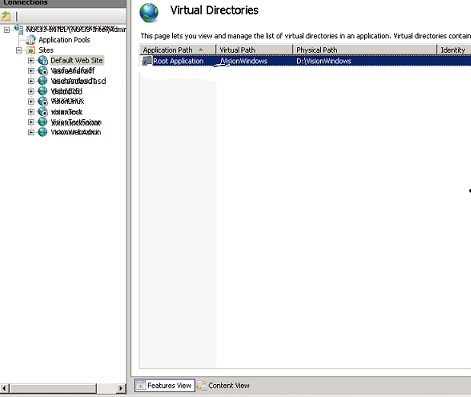
Then you need to create Virtual Directory in IIS Server. You have to create Virtual Directory in the Default or Home Website. I have created a Virtual Directory in Default Website and named it 'VisionWindows' and pointed it to Physical Path 'D:\VisionWindows' which is also my FTP folder. You can see it in the below image:

3. Give IIS Access to Folder
Most importantly, you need to give full right of IIS_User permission to Folder where you have pointed it to Virtual Directory or is going to deploy your application to that folder.
4. Steps of Publishing Application to Server
I have created a Windows Application by using C# and Visual Studio 2010. To deploy your application to Server by using Visual Studio 2010, please follow the steps given below:
4.1 Right click on Project Solution and get to 'Properties' and then click on 'Publish' button from the side menu in the bottom as mentioned in the below image:

From the Properties Window as mentioned in the above image, after clicking on Publish Button, Select "Application is available offline as well". The application files, pre-requisites, updates, etc. will be selected automatically by the application, you don't need to worry about these buttons. You can modify the publish version if you want.
So from here, you need to start with Publish Wizard. so click on Publish Wizard button.
4.2 After clicking on Publish Wizard, a new Windows will be opened, here you need to give path of your FTP folder directory as mentioned in the below image and then click on Next button.

4.3 Another new window will be opened and here you need to specify Application installation path. This is the path where your setup files will be deployed in the server and users will access the same to install application or access install.htm file for their installations. The below snap is about specifying the installation path:

4.3 After clicking on the next button as mentioned in 4.2, here you need to specify your application mode, whether your application can work in Online/Offline mode. I will recommend you select "Yes, this application is available online/offline." Then click on next button as mentioned in the below image:

4.4 The next windows will be about Ready to Publish, here you can see Paths and URLs you mentioned in the previous screen for review purposes. Then click on Finish button.
4.5 Here, your application will start building and after successful build, you will be asked to provide credentials for FTP folder as mentioned in the below image, simply provide the details and Select "Connect using passive mode" and click Ok button to Publish your application, for reference you can check the below image:

4.6 Your application will start publishing after the provision of credentials to FTP folder and you can check the status of publishing in Output windows of Visual Studio at the bottom. So after successful publish, you will get your application installation path like below:
http://yoursite.com/VisionWindows/install.htm
By entering the installation path in a browser, you need to click on Install button and here you will get your Application Setup. So download it and run the setup.
History
- First version created in June 2014
