Introduction
This article describes how OpenCV4Android is being used in one of my recently developed Android app to detect motion and face in the captured camera images.
Background
While developing my Android app, I have been researching for a simple way of performing image processing and motion detection. OpenCV, being an open source computer vision and machine learning software library, fits my need as it has been ported into Android environment.
Using the code
For development on Android using OpenCV4Android, there is a good introduction here. I will not go into details in this article but rather focus on how I use the library.
OpenCV4Android has an interface to the built-in phone camera to capture the camera frame for further processing. You can refer to the samples on how the code is being used.
In my app, I capture the input frame and then use the motion detection algorithms provided by the library.
@Override
public Mat onCameraFrame(CvCameraViewFrame inputFrame) {
if (isNotRealTimeProcessing()) {
try {
streamingLock.lock();
capturedFrame = inputFrame.rgba();
} finally {
streamingLock.unlock();
}
if (!frameProcessing && !isUploadInProgress) {
frameProcessing = true;
capturedFrame.copyTo(processingFrame);
fireProcessingAction(ProcessingAction.PROCESS_FRAME);
}
return capturedFrame;
} else {
return processFrame(inputFrame.rgba());
}
}
There are few ways to detect the motions, the simplest one is to convert the frame into gray scale and get the differences between the frames.
public final class BasicDetector extends BaseDetector implements IDetector {
private static final String TAG = AppConfig.LOG_TAG_APP + ":BasicDetector";
public static final int N = 4;
private Mat[] buf = null;
private int last = 0;
private List<matofpoint> contours = new ArrayList<matofpoint>();
private int threshold;
private Mat hierarchy = new Mat();
public BasicDetector(int threshold) {
this.threshold = threshold;
}
@Override
public Mat detect(Mat source) {
Size size = source.size();
int i, idx1 = last, idx2;
Mat silh;
if (buf == null || buf[0].width() != size.width || buf[0].height() != size.height) {
if (buf == null) {
buf = new Mat[N];
}
for (i = 0; i < N; i++) {
if (buf[i] != null) {
buf[i].release();
buf[i] = null;
}
buf[i] = new Mat(size, CvType.CV_8UC1);
buf[i] = Mat.zeros(size, CvType.CV_8UC1);
}
}
Imgproc.cvtColor(source, buf[last], Imgproc.COLOR_BGR2GRAY);
idx2 = (last + 1) % N;
last = idx2;
silh = buf[idx2];
Core.absdiff(buf[idx1], buf[idx2], silh);
Imgproc.threshold(silh, silh, threshold, 255, Imgproc.THRESH_BINARY);
contours.clear();
Imgproc.findContours(silh, contours, hierarchy, Imgproc.RETR_LIST, Imgproc.CHAIN_APPROX_SIMPLE);
Imgproc.drawContours(source, contours, -1, contourColor, contourThickness);
if (contours.size() > 0) {
targetDetected = true;
} else {
targetDetected = false;
}
return source;
}
}
</matofpoint></matofpoint>
Alternatively you can use background subtractor technique to detect the motion
public final class BackgroundSubtractorDetector extends BaseDetector implements IDetector {
private static final double LEARNING_RATE = 0.1 ;
private static final int MIXTURES = 4;
private static final int HISTORY = 3;
private static final double BACKGROUND_RATIO = 0.8;
private Mat buf = null;
private BackgroundSubtractorMOG bg;
private Mat fgMask = new Mat();
private List<matofpoint> contours = new ArrayList<matofpoint>();
private Mat hierarchy = new Mat();
public BackgroundSubtractorDetector() {
bg = new BackgroundSubtractorMOG(HISTORY, MIXTURES, BACKGROUND_RATIO);
}
public BackgroundSubtractorDetector(int backgroundRatio){
bg = new BackgroundSubtractorMOG(HISTORY, MIXTURES, (backgroundRatio / 100.0));
}
@Override
public Mat detect(Mat source) {
Size size = source.size();
if (buf == null || buf.width() != size.width || buf.height() != size.height) {
if (buf == null) {
buf = new Mat(size, CvType.CV_8UC1);
buf = Mat.zeros(size, CvType.CV_8UC1);
}
}
Imgproc.cvtColor(source, buf, Imgproc.COLOR_RGBA2RGB);
bg.apply(buf, fgMask, LEARNING_RATE);
contours.clear();
Imgproc.findContours(fgMask, contours, hierarchy, Imgproc.RETR_LIST, Imgproc.CHAIN_APPROX_SIMPLE);
Imgproc.drawContours(source, contours, -1, contourColor, contourThickness);
if (contours.size() > 0) {
targetDetected = true;
} else {
targetDetected = false;
}
return source;
}
}
</matofpoint></matofpoint>
You can find the source code for these algorithms here.
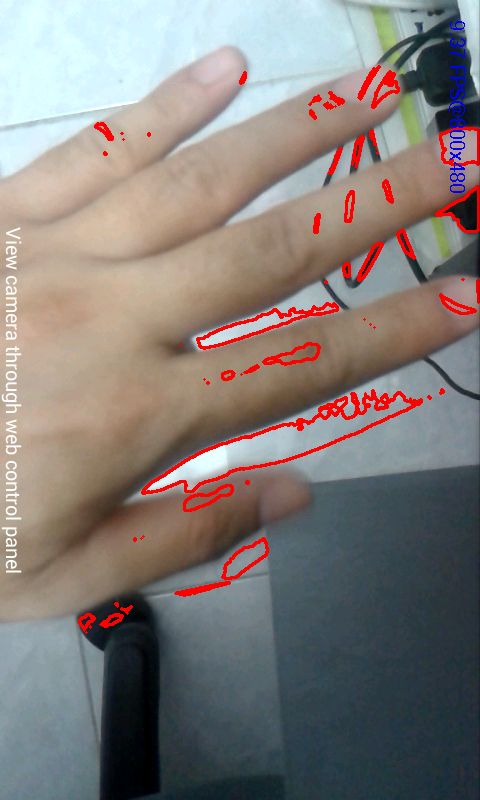
Few screenshorts using the above algorithms in my Android app.

Using background subtraction technique,

Points of Interest
Besides motion and face detection, there are definitely a lot more functions that OpenCV4Android can provide. In my next articles I will describe how I use this library for image processing in my Android app.
