
Introduction
In this article, I am showing the use of the AChartEngine charting library for Android to create charts for the Android platform. The AChartEngine library is an open source charting library for Android and supports all Android versions from 1.6 onwards. The project in this article is based on version 1.1.0 of the AChartEngine library.
Background
For demonstration of this article, I have created a project which plots sine, cosine and tangent charts. I have created the project in AIDE installed on Android X86 emulator running on VMWare. AIDE is an Android IDE for Android devices. AIDE completely runs on any Android based phone or tablet, as well as, it can be installed on Android emulator running on a virtual machine. Same method of development can be used to develop the project using the traditional eclipse based approach.
In order to start using AChartEngine, the main library (achartengine-1.1.0.jar) has to be copied to the lib folder of your Android project. AChartEngine supports three types of charts:
- XY Charts - These charts display data using an X-axis and a Y-axis, for e.g., line, area, bar, scatter.
- Round Charts - These are circular charts, for e.g., Pie, Doughnut, Dial.
- Combined Charts - These charts display a combination of several XY charts.
Using the Code
The main layout file has a linear layout with id as "@+id/chart".
Following is the layout XML file:
="1.0"="utf-8"
<LinearLayout xmlns:android="http://schemas.android.com/apk/res/android"
android:id="@+id/chart"
android:layout_width="fill_parent"
android:layout_height="fill_parent"
android:gravity="center"
android:orientation="vertical" >
</LinearLayout>
We need to override the onResume() method of the Activity class in the MainActivity class as follows:
@Override
protected void onResume()
{
super.onResume();
LinearLayout layout=(LinearLayout)findViewById(R.id.chart);
if(myChart==null)
{
initializeChart();
addData();
myChart=ChartFactory.getLineChartView(this, mySeries, myRenderer);
layout.addView(myChart);
}
else
{
myChart.repaint();
}
}
The above code references the chart layout and calls the user defined function initializeChart() to initalize the chart parameters and another user defined function addData() to add data to the chart. It then creates a line chart based on the specified data and adds the chart to the layout. If the chart is already created, it simply refreshes the chart by calling the repaint() method.
Following is the code of the initializeChart() method:
>private void initializeChart()
{
sineRenderer=new XYSeriesRenderer();
cosineRenderer=new XYSeriesRenderer();
tangentRenderer=new XYSeriesRenderer();
sineRenderer.setColor(Color.RED);
cosineRenderer.setColor(Color.GREEN);
tangentRenderer.setColor(Color.BLUE);
myRenderer=new XYMultipleSeriesRenderer();
myRenderer.addSeriesRenderer(sineRenderer);
myRenderer.addSeriesRenderer(cosineRenderer);
myRenderer.addSeriesRenderer(tangentRenderer);
myRenderer.setPanEnabled(false);
myRenderer.setYAxisMax(1);
myRenderer.setYAxisMin(-1);
sineSeries=new XYSeries("Sine");
cosineSeries=new XYSeries("Cosine");
tangentSeries=new XYSeries("Tangent");
mySeries=new XYMultipleSeriesDataset();
mySeries.addSeries(sineSeries);
mySeries.addSeries(cosineSeries);
mySeries.addSeries(tangentSeries);
}
The above code creates three XYSeriesRenderer objects, sineRenderer, cosineRenderer and tangentRenderer and initializes them with red, green and blue colors respectively. It then adds the three renderers to an XYMultipleSeries renderer object called myRenderer. Panning is disabled by calling the setPanEnabled(false) method. The range for the Y-Axis is set from -1 to 1 by using the setYAxisMin() and setYAxisMax() methods. Three XYSeries objects, sineSeries, cosineSeries and tangentSeries, are created and added to an XYMultipleSeriesDataset object called mySeries.
Following is the code of the addData() method:
private void addData()
{
for(int angle=5;angle<=1440;angle+=5)
{
sineSeries.add(angle, Math.sin(angle*(Math.PI/180)));
cosineSeries.add(angle, Math.cos(angle*(Math.PI/180)));
tangentSeries.add(angle, Math.tan(angle*(Math.PI/180)));
}
}
The above code adds sine, cosine and tangent data to the respective XYSeries objects for angles ranging from 5 to 1440. The parameters to the trigonometric functions are converted from degrees to radians by using the formula "angle * (? / 180)".
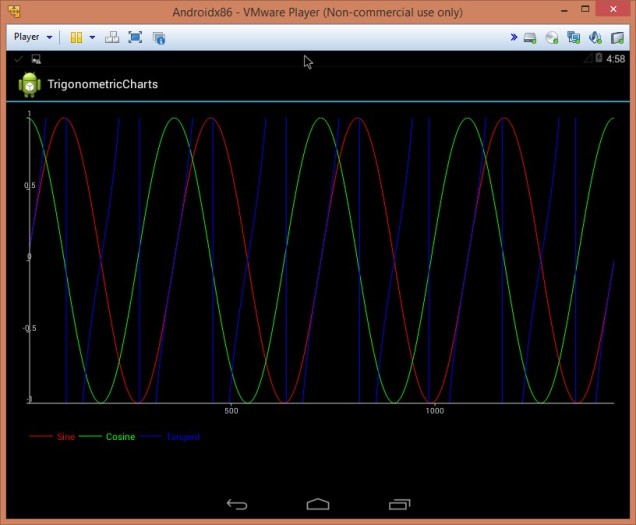
Running the program creates a line chart as follows:

Changing the getLineChartView() method to getBarChartView() in this way myChart=ChartFactory.getBarChartView(this, mySeries, myRenderer, BarChart.Type.Default), produces a bar chart as follows:

Points of Interest
The AChartEngine is a very useful charting library which can be easily used by amateurs and skilled professionals alike to create elegant charts for the Android platform.
