Introduction
This article is part of the Android Tutorial Contest, Round 1 - Article 3
Even though we will just develop a "Hello World" - Android application, you will learn how to adjust the build-process to have more than just 1 file as an output of your build process. This is extremely handy if you have multiple variations (or build - "flavors") of your app.
Background
Most people get in touch with Android when they buy a new phone or tablet. Usually it's a "Google Android" device. But around two years ago, the first non-google commercial fork of Android was released - The Amazon FireOS. Developing for Android now brings a little bit more complexity, at least if you want to take this step. But it might have benefits as well: While an app can be unsuccessful on the "Android Play Store" (because there are tons of similar apps) it can be successful on other markets.
The first FireOS devices were based on Android 2.2.3. The look and feel was completely different and a lot of pre-loaded apps have been replaced. No Google Maps, no Gmail client, no Play Store. Amazon put its own services on the devices: Amazon App Store, Maps powered by HERE maps (also known as Nokia maps), and a lot more.
BlackBerry on the other hand was still using their own operating system, but they combined it with Android. Next to native developed apps (written in C++ / QML), the device was able to run Android apps as well.
Another big player to mention is Nokia. With Nokia X, Nokia was releasing a phone based on Android as well.
Below: "Nokia Android", BlackBerry 10 with Android Runtime, Kindle Fire with FireOS and Google Android

We can find a lot of other examples in other countries like russia or china.
Unfortunately, some features are incompatible between these Android Platforms, even though all the mentioned companies claimed that 75% of all apps are 100% compatible.
Some incompatible features are:
- Maps
- Push-Notifications
- In-App Purchase.
Luckily, some of those platforms offer own solutions like HERE maps for Nokia / Kindle Fire. Others, like BlackBerry, don’t offer any map solution for the Android apps.
While (appreciated) 99% of all tutorials on the internet explain the "Google-Android only" - way of setting up a project and running a Hello World App, this tutorial will highlight build features called “build types” and ”build flavors”. To follow this tutorial, we need to understand some basic concepts.
The Basics of Android Development
APK
The APK-file is a container, holding all parts of the app together. This file is the output from the development process.
You can open the APK file using any "zip"-tool and have a look at the content. You will find the app icon, the manifest, the certificate of the application, libs, other resources like icons / images / raw-files (txt, db, png, ...) and the classes.dex file. The last one actually contains all the code, compiled into dex format. The APK is the file you have to upload to the store or send to your users to make your app available to the public.
Manifest
Every app must have a file called AndroidManifest.xml in the root directory. This file describes all parts of your application. During the installation process of the app, the operating system will only register components which are listed in this file.
You have to define the name of your app in this file, as well as the icon of your app and the package name: Your unique identifier in the world of apps. But also the components of your apps like the Activities, Services and Providers have to be listed here.
You need to specify the permissions here as well. If your app needs access to the internet, you have to provide this information here!
Example:
<?xml version="1.0" encoding="utf-8"?>
<manifest xmlns:android="http://schemas.android.com/apk/res/android"
    package="com.example.codeproject" >

    <application
        android:allowBackup="true"
        android:icon="@drawable/ic_launcher"
        android:label="@string/app_name"
        android:theme="@style/AppTheme" >
        <activity
            android:name=".MyActivity"
            android:label="@string/app_name" >
            <intent-filter>
                <action android:name="android.intent.action.MAIN" />

                <category android:name="android.intent.category.LAUNCHER" />
            </intent-filter>
        </activity>
    </application>

</manifest>
- The first important part occurs in line 3, package="com.example.codeproject". This is our unique identifier - the package name. Every app needs to have a unique package name. Usually you should take a combination of your company domain and the product you are developing.
Example for Codeproject could be: com.codeproject.android - Everything regarding your application has to be defined in between the <application> - tag
- icon, app name, theme, ... all properties of the application - tag.
- All your Activities, Services, Providers, Permissions and some others like meta-data have to be inside the application -tag
- Last but not least there is an <activity> - tag in line 10. Every Activity needs to be defined in the AndroidManifest. If you try to start an Activity which is not defined here: - an Exception is thrown.
- The name of the Activity need to be unique within the application and is defined in line 11 in this example. The name is MyActivity and the dot in front of the name just tells the build script to look for the file in the root of the package. Could be exchanged with com.example.codeproject.MyActivity
- In line 13 the intent filter is defined for this Activity. We will not go into details on this topic: The following two lines are telling the operating system mainly:
- The category for this Activity is LAUNCHER and the action for this Activity is MAIN. Together, this will make the system to place an icon on the launcher (= Home Screen) and this Activity is the main entry point for this icon.
Activity
An Activity represents the "presentation layer" of an Android application. Activities are using views and fragments to create the user interface and to interact with the user. Android apps can have multiple Activities, but they can also have no Activities at all. Background-services or live-wallpapers are two examples which can exist without an own "presentation layer". But Activities can be actually even more than that. Each Activity can be considered as own "App", not being connected to other Activities of the actual app which was installed.
One App can have two Activities and two icons on the home screen. Each icon will open one Activity. For the normal user it seems like he has two Apps, however, both are gone if the user uninstalls one of them. The connection between everything is the Application class. Each App has one Application class.
You don't need so specify one by yourself, but you can. Add this one line to our application-tag in the AndroidManifest.xml
<application
     android:name=".MainApplication"
>
After adding this one line to the Manifest, the IDE (or actually the build system behind the IDE) will now expect to have a MainApplication class inside the root directory which is extending from android.app.Application. Every part of your app (Activity / Fragment / Service) can access this one unique Application class. Your Application class is a singleton, so all parts have access to the same Application instance.
Fragment
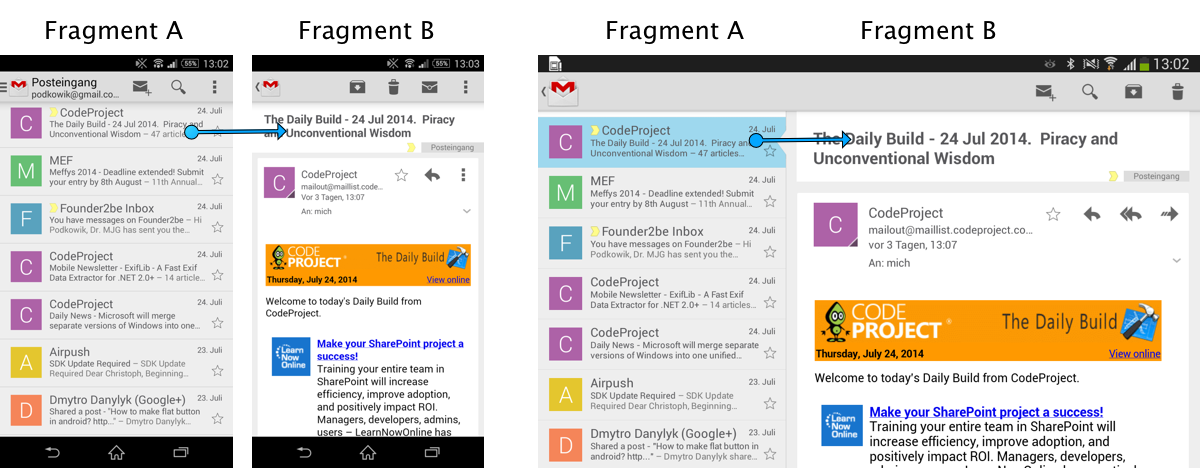
A Fragment is usually a part of the user interface which can be placed inside an Activity. There is also the possibility to place multiple Fragments inside one Activity. Imagine a phone screen showing you a list of content. Pressing one list-entry would update the view and show details to this one entry. Imagine the same content on a tablet. You have much more space and you can place both Fragments next to each other.
Gradle
Gradle is used as the new Android Build System. It will replace ant, which was used in the past to build the app. New projects generated in the Eclipse IDE are still using ant. New projects generated in Android Studio / IntelliJ are using gradle. You should avoid using ant for new projects - one could say: Ant for Android is deprecated. The first libraries and SDK are already available only in gradle format. Ant will “not understand” the structure of these SDK / library. As an example: the newest Facebook SDK for Android is available for gradle - type builds only.
Developers are usually not used to mess around with build scripts at all. In all of the IDEs there is this (often green) magic "Play"-button which compiles and runs everything for the developer.
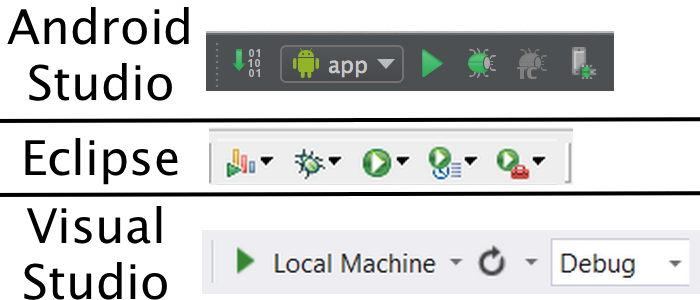
However, this "Play"-button always triggers some sort of build script in the background - no matter which IDE.
Build script are mainly used to automate the build process and / or extend it. These scripts are configured to take the code and the resources - compile the code, put everything into a container and provide a "ready to ship" - APK, EXE or whatever your script is actually configured to have as an output. In Android Studio you have full control of the build script, also called "the gradle file(s)".
Example:
apply plugin: 'com.android.application'

android {
    compileSdkVersion 19
    buildToolsVersion "19.1.0"

    defaultConfig {
        applicationId "com.example.codeproject"
        minSdkVersion 14
        targetSdkVersion 19
        versionCode 1
        versionName "1.0"
    }
    buildTypes {
        release {
            runProguard false
            proguardFiles getDefaultProguardFile('proguard-android.txt'), 'proguard-rules.pro'
        }
    }
}

dependencies {
    compile fileTree(dir: 'libs', include: ['*.jar'])
}
- apply plugin will, you guessed it: apply the Android plugin. The plugin makes sure the output will be an APK. It verifies that your App has a AndroidManifest.xml. It compiles your java code into dex-format … all the magic you don't want to mess around (and shouldn't)!
- android { … } is used for your custom configuration of the app. The package name, the build tools you want to use, which Android API are you going to target, which version number should the build have …
- dependencies { ... } is used to put all dependencies together. The default value makes sure all libraries (only *.jar files) are included and compiled if necessary.
The $PATH variable and command line tools
This tutorial will use the terminal quite a lot. Building the App, setting up emulators and installing the app, everything can be done in the terminal. To make it more comfortable, we need to add some folders to the system $PATH variable. This makes some commands available everywhere (You don't need to be in the folder of the executable to use it).
We should add the following folders to the $PATH
- .../YOUR-ANDROID-SDK/platform-tools
- The tool adb can be found in this folder. The Android Device Bridge (adb) is responsible for all connections from and to a device / emulator. We are going to use adb to install our app
- .../YOUR-ANDROID-SDK/tools
- The tools android and emulator are located in this folder.
- android will be used to create an emulator-image
- emulator will run the emulator-image
- .../YOUR-JAVA.SDK
- The tools keytool and jarsigner are located in this folder.
- keytool will be used to create a certificate. We need one to sign our app
- jarsigner will use the certificate to sign our app
Project Setup
To get started, we need to create an empty Android Project using Android Studio:
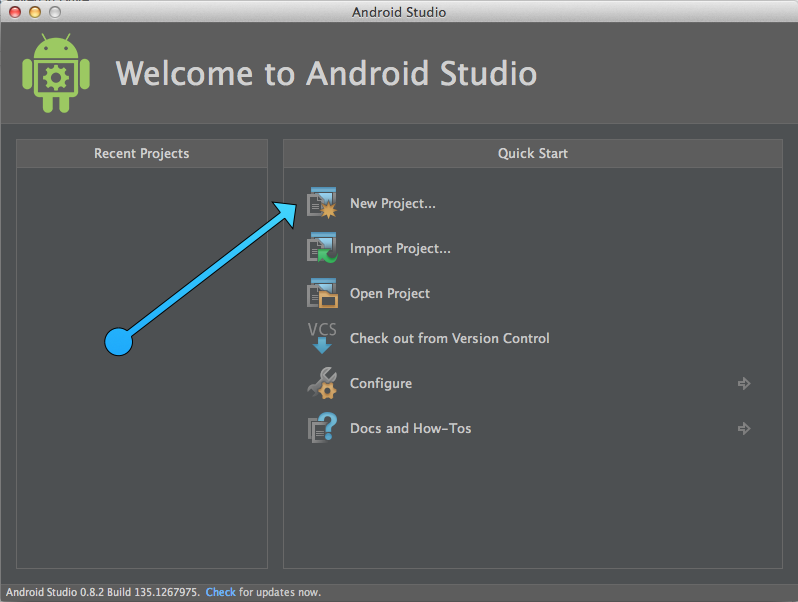
- Start Android Studio.

- Click on "New Project" on the right side of the window.
- Enter a project name (e.g.: MultiFlavors) and pick a unique package name (e.g. com.example.codeproject)
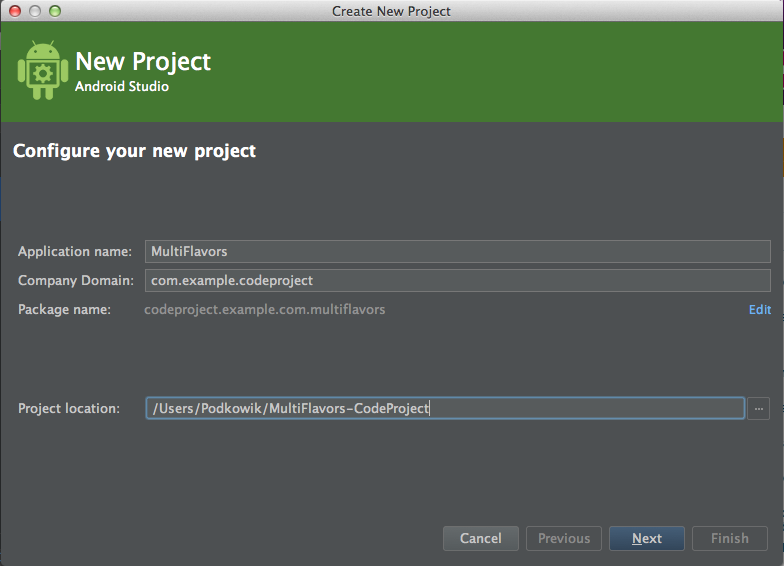
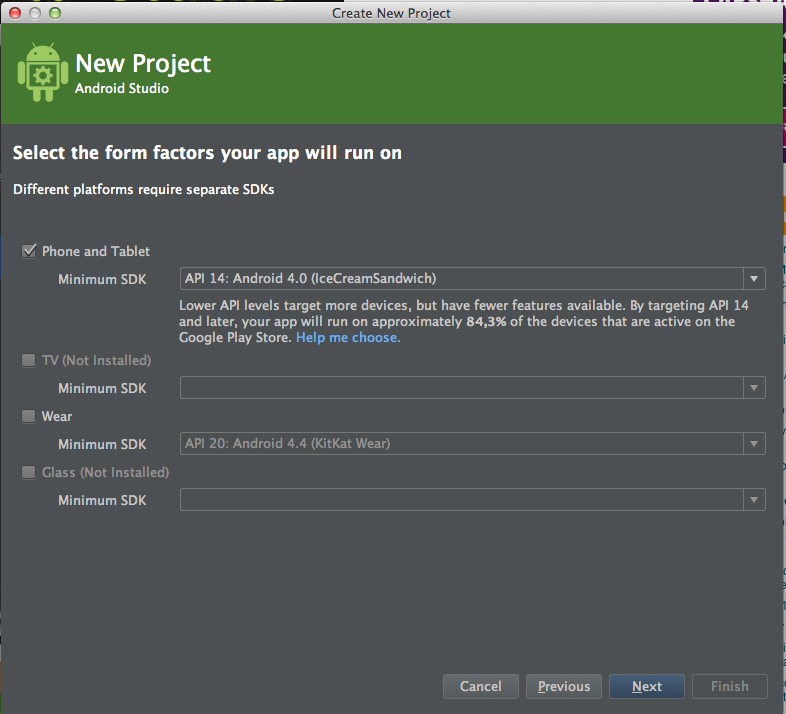
- Keep all of the default Settings. As the "Minimum SDK" i suggest using API 14.
- Select the "Blank Activity" template.
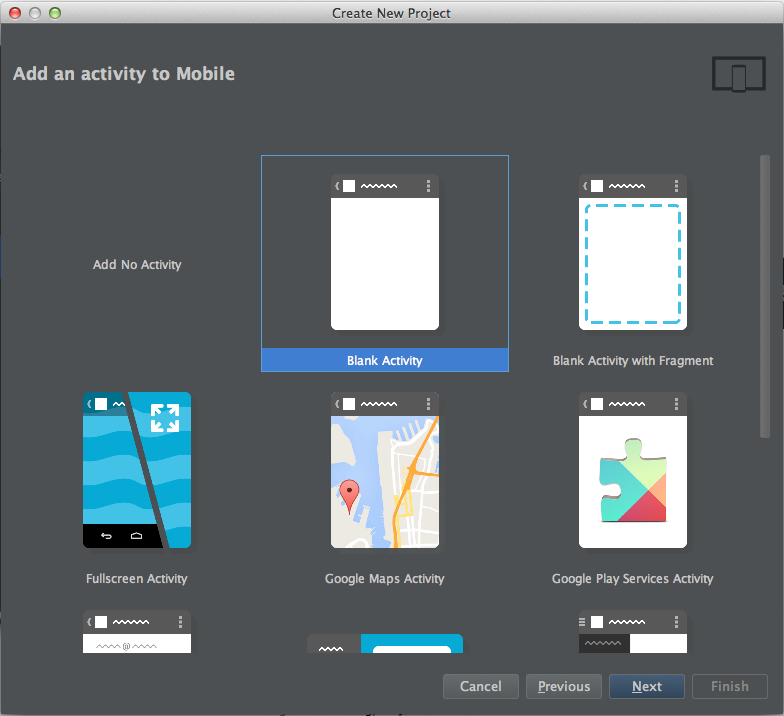
- Rename your Activity to MainActivity. This will be our entry point in the App.
Now we need to switch to the terminal and start the build process. Select the terminal windows in Android Studio and type
./gradlew assemble
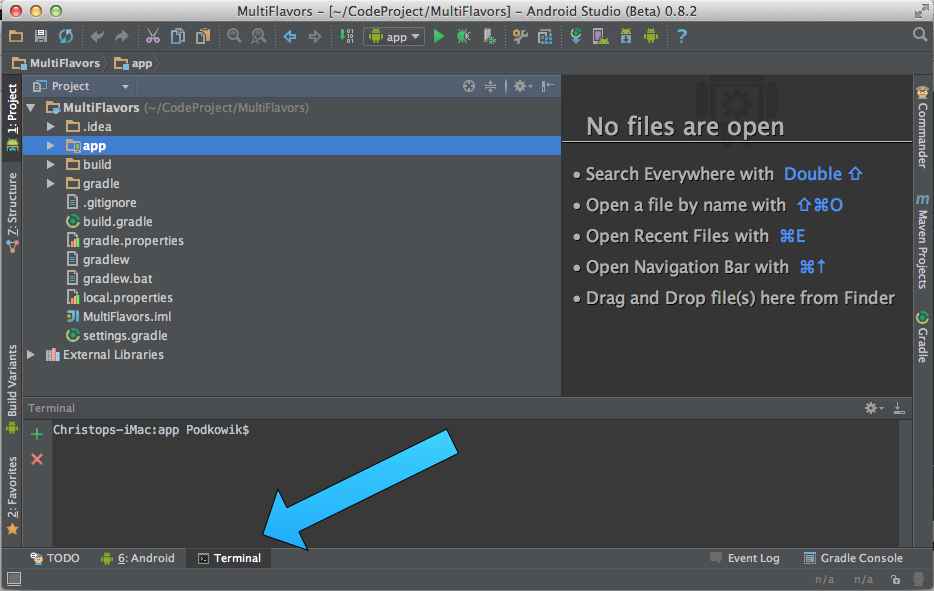
You should end up with a lot of output in the terminal window. The most important is
BUILD SUCCESSFUL
As the result of the build we will find some files in the /app/builds/outputs/apk/ folder
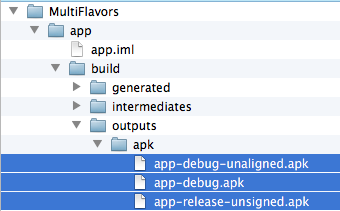
- The app-debug.apk file
- The app-release-unsigned.apk file
- The app-debug-unaligned.apk
These "unaligned" files are just the uncompressed versions of the debug version. Not needed, at least not in this tutorial. We could already install the debug version on a device / emulator. To install the release version, we have to sign it first.
But we can switch between these two build types in the IDE as well. Select the "Build Variants"- Tab in the left bottom corner of Android Studio (left image). Switch between the types by selecting "debug" or "release" next to "app" (right image). But remember: You cannot install the release version right away from the IDE. The release version is not signed and it's impossible to install unsigned APKs on devices / emulators. The debug version is signed with a debug key.


Signing Apps
All Android Apps are digitally signed with a certificate. You have to use the tool jarsigner, which is part of the Java SDK. Type this line into your terminal
keytool -genkey -v -keystore /Users/christoph.podkowik/my-new-release-key.keystore -alias chris -keyalg RSA -keysize 2048 -validity 10000
Make sure to replace:
- /Users/christoph.podkowik/my-new-release-key.keystore
- Replace this with an existing path on your machine. This is where the certificate will be created.
- -alias chris
- Replace this with an alias for you / your company (e.g. Codeproject)
A wizard will ask you some questions, like a password, your name, ...
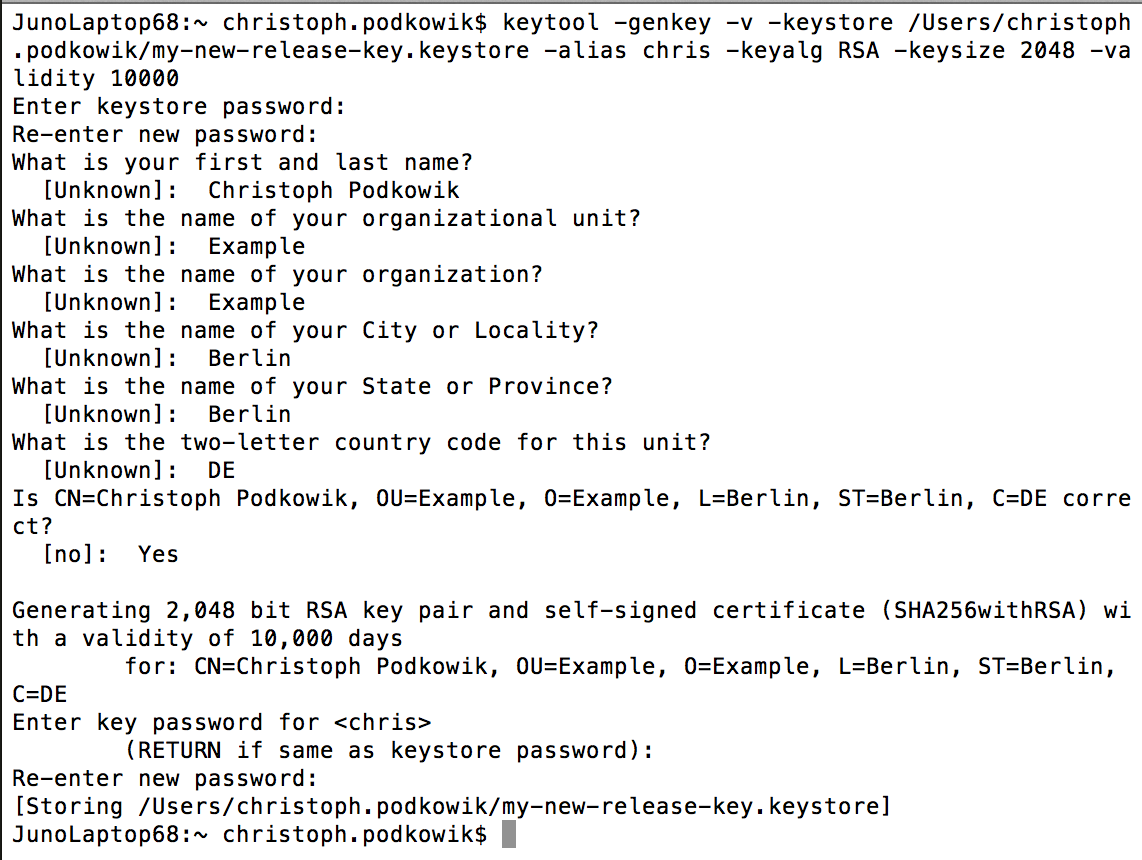
You can now find your certificate at the location you've specified.
Signing Apps can be done in multiple ways:
- command line / terminal
- part of the build progress / gradle
- in the IDE
I would avoid the second one. You need your password to sign the app. And you should commit your build script to git or any other source code control system: The combination of both is not the best idea.
The easies way to do this is in the terminal. You can use this command to do it
jarsigner -verbose -keystore /Users/christoph.podkowik/my-new-release-key.keystore /Users/christoph.podkowik/app-release.apk chris -tsa http:
Make sure to replace:
- /Users/christoph.podkowik/my-new-release-key.keystore
- with your own certificate
- /Users/christoph.podkowik/app-release.apk
- with the location of your apk which should be signed
- chris
After entering your password, the file should be signed.


Deploying an application
We have two possibilities to test our app
- Setting up an emulator
- Connecting a real device
We can do the first one completely from command line. Most people are using the wizard from the AVD-Manager, but it's much faster and easier to do it in the terminal. It's also useful to know these commands in case we want to have automated tests running on emulators on remote machines / in the cloud.
The command
android list targets
will show you a list of available images installed on the current PC / Mac. These images have been installed during the project setup of Android Studio.
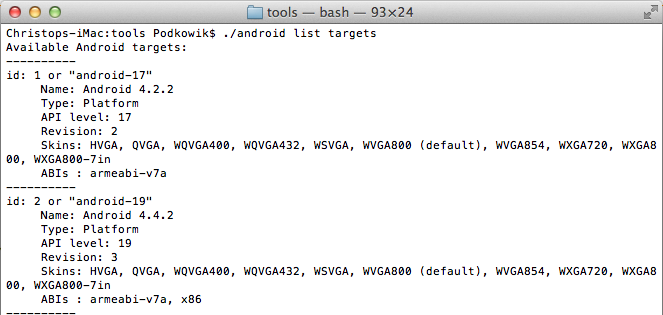
The first one already fits into our requirements. To install the emulator, we just need to type
android create avd -n Emulator_4_2_2 -t 1
We just use two parameters
- -n for the name of the emulator
- -t for the ID of the installed images (we decided to use id:1)
The emulator is ready after just a few seconds.

To start the emulator, just type:
emulator -avd Emulator_4_2_2
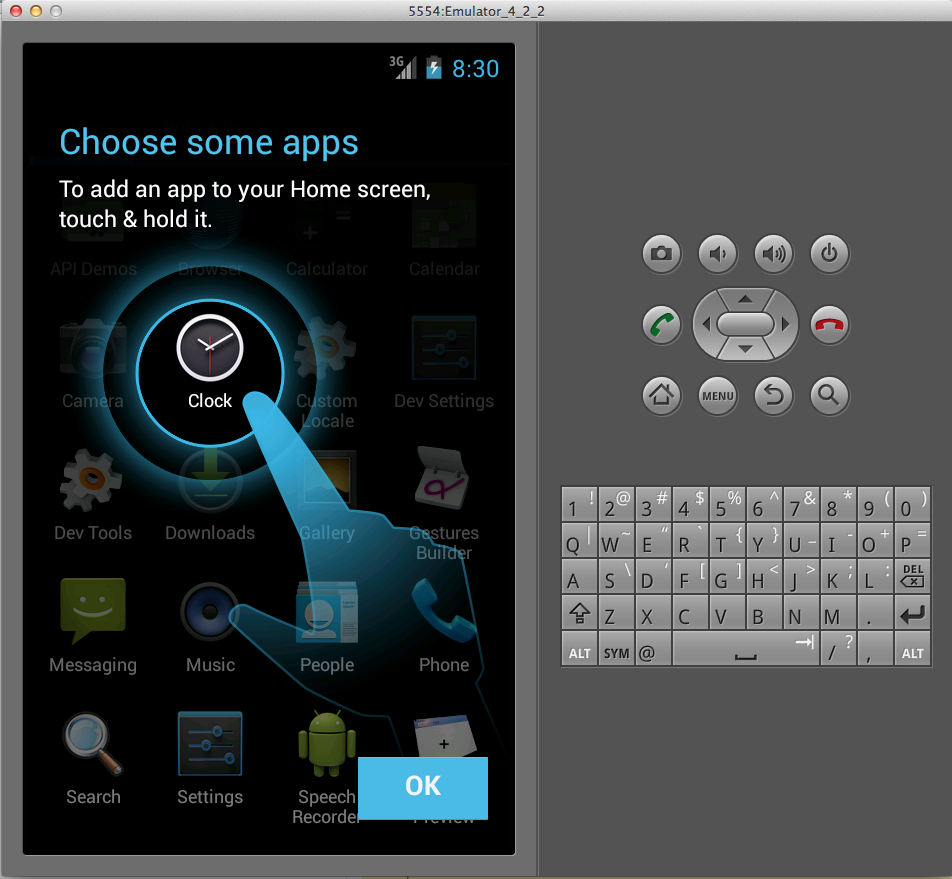
Now we just need to install our app on the device.
adb install /Users/podkowik/app-release.apk
This command will install the signed app.

We can now start the app by clicking on that green Android icon.
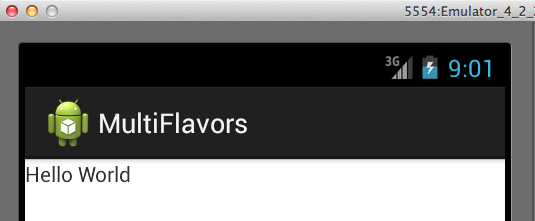
To test our app on a real device, we need to enable the developer options an first. This option is hidden since Android 4.2. Too many people were using them and ended up in situations they were not able to solve by themself.
To enable them, simply follow these steps
- Go to Settings → System → About Device / Phone / Tablet
- Scroll down to Build Number
- Tap it repeatedly.
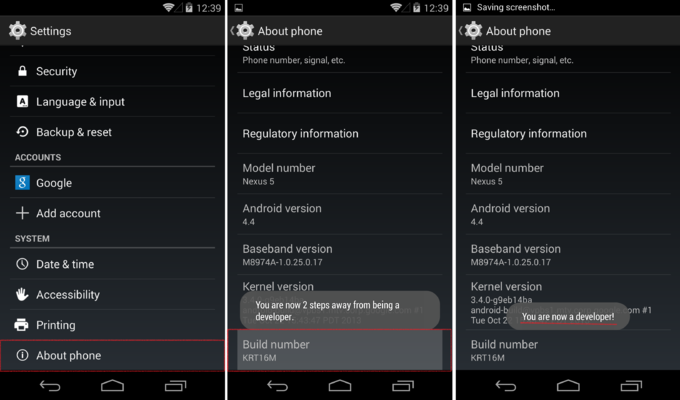
To finaly enable debugging, follow these steps
- Go to Settings → System → Developer options
- Now enable USB Debugging
- Allow USB debugging for the current device
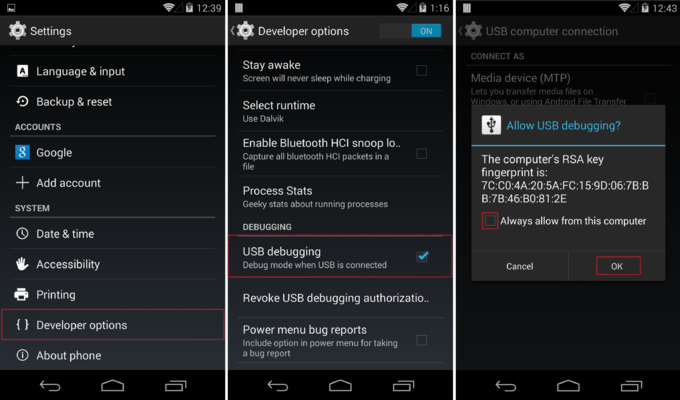
The same command which was used to install the app on the emulator, can be used to install the app on a real device.
adb install /Users/podkowik/app-release.apk
If you have more devices connected or the emulator is still running in the background, you can specify which device should be used. This command will list all available devices:
adb devices
With this informarion, you can use the following command to install the app. Simply exchange emulator-5554 with one of the listed devices
adb -s emulator-5554 install path/to/your/app.apk
This is the point where most of the available "Hello World" tutorials end. But in this tutorial, this is the point where the fun starts!
Flavored resources
In this section we will finally create our build - flavors.
Lets open the build.gradle file. It is located inside the app folder.
We will add the flavors right below the “buildTypes” entry.
apply plugin: 'com.android.application'

android {
    compileSdkVersion 19
    buildToolsVersion "19.1.0"

    defaultConfig {
        applicationId "com.example.codeproject"
        minSdkVersion 14
        targetSdkVersion 19
        versionCode 1
        versionName "1.0"
    }
    buildTypes {
        release {
            runProguard false
            proguardFiles getDefaultProguardFile('proguard-android.txt'), 'proguard-rules.pro'
        }
    }
    productFlavors {
         google { }
         nokia { }
         kindle { }
         blackberry { }
    }
}

dependencies {
    compile fileTree(dir: 'libs', include: ['*.jar'])
}
We should "sync" the project with the changes we actually did. Press on this tiny little button in the toolbar of Android Studio.

It is suggested to perform this step every time we edit any of the .gradle files.
The IDE should have recognizes our changes and added the flavors. If we select the "Build Variants"- Tab in the left bottom corner of Android Studio again (“Build Variants”) we should see the result of this change:
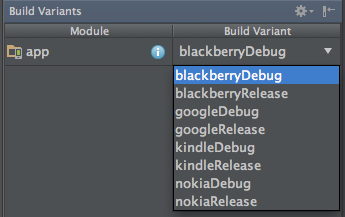
Let's run our build script once again and check the generated file.
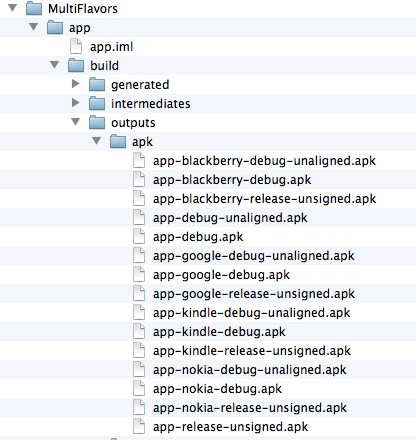
The script generated a lot of files. But all of them are doing the same. Showing "Hello World"
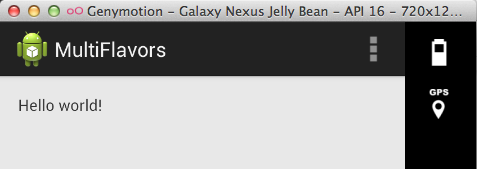
To understand the basics of manipulating flavors we are going to change the text, based on which apk is used.
- First, we have to create folders with the exact names we used in our gradle script.
- Second, we have to create a “res” folder in each of them!
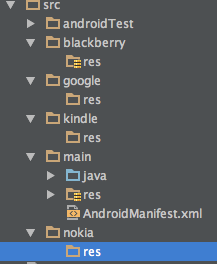
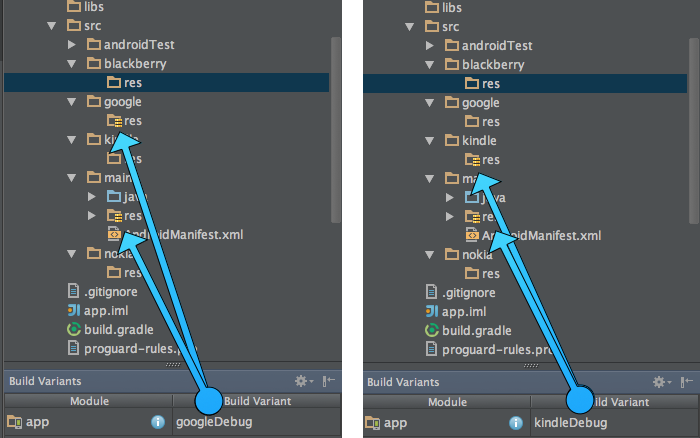
Android Studio will give some of them a slightly different icon. This is how the IDE visualises the “current active resource folder”. If you select another Build Variant, the icon will change as well. The res folder inside the main - folder will always stay active.
Now we need to do two more steps
- create a “values” folder in each of the “res” folders
- create a strings.xml file in each of them
Each of the strings.xml files will now get a unique text. This is how the kindlefire strings.xml file looks like
="1.0"="utf-8"
<resources>
<string name="hello_world">Hello kindlefire world!</string>
</resources>
while the strings.xml file inside the google folder will look like this
="1.0"="utf-8"
<resources>
<string name="hello_world">Hello google world!</string>
</resources>
During the initial setup of our app, a string.xml file was already created inside the main - res folder
<?xml version="1.0" encoding="utf-8"?>
<resources>
   <string name="app_name">MultiFlavors</string>
   <string name="hello_world">Hello world!</string>
   <string name="action_settings">Settings</string>
</resources>
We can find the <string name="hello_world"> here as well. As long as we use the same name for our string inside main and our flavors, the build script will replace them. The priority is always: flavor will overwrite the main resource!
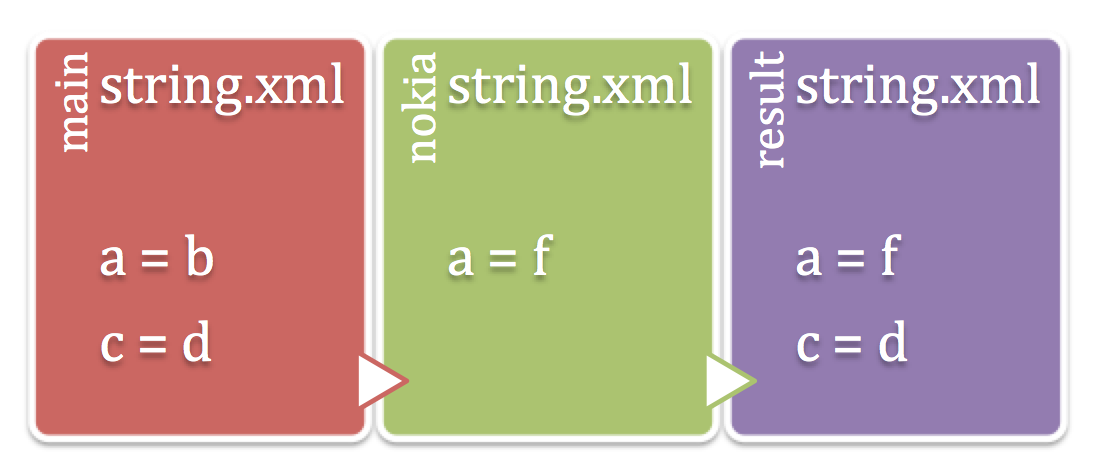
This works for all resource. You can overwrite
- strings
- values
- icons
- images
- colors
- layouts
- the AndroidManifest file
- assets
- ...
Code and libraries are handled a little bit different, but we will handle this later. First, lets install our APKs and compare the result.

vs

Even though we reached our goal already, we have to handle two more topics to make this tutorial complete
- flavored code
- flavored libraries
Flavored Code
We are going to have a few lines of (real) code now. Before we can start, we have to create some folders and our class files! Let's create a “src” folder in each of the flavors. Inside each of them, we have to add our package name and - this is good practice - a fragments folder! Inside the fragments folder we can finally create a MapFragment.java class.(Remember to do it in each of the flavors)
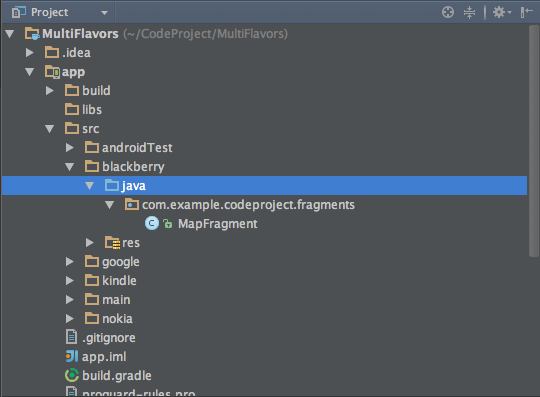
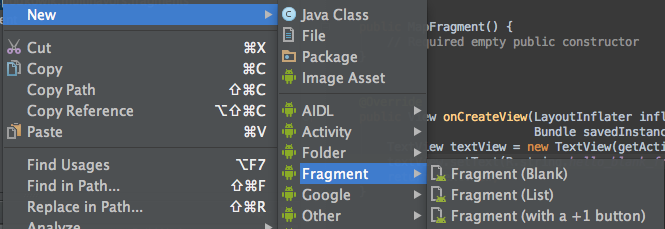
Use the wizard to create the MapFragment. Right-Click the fragments folder and select New-> Fragment -> Fragment (Blank). This will generate some boilerplate code.
To identify the difference, we are going to create some more strings in each of the flavors.
Put this line into each of the string.xml (replace 'google' by the flavours name).
<string name="hello_blank_fragment">Hello google fragment</string>
Now, open up the activity_main.xml file, located inside main/res/layouts and exchange the layout to this
<FrameLayout xmlns:android="http://schemas.android.com/apk/res/android"
    xmlns:tools="http://schemas.android.com/tools"
    android:id="@+id/container"
    android:layout_width="match_parent"
    android:layout_height="match_parent"
    tools:context=".MainActivity"
    tools:ignore="MergeRootFrame" />
This layout is now just an empty container!
Switch to the MainActivity and add this line of code into the onCreate method:
if (savedInstanceState == null)
{
    getFragmentManager().beginTransaction()
        .add(R.id.container, new MapFragment())
        .commit();
}
Everytime we start the app, this code will add the MapFragment into our container!
If we execute the build script once again ("./gradlew assemble”) and install our apks, we end up with this
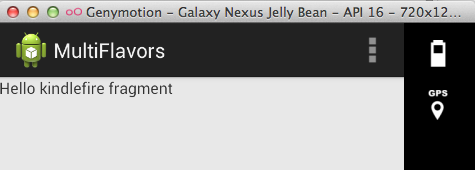
+
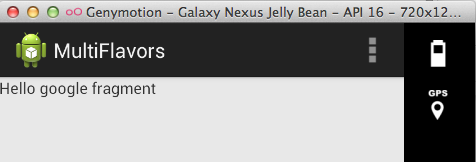
It mainly does the same thing we already did in the flavored resource section, but this time not because the resources are overwritten. This time the code between these flavors is completely different.

Flavored libraries
In some situations you might need different libraries in your flavors. The Maps-SDK from Nokia is provided as a jar file, so you need to add it to your project. But this SDK cannot be used in your google version. To keep the file size of your APK as small as possible, you should avoid putting it into the main project. Create a folder called "libs" in the target you want to add the library to. Put the map.jar file into this folder. Now open the build.gradle file and add this line to the dependencies
dependencies {
    compile fileTree(dir: 'libs', include: ['*.jar'])
    nokiaCompile files('src/nokia/libs/map.jar')
}
Once we hit the "Sync Project" button, we are able to use the map sdk inside our nokia flavor (and only here!)
Points of Interest
This article teaches build automation on a "Hello World" Example. Build automation is one of the most important steps into professional development (Next to the development itself of course). Android Studio and gradle are offering tons of possibilities to automate nearly everything and make the project structure and the code itself much more clear.
This article just describes one possible use case for flavors. Another use case would be Free, Pro and InApp-Purchase flavors.
History
27.07.2014 Initial version
31.07.2014 Fixed Image Urls
