Azure is Microsoft’s application platform for the cloud. We can use Azure to build web applications, store data in Azure data centers, create virtual machines for development and test or run massively scalable applications with lots and lots of users. You can get a quick introduction over here and here. In this post, I will be explaining how we can create an Azure service a.k.a Worker role.
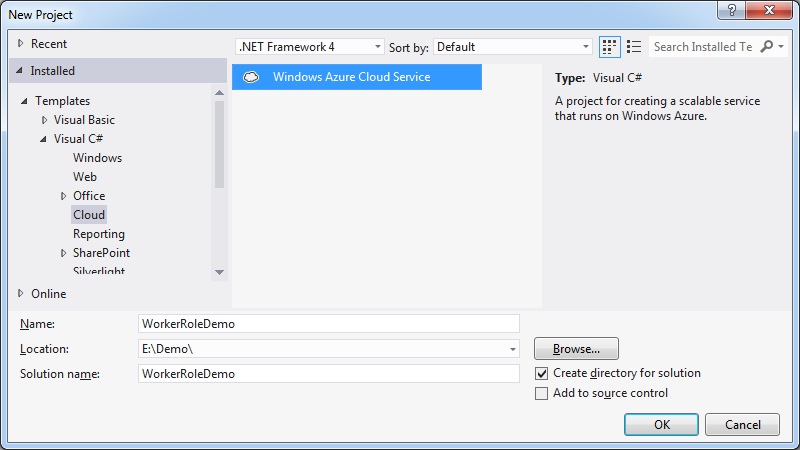
I will be using VS 2012 and Azure .NET SDK 2.4. If you haven’t already, you will need to install the Azure SDK, from here. Once installed, create a brand new project in Visual Studio.

Next, pick up the cloud service which you want. In this case, we will be selecting the Worker Role from the left selection panel and renaming it to MyWorkerRole.

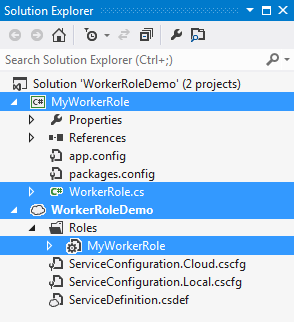
On pressing Ok, Visual Studio adds the cloud project and a class library project to the solution.

There are few things we need to observe over here. Visual Studio follows a convention and adds a worker role, under cloud project Roles directory named same as class library project, which is MyWorkerRole. The MyWorkerRole class library project contains a file named as WorkerRole.cs.
using System.Diagnostics;
using System.Net;
using System.Threading;
using System.Threading.Tasks;
using Microsoft.WindowsAzure.ServiceRuntime;
namespace MyWorkerRole
{
public class WorkerRole : RoleEntryPoint
{
private readonly CancellationTokenSource cancellationTokenSource = new CancellationTokenSource();
private readonly ManualResetEvent runCompleteEvent = new ManualResetEvent(false);
public override void Run()
{
Trace.TraceInformation("MyWorkerRole is running");
try
{
this.RunAsync(this.cancellationTokenSource.Token).Wait();
}
finally
{
this.runCompleteEvent.Set();
}
}
public override bool OnStart()
{
ServicePointManager.DefaultConnectionLimit = 12;
bool result = base.OnStart();
Trace.TraceInformation("MyWorkerRole has been started");
return result;
}
public override void OnStop()
{
Trace.TraceInformation("MyWorkerRole is stopping");
this.cancellationTokenSource.Cancel();
this.runCompleteEvent.WaitOne();
base.OnStop();
Trace.TraceInformation("MyWorkerRole has stopped");
}
private Task RunAsync(CancellationToken cancellationToken)
{
return Task.Factory.StartNew(() =>
{
while (!cancellationToken.IsCancellationRequested)
{
Trace.TraceInformation("Working");
Thread.Sleep(1000);
}
});
}
}
}
The WorkerRole class derives from RoleEntryPoint and acts as the startup point. All Worker roles must extend the RoleEntryPoint class to add functionality to the role instances. It provides methods to run code when a role instance is initialized, run, and stopped. When a role instance is started, the Azure Agent will search within role’s assembly, finding for a class that inherits from RoleEntryPoint, then it will call that class’s OnStart() method.
OnStart() returns a boolean value and before control returns from this method. This allows you to run any initialization tasks, and while you’re setting it up, the status of the role instance is set to busy. If the OnStart() method returns false, the role instance is immediately stopped, otherwise Windows Azure starts the role by calling the Run() method.
The Run() method makes a call to RunAsync() method which is responsible for executing our task. It contains a while loop with a condition checking if the cancel signal has been raised. Hence, it goes into an infinite loop, which keeps it running as a background service.
OnStop() method provides us 5 minutes to clean up and persist any state. If we are unable to finish our clean up within 5 minutes, then, it will terminate and we will lose anything we wanted to do.
The use of CancellationToken helps us in maintaining consistency. Think of this scenario: we have not used the CancellationToken and instead of that, just have while(true) this does make it an infinite loop. But what will happen if Azure is to recycle the instance and the control is in the middle of executing our task. The execution will be forced to shutdown in the middle resulting an in-consistent state. Thus while (!cancellationToken.IsCancellationRequested) is the best way to do it. And when the OnStop() method is called, it will raise the cancellation signal and will wait not more than 5 minutes waiting for task to complete execution.
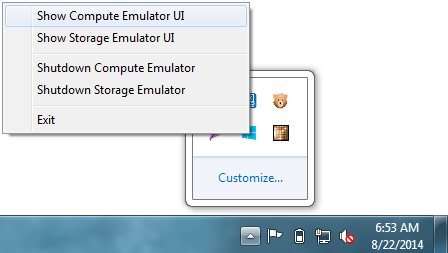
Let's debug the application making the cloud project as the start up project. On hitting F5, the Windows Azure Emulator is started in your system tray.

In order to see what's going on, right click and select ‘Show Compute Emulator UI’.

A window comes up showing our service running.

The post Creating an Azure Cloud Service appeared first on Its me !.
CodeProject
