Introduction
I previously wrote about a way of tracking balances addresses in the blockchain in the previous article with the help of what I called Scan State.
Scan State is a flexible and scalable idea, but hard to use. And you need to know exactly what address you want to track beforehand.
That’s why I decided to create my own bitcoin indexer, based on NBitcoin. It will permit you to ask for blocks, transaction, and address balances with a simple API.
Query throughput are highly partitioned, this make it potentially match the throughput measured by the benchmark of Troy Hunt. You can find the official numbers on MSDN.
In other words: 2000 requests per seconds at worst (limited by partition throughput), 20 000 requests per seconds at best (limited by storage account throughput). The design I made is highly partitioned, so you can count on the 20 000 requests per seconds for most of the scenarios.
The design decision I took maximizes scalability, idempotence and reliability, not efficiency. In other words, don’t be afraid to index the blockchain out of order, on several machines at the same time, reindex something already indexed, and restart a crashing machine.
For the reliability aspect, you can run multiple machines with the indexer running on the same tables, thanks to idempotence, as long as at least one machine is working, blockchain will keep being indexed.
But be careful: due to the high latency between Azure and your home (30ms on a typical connection), the indexer should run in a VM hosted in Azure directly (that makes latency drop at 2 to 4ms). There is no such requirement for requesters.
In this article, I assume good knowledge of Bitcoin architecture. You can check my previous articles to get a quick overview.
Architecture
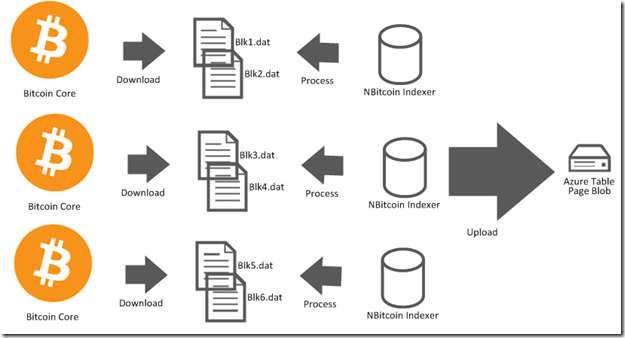
NBitcoin Indexer depends on a Bitcoin Core instance to download blocks from the network. The blocks are saved by Bitcoin Core in the block folder in the form of several Blk*.dat files. The indexer then processes those files, and extracts blocks, transactions and balances and sends to Azure storage.
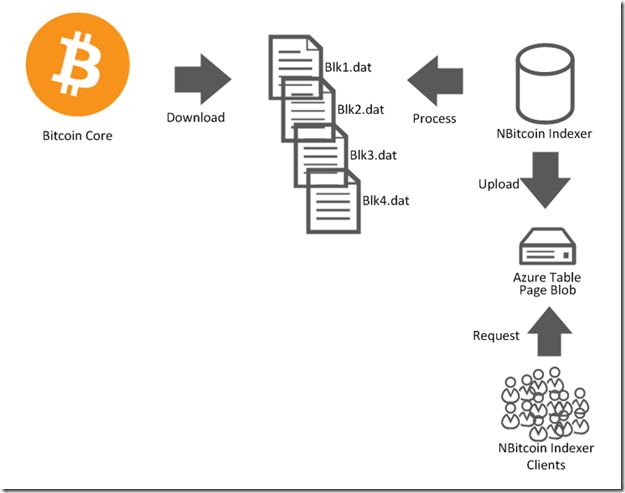
The indexer keeps track of its work in internal files, so you don’t have to retry the whole indexing if something goes wrong.
For the initial sync between the local bitcoin core and the Azure table, the indexer needs to upload all transactions and blocks (3H on a medium instance), but uploading all balances can take a while (2 days).
However, with Azure, you can easily clone VMs with a pre downloaded block directory and ask each local indexer to process a subset of files in the block directory. So with 16 machines, you can expect (24 * 2)/16 = 3 hours, we’ll see the Azure nitty gritty to achieve that.

Once the original sync is done, you can just trash most of the machines. Indexing will continue to process normally as long as at least 1 instance is running. This is made possible by the fact that indexing is an idempotent operation, so indexing the same block or transaction several times will do nothing.
Indexer Clients
Clients use the IndexerClient class, it is the upper layer on the top of Azure Storage. A client only depends on Azure Storage credentials. I intend to develop a JSON API layer on top of that later on.
Let’s take a look at the methods a client can find:
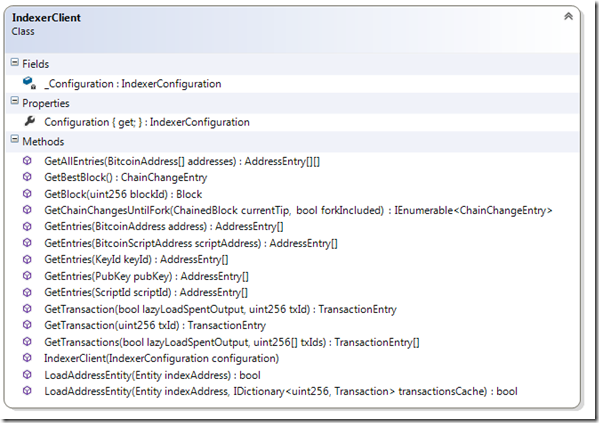
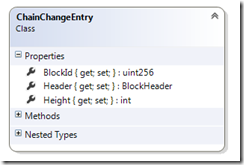
What you can see, is the different structures. You can query 4 structures: Blocks, Transactions, ChainChange (block header with its height), AddressEntries (Balances).
ChainChanges are only the list of all block headers of the current main chain.
An array of AddressEntries represents all operations made on one balance.
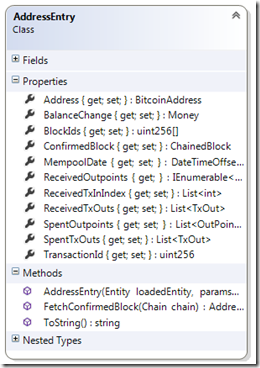
However, be careful the AddressEntry.BalanceChange might be null if parent transactions are not yet indexed. The AddressEntry.BalanceChange is lazily indexed at the first client request if all parent transactions are already indexed. Thus, a request for a balance can take more than one Azure transaction, but will tend to 1.
Also, AddressEntry.ConfirmedBlock will always be null after calling IndexerClient.GetEntries, the reason is that this information might change if a chain reorg happens, so I don’t save the block that confirmed the transaction of the AddressEntry in the Azure table.
To get the confirmed block, you need a local Chain and then call AddressEntry.FetchConfirmedBlock.
So, in summary, to get all the confirmed AddressEntries, here is the code you need:
IndexerClient client =
IndexerConfiguration.FromConfiguration().CreateIndexerClient();
AddressEntry[] entries = client.GetEntries(new BitcoinAddress("..."));
Chain mainChain = new Chain(Network.Main);
client.GetChainChangesUntilFork(mainChain.Tip, false)
.UpdateChain(chain);
var confirmedEntries =
entries
.Where(e => e.BalanceChange != null)
.Select(e => e.FetchConfirmedBlock(chain))
.Where(e => e.ConfirmedBlock != null)
.ToList();
With the configuration file holding the connection information to Azure.
<appSettings>
    <add key="Azure.AccountName" value="…"/>
    <add key="Azure.Key" value="…"/>
The Chain class belongs to NBitcoin, the first GetChainChangesUntilFork, can take several minutes, since it gets all the block headers (320 000). Then it takes almost no time since the enumeration stops as soon at the fork between the local chain and the chain in the Azure table fork.
You can save the local chain into a file, the Chain class saves automatically and incrementally (so no Chain.Save() is necessary).
Chain mainChain = new Chain
(Network.Main, new StreamObjectStream<ChainChange>(File.Open("LocalChain.dat", FileMode.OpenOrCreate)));
Last but not the least, let's take a look at the TransactionEntry class you get by calling IndexerClient.GetTransaction(id).
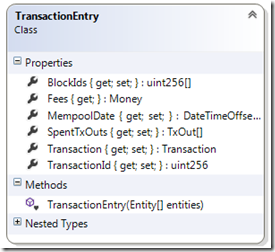
In the same way as AddressEntry, SpentTxOuts might be null if parent transactions are not yet indexed. The SpentTxOuts are lazy loaded at the first request, so the first request will take as many requests Azure transactions than there are parent transactions, but only 1 afterwards.
Indexer Console Application
The indexer is implemented by the AzureIndexer class you can find in the NBitcoin.Indexer nuget package.
However, you will most likely run the indexer in its console application that you can download here. You will find all the options to index bitcoin structures we talked about in the previous part: Block, Transaction, Main chain, and Addresses (balances).
The interesting part for spreading the indexing across multiple machines is the FromBlk and BlkCount options, that specify which blk files will be processed by this instance.
NBitcoin.Indexer 1.0.0.0
Nicolas Dorier c AO-IS 2014
LGPL v3
This tool will export blocks in a blk directory filled by bitcoinq, and index
blocks, transactions, or accounts into Azure
If you want to show your appreciation, vote with your wallet at
15sYbVpRh6dyWycZMwPdxJWD4xbfxReeHe ;)

  -b, --IndexBlocks          (Default: False) Index blocks into azure blob
                             container

  --NoSave                   (Default: False) Do not save progress in a
                             checkpoint file

  -c, --CountBlkFiles        (Default: False) Count the number of blk file
                             downloaded by bitcoinq

  --FromBlk                  (Default: 0) The blk file where processing will
                             start

  --CountBlk                 (Default: 999999) The number of blk file that must
                             be processed

  -t, --IndexTransactions    (Default: False) Index transactions into azure
                             table

  -a, --IndexAddresses       (Default: False) Index bitcoin addresses into
                             azure table

  -m, --IndexMainChain       (Default: False) Index the main chain into azure
                             table

  -u, --UploadThreadCount    (Default: -1) Number of simultaneous uploads
                             (default value is 15 for blocks upload, 30 for
                             transactions upload)

  -?, --help                 Display this help screen.


NBitcoin.Indexer 1.0.0.22
You need to configure the LocalSettings.config file before running the indexer (blk folder directory, Azure credentials, and connection to local node, as seen in the next part), it will be the same across all machines.
Note that the console app exits when it has indexed all the blocks, so you'll need to schedule to run every minute or so with the Windows Task Scheduler.
Installing the Console Application in Azure
Now, I will show you how to run the indexer on several machines. As well as spreading the load for the initial sync. The first step is to create an image in Azure that we will then replicate.
You can do it in three ways: with the Azure portal (manage.windowsazure.com), or in Powershell, or with some third party tools (which I did  ). Since I am no good in explaining how to click in a user interface, I’ll do it in Powershell so you can script it as you wish.
First, download and install Powershell Azure commandlet directly at this address: https://github.com/Azure/azure-sdk-tools/releases
Then fire up Powershell. and download the login information of your subscription by running:
Get-AzurePublishSettingsFile
Then import it with:
Import-AzurePublishSettingsFile "pathToSettings.publishsettings"
Then, I will save all configuration settings I need for the machine creation:
$serviceName = "nbitcoinservice"	#Name of the machine
$storageAccount = "nbitcoinindexer"	#Where to save
$machineLogin = "BitcoinAdmin"
$machinePassword = "vdspok9_EO"
$cloneCount = 16
Now, we need to create a new Storage Account and the container that will hold all of the disk drives and the indexed data. (Locally Redundant Storage is preferred for VMs):
$subscriptionName = (Get-AzureSubscription)[0].SubscriptionName
New-AzureStorageAccount -StorageAccountName $storageAccount -Location "West Europe" -Type "Standard_LRS"
Set-AzureSubscription -SubscriptionName $subscriptionName -CurrentStorageAccountName $storageAccount
New-AzureStorageContainer -Container vhds
Now, we need to create the configuration of the VM, a quick look at the available image found me the name of an interesting one.
Get-AzureVMImage | Out-GridView
I chose a699494373c04fc0bc8f2bb1389d6106__Windows-Server-2012-R2-201408.01-en.us-127GB.vhd.
$computerName = $serviceName.Substring(0,[System.Math]::Min(15,$serviceName.Length))
#trunk computer name
New-AzureVMConfig -Name $computerName -InstanceSize "Basic_A2" -MediaLocation
("https://"+ $storageAccount +".blob.core.windows.net/vhds/"+ $serviceName +"-system.vhd")
-ImageName a699494373c04fc0bc8f2bb1389d6106__Windows-Server-2012-R2-201408.01-en.us-127GB.vhd |
#What image, what config, where to save
Add-AzureProvisioningConfig -Windows -AdminUsername $machineLogin -Password $machinePassword
-EnableWinRMHttp | #What log/pass and allow powershell
Add-AzureDataDisk -CreateNew -DiskSizeInGB 500 -MediaLocation ("https://"+ $storageAccount
+".blob.core.windows.net/vhds/"+ $serviceName +"-data.vhd") -DiskLabel bitcoindata -LUN 0 |
#attach a data disk (we will save the blockchain on this one)
New-AzureVM -ServiceName $serviceName -Location "West Europe" #Make it so !
Get-AzureRemoteDesktopFile -ServiceName $serviceName -Name $computerName
-LocalPath ($serviceName + ".rdp")
explorer ($serviceName + ".rdp") #Lazy wait to open folder where the rdp file is saved
Once the VM is up, connect to it with the rdp file. Format your data disk with diskmgmt. Download and install Bitcoin Core. Then create a ps1 (or batch) file to run it (where E: is my data drive):
& "C:\Program Files (x86)\Bitcoin\daemon\bitcoind.exe" -conf=E:\bitcoin.conf
My configuration file for bitcoind is the following:
server=1
rpcuser=bitcoinrpc
rpcpassword=7fJ486SgNrajREUEtrhjYqhtzdHvf5L81LmgaDJEA7z
datadir=E:\Bitcoin
Don’t forget to create E:\Bitcoin in E: (if E: is the letter of the attached drive). Run bitcoin qt and patiently wait for the full sync of the blockchain (can take days).
Then download NBitcoin.Indexer.Console, unzip and modify LocalSettings.config.
="1.0"="utf-8"
<appSettings>
<add key="BlockDirectory" value="E:\Bitcoin\blocks"/>
<add key="Azure.AccountName" value="nbitcoinindexer"/>
<add key="Azure.Key" value="accountkey"/>
<add key="StorageNamespace" value=""/>
<add key="MainDirectory" value=""/>
<add key="Node" value="localhost:8333"/>
</appSettings>
You can get the accountkey in Powershell in your clipboad with the following command:
(Get-AzureStorageKey nbitcoinindexer).Primary | Out-Clipboard
You are ready to use NBitcoin.Indexer.Console, here I index block, transaction, addresses and the main chain.
NBitcoin.Indexer.Console.exe -b -t -a -m
Scaling and Fault Tolerance
Fault tolerance is simple business, just run the previous command line on several instances with the same config file.
But to scale the initial indexing, you have to run almost the same command, except that you will specify blk files that need to be processed on each instance as explained in the Architecture part.
Note that you can connect to the previous instance in powershell with the following powershell script (warning the port can be different):
$port = (Get-AzureVM -ServiceName $serviceName | Get-AzureEndpoint PowerShell).Port
$password = ConvertTo-SecureString $machinePassword -AsPlainText -Force
$creds = New-Object System.Management.Automation.PSCredential ($machineLogin, $password)
$sessionOptions = New-PSSessionOption -SkipCACheck -SkipCNCheck
Enter-PSSession -ConnectionUri ("https://" + $serviceName + ".cloudapp.net:"+$port+"/wsman")
-Credential $creds -SessionOption $sessionOptions
Our goal is to duplicate our VM with Bitcoin core synched $cloneCount times. We will then make a script to run the indexer on each of them on different files of the blk folder. Sure, you can do it by hand, but also by script, this is what we will do:
First, we need to capture the image of our machine.
Save-AzureVMImage -ServiceName $serviceName -Name $computerName
-ImageName $serviceName -OSState Specialized
Then create clones (Tips: Run the command line and go get some tea).
$endpoints =  Get-AzureVM -ServiceName $serviceName | Get-AzureEndpoint
For ($i=0; $i -lt $cloneCount; $i++)
{
$baseNameLen = [System.Math]::Min
(15 - $i.ToString().Length, $computerName.Length + $i.ToString().Length)
$cloneName = $computerName.SubString(0,$baseNameLen) + $i
$vmconfig = New-AzureVMConfig -Name $cloneName -InstanceSize "Basic_A2" -ImageName $serviceName
Foreach ($endpoint in $endpoints)
{
 $vmconfig | Add-AzureEndpoint -Name $endpoint.Name
-LocalPort $endpoint.LocalPort -PublicPort $endpoint.Port -Protocol $endpoint.Protocol
}
$vmconfig | New-AzureVM -ServiceName ($serviceName + $i) -Location "West Europe"
}
Now, let’s admit that there are 160 blk files in the folder to index. Then, the machine i will start indexing from blk file i and index 10 blk files. In other words, the following command line:
$jobs = @()
$blkCount = 160
$blkPerMachine = [System.Math]::Floor($blkCount / $cloneCount)
For ($i=0; $i -lt $cloneCount; $i++)
{
$password = ConvertTo-SecureString $machinePassword -AsPlainText -Force
$creds = New-Object System.Management.Automation.PSCredential ($machineLogin, $password)
$sessionOptions = New-PSSessionOption -SkipCACheck -SkipCNCheck
$session = New-PSSession -ConnectionUri
("https://" + $serviceName + $i + ".cloudapp.net:"+$port+"/wsman")
-Credential $creds -SessionOption $sessionOptions
$job = Invoke-Command -Session $session -AsJob -ArgumentList $i -Scriptblock {
param($locali)
cd "E:/Indexer.Console"
NBitcoin.Indexer.Console.exe -b -t -a -m -FromBlk ($locali * $blkPerMachine) -CountBlk $blkPerMachine
}
$jobs = $jobs + $job
}
Then let's monitor all of that by writing in files named C:/output $i.txt.
while($TRUE)
{
$i = 0;
foreach($job in $jobs){
Receive-Job -Job $job 2>&1 >> ("c:\output"+$i+".txt")
$i++
}
Start-Sleep -s 5
}
Surely enough, all of that can be done by hand (doing 16 times the same thing is not that long), and you need to do it only once for the initial indexing. But my selfish reason was that I wanted to do some Azure and Powershell because it's cool. 
In how much time can you index the whole blockchain? It depends on how many machines you are ready to fire up. But I expect 16 machines to index everything in less than 3 hours.
One last advice, you will likely need a tool to manage your machines if there is any problem. So I advice you to use my third party tool IaaS Management Studio, it will permit to pause, connect, and trash disks of your clones more easily.

Conclusion
I intend to improve the indexer with Stealth Address support (if known scankey), Colored Coins support, then I'll think about a solution to make you extend that with your own Scanner. I will also add a JSON API to easily create web portals like blockchain.info on top of it. If you want to speed up development, vote with your wallet at 15sYbVpRh6dyWycZMwPdxJWD4xbfxReeHe. 
